PicZoom: A Photo Viewer created in OpenGL.
- Download PicZoom_Source.zip - 168.46 KB
- Download InstallPicZoom_Src - 14.69 KB
- Download PicZoom - 386.78 KB
Introduction
This article explains implementation details of PicZoom application [A photo viewer with some functionalities are similar to the Picasa Photo Viewer]. PicZoom is an MFC Dialog based application, and OpenGL is used for drawing. Shader programs are not used for display, and therefore I hope PicZoom will run without a high-end graphics card.
Background
After using Picasa Photo Viewer, I felt most of the functionalities are amazing, and possible to implement with OpenGL. That forced me to create an application, which should behave like Picasa Photo Viewer.
Using the code
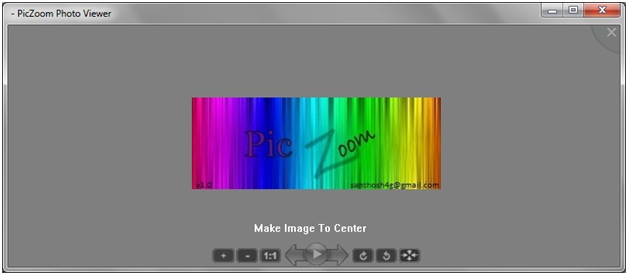
Screenshot of PicZoom Application in dialog mode.
When starting PicZoom, it captures the desktop background and create a semitransparent view to the background. The implementation details are as follows.
The screenshot of PicZoom with semi-transparent desktop as background.
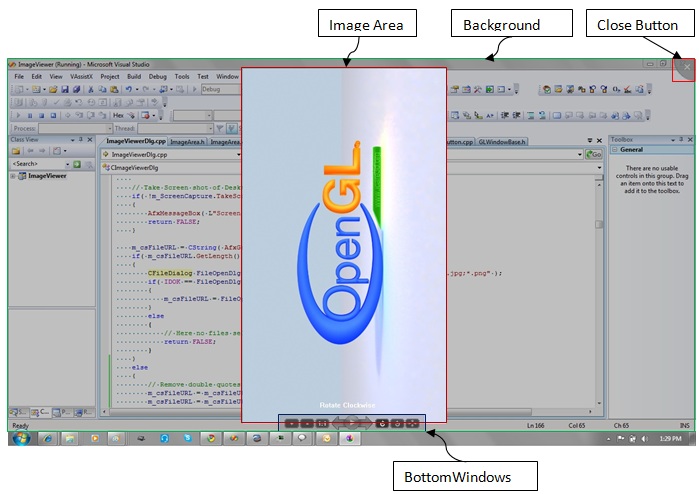
Main Components:
The above figure shows the split up of main classes used in PicZoom. PicZoom creates a MFC dialog, and the painting of client area is handled with OpenGL technology.
Initially, PicZoomDlg creates 4 main components of PicZoom,[Background, ImageArea, BottomWindows, and CloseButton] and add to a vector named WindowList. Whenever getting WM_PAINT in dialog, Draw() commands are passed to all the 4 components. Like Draw()
Functionalities and Implementation of 4 components.
All these classes [Background, ImageArea, BottomWindows, and CloseButton] are derived from GLWindowBase, the base class designed for handling different windows( or image components).
1. Background
This class is responsible to create one texture with desktop image. The RGB buffer with screenshot of desktop is obtained with ScreenCapture class. The background image texture is created with 25% transparency. It is achieved with glPixelTransferf() before texture loading. glPixelTransferf is used to provide scale factor of Red, Green Blue channels.
    // Set Pixel Transfer to make semitransparent effect of Desktop.
    glPixelTransferf( GL_RED_SCALE, 0.75 );
    glPixelTransferf( GL_GREEN_SCALE, 0.75 );
    glPixelTransferf( GL_BLUE_SCALE, 0.75 );
    // Create Desktop Texture.
    if( !m_pImage->Create( m_nWidth, m_nHeight, pbyScreenCapuredData ))
    {
        AfxMessageBox(L"Texture Creation failed.");
        return false;
    }

    glPixelTransferf( GL_RED_SCALE, 1.0 );
    glPixelTransferf( GL_GREEN_SCALE, 1.0 );
    glPixelTransferf( GL_BLUE_SCALE, 1.0 );
Draw() handler just displaying this texture to the eBackground instance is deleted from the WindowList and the background drawing is avoided. bool BackGround::Draw() { if( !GLWindowBase::m_bVisible ) { return true; } glMatrixMode( GL_MODELVIEW ); glLoadIdentity(); // Here draws the background image. m_pImage->Enable(); m_pVertexBuffer->DrawVertexBuffer( GL_POLYGON ); return true; }
2. ImageArea
The display and all operations ( Zoom, Translation, Rotation) of currently loaded image file is handled in this class.
ImageArea creates one opengl texture with RGB data of the image file. Whenever user request a new image file, ImageArea creates the RGB buffer of new file with BMPLoader class. BMPLoader class uses GdiPlus for creating RGB buffer of image file of type *.jpg, *.bmp, *png, and *tga. Whenever Draw() recieves, ImageArea will display this texture with zoom, translation, and rotation. The details of Zoom, Translation and Roation are explained below.
glScalef() is called before displaying the texture, and therefore the texture will be scaled based on the current zoom factor. Whenever mouse wheel received in Dialog, Dialog will send it to all components, and therefore ImageArea will receive mouse wheel message. The zoom factor is calculated based on the current scroll value.
bool ImageArea::OnMouseWheel( const int nX_I, const int nY_i, const UINT nFlags, const short zDelta )
{
    float fZoomValue = float( zDelta ) / WHEEL_DELTA;

    if( 0 == m_fZoomOffset )
    {
        ::SetTimer( m_hParentWindow, TIMER_ZOOM, 5, 0 );
    }

    // Findout zoom factor based on width of and height of image.
    if( m_nImageWidth > m_nWidth || m_nImageHeight > m_nHeight )
    {
        float fImageToDesktopRatioX = (float)m_nWidth / m_nImageWidth;
        float fImageToDesktopRatioY = (float)m_nHeight / m_nImageHeight;
        float fImageToDesktopRatio = min( fImageToDesktopRatioY, fImageToDesktopRatioX );
        fZoomValue = fZoomValue * fImageToDesktopRatio;
    }

    m_fZoomOffset += ( fZoomValue / 100 );
    // Apply Zoom factor 15 times. then first single scroll make 15% zoom.
    m_ZoomTimer.SetMaxElapseTime( 15 );
    return true;
}
ImageArea::Draw(), Zoom factor is added to current zoom factor, and then calls glScalef( m_fZoom, m_fZoom, 1.0 ), scaling is not applied in Z order, since it is not required. Whenever Zoom Factor changing, ZoomText class will display the new Zoom value. ZoomText simply draw a rounded rect and dsplays the current zoom factor with text drawing of OpenGL. FontEngine class is created to handle the drawing of text.
FontEngine creates a display list with bitmap of all characters. This can be simply achived through wglUseFontBitmaps() function of OpenGL.bool FontEngine::Create( HDC hDeviceContext_i ) { VERIFY(m_pFont->CreateFont( 15, // nHeight 7, // nWidth 0, // nEscapement 0, // nOrientation FW_BOLD, // nWeight FALSE, // bItalic FALSE, // bUnderline 0, // cStrikeOut ANSI_CHARSET, // nCharSet OUT_DEFAULT_PRECIS, // nOutPrecision CLIP_DEFAULT_PRECIS, // nClipPrecision ANTIALIASED_QUALITY, // nQuality DEFAULT_PITCH, // nPitchAndFamily L"Arial")); // lpszFacename HGDIOBJ hOldFont = ::SelectObject(hDeviceContext_i, m_pFont->m_hObject); if( !wglUseFontBitmaps( hDeviceContext_i, 0, 256 * 2, 1000 )) { return false; } ::SelectObject( hDeviceContext_i, hOldFont ); return true; }

Screenshot of Zoom Text display.
Zoom Text dislayed at center of dialog, with current zoom factor. This text is displayed in a semi transparent way. Hide and Show are very smooth, which is implemented by blending feature of OpenGL. When drawing new object, new object and old object[already drawn object] are combined and create a transparent look of new object. Alpha value is started from 0.0, and increased 0.1 during each frame, and get get smooth appearance. When hide, Alpha value is decreased from 1.0 to 0.0, and getting a smooth disappearance effect.
Translation:
LButtonDown and MouseMove messages are tracked in ImageArea, and find out the translation required in X and Y direction.When drawing the image texture, ImageArea::Draw() will apply translation with OpenGL translate function glTranslatef.
    // Y value is -ve, only becouse opengl Y coordinate is increasing from bottom to top,
    // But Y direction mouse movement received in Dialog is decreasing from bottom to top.
    glTranslatef( m_fXTranslation, -m_fYTranslation, 0.0 );
Rotation is simply implemented with glRotate() function. The rotation angle is calculated based on the current rotation state. Possible rotation values are listed below.
const float ROTATION_ANGLES[4] =
{ 0.0,// No rotation
  270.0, // First Clockwise
  180.0, // Second Clockwise
  90.0 // 3rd clockwise
};
Inside ImageArea::Draw(), rotation angle is applied to z-order to achieve the required rotation.
/// Drawing of Image.
bool ImageArea::Draw()
{
    // ....................
    // Apply rotation
    glRotatef( ROTATION_ANGLES[m_nRotate], 0, 0, 1 );

    m_pVertexBuffer->DrawVertexBuffer( GL_QUADS );
   // ...........................
    return true;
}
Here we can discuss the vertex buffer logic. The below picture shows the 4 corners of image and its corresponding vertex coordinate. Rotation is applied to this vertex buffer and creating a rotated image image display.
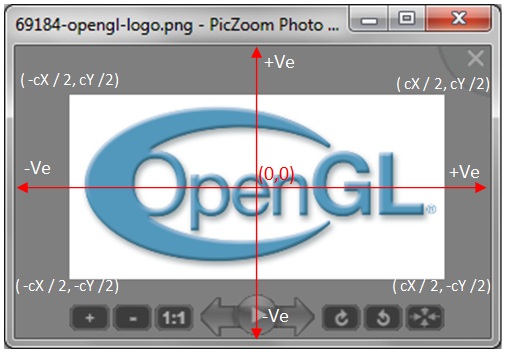
The vertex buffer logic.
// Vertex buffer creation logic in ImageArea.
bool ImageArea::SetupWindow()
{
    // Setup Vertex buffer and UnProject.
    int nHalfOfImageY = m_nImageHeight / 2;
    int nHalfOfImageX = m_nImageWidth / 2;
    /*
    0--3
    |  |
    1--2
    */

    m_pVertexBuffer->SetAt( 0, -nHalfOfImageX , nHalfOfImageY, 0.0f, 0.0f,1.0f); // Left Top  corner
    m_pVertexBuffer->SetAt( 1, -nHalfOfImageX , -nHalfOfImageY, 0.0f, 0.0f,0.0f), // Left Bottom
    m_pVertexBuffer->SetAt( 2, nHalfOfImageX, -nHalfOfImageY, 0.0f, 1.0f,0.0f); // Right bottom
    m_pVertexBuffer->SetAt( 3, nHalfOfImageX, nHalfOfImageY,  0.0f, 1.0f,1.0f); // Right top
 /// ...................
}
3. BottomWindows.
This class is responsible for drawing and message handling of buttons displayed at the bottom of PicZoom.
There are 9 buttons displayed at bottom of PicZoom, which will help to explore different image files in the current folder, zoom, and rotation of image.
![]()
Screenshot of BottomWindows.
GLButton is designed to handle all operations related to one button. Bottomwindows creates 9 instances of GLButton, and hold in a list, and all commands are passed to the button list.
/*
This class handles all operations related to a Button.
The drawing and mouse message handling is handled in this class.
The resource ID of bitmap is provided to this class, and ID of Message
to send to parentWindow( PicZoomDlg) is also provide to this class.
Whenever user press the button, this class will send message to PicZoomDlg.
*/
class GLButton : public GLWindowBase
{
public:

    GLButton( HWND hParentWindow_i );
    virtual ~GLButton();
    virtual void SetRegion( const int nLeft_i, const int nTop_i,
                    const int nWidth_i, const int nHeight_i );
    virtual void SetImage( const int nResourceID_i );
    virtual bool SetupButton();
    virtual void SetLButtonMessage( const int nMessageToParent_i );
    virtual bool OnMouseMove( const int nX_i, const int nY_i, const int nFlags_i );
    virtual bool OnLButtonDown( const int nX_i, const int nY_i, const int nFlags_i );
    virtual bool OnLButtonUp( const int nX_i, const int nY_i, const int nFlags_i );
    virtual bool IsWithinRegion( const int nX_i, const int nY_i );
    void SetTransparency( const float fTransparency_i );
    virtual bool Draw();
}; <span class="Apple-style-span" style="font-size: 14.4px; "> </span>
The initialization of a GLButton is very simple. Three items are required to initialize a GLButton. The resource ID, region of display and the Message ID. The resource ID of bitmap is used to create button image. The alpha channels of each pixel determine the transparency of button. When alpha values of a pixel is 0.0, then that pixel will not displayed in button image. When user clicks the button, the message will send to the parent window(PicZoomDlg).
The transparent behaviour of each button is achieved by the alpha blending technique. The bitmaps are created in RGBA format( one 8 bit channel for alpha component). GLTexture class is modified to create RGB8, RGBA8, textures. The bitmaps required for bottom windows are added as resource of PixZoom, and that bitmaps are loaded with BMPLoader, and create GLTexture with RGBA data.
// The texture and vertex buffer for rendering are setup in this function.
bool GLButton::SetupButton()
{
    // Create Vertex buffer.
    m_pVertexBuffer = new GLVertexBuffer;
    if( 0 == m_pVertexBuffer )
    {
        return false;
    }
    // Create Vertex buffer for rendering Quad image.
    m_pVertexBuffer->CreateQuadVertexBuffer();

    UpdateVertexBuffer();

    // Setup Texture from Bitmap resource ID.
    m_pTexture = new GLTexture;
    int nWidth = 0;
    int nHeight = 0;
    BYTE* pbyARGBImage = 0;
    BMPLoader LoadImage;
    // Load Alpha enabled texture.
    LoadImage.LoadBMP( m_nResourceID, nWidth, nHeight, pbyARGBImage, true );
    // Create RGBA format texture.
    m_pTexture->Create( nWidth, nHeight, pbyARGBImage, GL_RGBA, GL_RGBA8 );
    return (GL_NO_ERROR == glGetError());
}
The mouse over effect of buttons is implemented in a tricky way. When displaying, the blending feature of texel( texture color) with current colour(glColor) is enabled. Then set low color( glColor4f(0.75f, 0.75f, 0.75f, 0.75f) while diplaying button in normal scenario. While displaying button with mouse over high color is applied glColor4f(1.0, 1.0, 1.0, 1.0 ).
bool GLButton::Draw()
{
    if( m_bMouseOver )
    {
        // After drawing, pixelstore biasing is changed.
        //glColor4f( 1.0, 1.0, 1.0, 1.0 );
        glColor4f( m_fTransparency, m_fTransparency, m_fTransparency, m_fTransparency );
    }
    else
    {
        // After drawing, pixelstore biasing is changed.
        //glColor4f( 0.75, 0.75, 0.75, 1.0 );
        glColor4f( 0.75 * m_fTransparency, 0.75 * m_fTransparency, 0.75 * m_fTransparency, 0.75 * m_fTransparency );
    }
    m_pVertexBuffer->DrawVertexBuffer( GL_QUADS );
    return true;
}
Displaying functionality of current button.

The above screenshot displaying the behavior of description text display. GLText is created for displaying a text with smooth show and hide. Here also, alpha blending is used to make smooth appearance and smooth hide.
void GLText::Draw(const int nX_i, const int nY_i)
{
    if( m_StringTimerHide.IsEnabled())
    {
        // Hide old string. Here fColorComponent will decrease
        // after each frame.
        int nRemTime = m_StringTimerHide.GetRemainingTime();
        float fColorComponent = ( nRemTime / 20.0 );
        glEnable( GL_BLEND );
        glBlendFunc( GL_SRC_ALPHA, GL_ONE_MINUS_SRC_ALPHA );
        glColor4f( 1.0, 1.0, 1.0, fColorComponent );
        // Drawing text to screen.
        m_pFontEngine->DrawText( nX_i, nY_i, m_csDisplayString.GetBuffer( 0 ) );
        glDisable( GL_BLEND );
        glColor4f( 1.0, 1.0, 1.0, 1.0 );
        m_StringTimerHide.ElapseTime();
    }
    else
    {
        m_csDisplayString = m_csDisplayStringNew;
        // Show New string. Here fColorComponent will
        // increase during each frame, then reach the maximum value.
        int nRemTime = 20 - m_StringTimerShow.GetRemainingTime();
        float fColorComponent = ( nRemTime / 20.0 );
        glEnable( GL_BLEND );
        glBlendFunc( GL_SRC_ALPHA, GL_ONE_MINUS_SRC_ALPHA );
        glColor4f( 1.0, 1.0, 1.0, fColorComponent );
        // Drawing text to screen.
        m_pFontEngine->DrawText( nX_i, nY_i, m_csDisplayString.GetBuffer( 0 ) );
        glDisable( GL_BLEND );
        glColor4f( 1.0, 1.0, 1.0, 1.0 );
        m_StringTimerShow.ElapseTime();
    }
}
4. CloseButton.
CloseButton is derived from GLButton, in order to implement some additional functionalities in CloseButton. The circular shape of close button is implemented by setting alpha channels to outer region of circle to 0.0 and 1.0 to the inner region of circle. The mouse cursor changing is also based on the circle region.
bool CloseButton::IsWithinRegion( const int nX_i, const int nY_i )
{
    if( GLButton::IsWithinRegion( nX_i, nY_i ))
    {
        // Here check the bottom left corner of circle.
        // If mouse move is not within the semi-circle, then return false.
        int nXDiff = nX_i - GLWindowBase::m_nWidth;
        int nYDiff = nY_i;
        int nRadius = sqrt( (float)nXDiff * nXDiff + (float)nYDiff * nYDiff );
        if( nRadius < 45 )
        {
            return true;
        }
    }
    return false;
}
One work around is also included in CloseButton to create smooth edges of semi circle. When semicircle is texture mapped, the edges will not be smooth. Therefore one GLCircle will draw a circle with 50% transparency. Therefore edges of close button will be smooth.
bool CloseButton::Draw()
{
    GLButton::Draw();
    // CloseBoundry draws the outline of cirle in 50% transparency.
    m_CloseBoundary.Draw();
    return true;
}
Slideshow functionality
Slideshow is also implemetend with alpha blending functionality. Two textures are created with bitmap data of two image files. Transition from first image to second is created by blending first and texture texels. When starting slide show, the window size is changed to full desktop size, then hides all other windows( BottomWindows, CloseButton etc).
void SlideShow::Display()
{
   // glColor3f is used to make small amount of texture display.
    // This color factor is multiplied with texel color and get a shading effect.
    glColor4f( fColorFactor, fColorFactor, fColorFactor, fColorFactor );
    m_pTexture1->Enable();
    // Apply zoom1.
    glScalef( m_fZoom1, m_fZoom1, 0.0 );
    m_pVertexBuffer1->DrawVertexBuffer( GL_QUADS );
    glPopMatrix();

    if( nRemTime < 100 )
    {
        glPushMatrix();
        // When transparent display of second texture is required.
        float fTex2Color = 1.0 - fColorFactor;
        glColor4f( fTex2Color, fTex2Color, fTex2Color, fTex2Color );
        m_pTexture2->Enable();
        // Apply Zoom 2.
        glScalef( m_fZoom2, m_fZoom2, 0.0 );
        m_pVertexBuffer2->DrawVertexBuffer( GL_QUADS );
        glPopMatrix();
    }
}
Installer.
PicZoomInstaller is created to modify the registry entries, which are required to add context menu in windows explorer. When right click a file, the following context menu will be appeared.

The following registry modification is required for creating a context menu in Windows Explorer.
Create a new key “OpenWith PicZoom” under HKEY_CLASSES_ROOT\*\Shell\.
RegistryHandler::RegisterForAllFiles() is responsible for creating a OpenWith PicZoom entry in HKEY_CLASSES_ROOT\*\Shell\.
PicZoomInstaller Some other registry modification is also implemented, inorder to create a new application entry(PicZoom) in open with list.

The registry modification is identified by trial and error method. I selected new program(PicZoom.exe) as default application for opening a bmp file. Then searched registry and find out the registry location to create an application in open with list. I don’t know any other method to do the same.
The registry entries are created for open with list in bmp, jpg, png, and tga files.
// HKEY_CURRENT_USER\Software\Microsoft\Windows\CurrentVersion\Explorer\FileExts\.jpg
// HKEY_CURRENT_USER\Software\Microsoft\Windows\CurrentVersion\Explorer\FileExts\.bmp
// HKEY_CURRENT_USER\Software\Microsoft\Windows\CurrentVersion\Explorer\FileExts\.png
// HKEY_CURRENT_USER\Software\Microsoft\Windows\CurrentVersion\Explorer\FileExts\.tga
RegistryHandler::AddApplicationName() is responsible for creating PicZoom in open with list of different image files.
Points of Interest
When retrieving the width and height of a character with GetGlyphOutline(), I got a GDI_ERROR. Debug mode works fine, but release mode cause a GDI_ERROR. At last I found its reason from some forums. The transformation matrix provided to GetGlyphOutline(), should be initialised with idendity matrix.
Projection Matrix.
Since there is no 3D related operation, here we can use orthographic projection. Orthographic projection area is same as the window coordinate, and simply overcame -1 to +1 mapping method of perspective projection.
History
16-Jan-2011: Initial version.