Task Parallel Library : 1 of n
Demo code source : TasksArticle1.zip
Demo code source (LINQPad scripts, thanks to reader, Rainer Schuster) : LINQPAD_Task1.zip
Introduction
I recall the 1st time I created a UI in .NET that had to go and get some data from a database, and the amount of data that I fetched was way larger in production that my code assumed it would be in my dumbed down test setup. Guess what happened.....my UI froze as soon as it used real data. The reason for this, is that the UI thread (ie the only thread in my naive UI) was being used to carry out this fetching of data from the backend database. Yikes. Surely there is a better way.
As it turned out there was, .NET offered (and still does) a wide variety of
Threading classes to help with just this sort of situation, such as
Thread/BackgroundWorker/ThreadPool etc etc.
So I got to know and love some of these classes in the System.Threading
namespace, and they did make a massive difference to the responsiveness of my
application, all cool.
Thing is some of the code one has to write when doing some of this threading
stuff using the System.Threading namespace (from here on in "classic threading")
took a lot of work in some cases, and just was not that intuative at times.
Classic threading is well known as the domain of experts, after messing with its
quirks for long enough, one can begin to see why.....You are like frack, where
did that Exception come from, ahhhh I am using a shared data object with multiple
threads, aha. This has by the main stay, been a mixture of
intuition/luck/skill...and not necessarily in equal parts.
Luckily help is at hand, with .NET 4.0, there is a new kid in town, it is
called a "Task", which some of you may know is part of the "Task Parallel
Library (TPL)", which is a new collection of very very useful (and I feel
highly intuitive) classes aimed at
not only making your parallel programming easier to read, but also offers
lighter weight objects when compared to the classic threading alternatives. For
example when a new Thread is started in .NET there is a whole process that goes
with that, such as creating queues, thread local storage, managing the Threads
lifecycle etc etc, this takes
time. Ok so you could use the classic threading ThreadPool, which does allow you
to queue up work item delegates directly to the ThreadPool, which means you are
not impacted by the overhead of creating a new Thread yourself, as the
ThreadPool will manage all new Thread creation etc etc.
However even using the classic threading ThreadPool there were
problems, in that you could not cancel a
work item once it has been queued with the ThreadPool, or get a return result
that easily. It just doesn't read that well either. There is an excellent
article here on codeproject that
tackles some of these issues :
Smart
ThreadPool which is pretty excellent actually. However the new TPL
infrastructure has got all these problems covered, and many many more useful
features in my opinion.
A TPL Task actually uses the ThreadPool internally, if you use the default scheduler, which you more than likely will, most of the time. The schedular can be swapped out, and that is something I will be showing in a subsequent article. For the time being if we assume we are using the default scheduler Tasks will be allocated threads by the the use of a ThreadPool, which handles the creation
of Threads to carry out Tasks, so a lot of the heavy lifting (so to speak) is
done behind the scenes for us by TPL.
It is worth mentioning that Tasks are merely wrappers for passing a delegate of work to be done, also storing state, exceptions and continuations amongst others. That work may or may not be done by the threadpool, and as already stated, that will depend upon the scheduler used.
Steve Soloman, one of the readers of this article stated this in the forum, and I could not have said it any better, so included it in this article. Thanks Steve good bit of extra information there.
The other great thing about TPL is that it is aimed at using each core of
your CPU, which may have been otherwise idle. It obviously does this using
Thread(s) behind the scenes, but you really do not have to get involved with
spinning up new Threads at all (ok in advanced scenarios such as custom
Schedulers maybe, but hey more on that later, day to day you really don't have
to care about it).
Tasks also seem to be more inline with how people think about things, for
instance, imagine this scenario "I want to call a web service and have it return
a List<int>", using a TPL Task I would create a Task<List<int>> and get it to
call some service in its payload delegate (which will use the ThreadPool) that returned me a List<int>.
Using classic threading my code certainly would not be such a simple story,
sure you could do the same thing, but honestly the sheer readability that TPL
brings to the table simply can not be ignored. Add to that the fact that it
actually uses the ThreadPool and handles
Thread creation for you, add to that the fact that
Microsoft are investing considerable time in it for C# 5, and I think you will
agree that getting to know TPL is a must have skill for most .NET programmers.
In this article (and the subsequent ones) I hope to show you just how easy TPL is to use.
Article Series Roadmap
This is article 1 of a possible 6, which I hope people will like. Shown below is the rough outline of what I would like to cover.
- Starting Tasks / Trigger Operations / ExceptionHandling / Cancelling / UI Synchronization (This article)
- Continuations / Cancelling Chained Tasks
- Parallel For / Custom Partioner / Aggregate Operations
- Parallel LINQ
- Pipelines
- Advanced Scenarios / v.Next For Tasks
Now I am aware that some folk will simply read this article and state that it is similar to what is currently available on MSDN, and I in part agree with that, however there are several reasons I have chosen to still take on the task of writing up these articles, which are as follows:
- It will only really be the first couple of articles which show simliar ideas to MSDN, after that I feel the material I will get into will not be on MSDN, and will be the result of some TPL research on my behalf, which I will be outlining in the article(s), so you will benefit from my research which you can just read...Aye, nice
- There will be screen shots of live output here which is something MSDN does not have that much off, which may help some readers to reinforce the article(s) text
- There may be some readers out here that have never even heard of Task Parallel Library so would not come across it in MSDN, you know the old story, you have to know what you are looking for in the 1st place thing.
- I enjoy threading articles, so like doing them, so I did them, will do them, have done them, and continue to do them
All that said, if people having read this article, truly think this is too similar to MSDN (which I still hope it won't be) let me know that as well, and I will try and adjust the upcoming articles to make amends.
Table Of Contents
Anyway what I am going to cover in this article is as follows:
- Thread Versus Tasks
- Creating Tasks
- Trigger Methods/Properties
- Handling Exceptions
- Cancelling Tasks
- SynchronizationContext
Thread Versus Tasks
Demo code project : ThreadsVersusTasks
Ok so in the introduction I talked briefly about the differences between
Threads and Tasks, where spinning up a Thread compared to spinning up a Task
should be more costly. To illustrate that, lets consider the following small
example, which simply creates 64 threads and waits (via one of the class
threading sychronization primtives: ManualResetEventSlim)
for these 64 Threads to complete and then creates and starts 64 Tasks, each Thread/Task
will simple write 10 lines to the Console.
The full code is as follows, don't worry we will get into all the nitty gritty later, for now I just want to show you a screen shot of the results of running this code.
static void Main(string[] args)
{
    Stopwatch watch = new Stopwatch();
    //64 is upper limit for WaitHandle.WaitAll() method
    int maxWaitHandleWaitAllAllowed = 64;
    ManualResetEventSlim[] mres = new ManualResetEventSlim[maxWaitHandleWaitAllAllowed];

    for (int i = 0; i < mres.Length; i++)
    {
        mres[i] = new ManualResetEventSlim(false);
    }


    long threadTime = 0;
    long taskTime = 0;
    watch.Start();

    //start a new classic Thread and signal the ManualResetEvent when its done
    //so that we can snapshot time taken, and

    for (int i = 0; i < mres.Length; i++)
    {
        int idx = i;
        Thread t = new Thread((state) =>
        {
            for (int j = 0; j < 10; j++)
            {
                Console.WriteLine(string.Format("Thread : {0}, outputing {1}",
                    state.ToString(), j.ToString()));
            }
            mres[idx].Set();
        });
        t.Start(string.Format("Thread{0}", i.ToString()));
    }


    WaitHandle.WaitAll( (from x in mres select x.WaitHandle).ToArray());


    //mre.WaitOne();
    threadTime = watch.ElapsedMilliseconds;
    watch.Reset();
    //mre.Reset();
    for (int i = 0; i < mres.Length; i++)
    {
        mres[i].Reset();
    }

    watch.Start();

    for (int i = 0; i < mres.Length; i++)
    {
        int idx = i;
        Task task = Task.Factory.StartNew((state) =>
            {
                for (int j = 0; j < 10; j++)
                {
                    Console.WriteLine(string.Format("Task : {0}, outputing {1}",
                        state.ToString(), j.ToString()));
                }
                mres[idx].Set();
            }, string.Format("Task{0}", i.ToString()));
    }
    //mre.WaitOne();
    WaitHandle.WaitAll((from x in mres select x.WaitHandle).ToArray());
    taskTime = watch.ElapsedMilliseconds;
    Console.WriteLine("Thread Time waited : {0}ms", threadTime);
    Console.WriteLine("Task Time waited : {0}ms", taskTime);
    //mre.Reset();
    for (int i = 0; i < mres.Length; i++)
    {
        mres[i].Reset();
    }
    Console.WriteLine("All done, press Enter to Quit");

    Console.ReadLine();

}
If we observe what the output of this code looks like:

It can be seen that even in this little expirement that the creation of the
Threads to do the same job as the Tasks is far greater. This is undoubtebly down
to the work that has to be done to create and manage a classic
Thread. Ok like I
say most classic threading developers would use the ThreadPool which would give
better results, but like I also said in the introduction the classic ThreadPool
also has its limitations, these limitations are all taken care of with TPL.
The rest of this article will concentrate on how you can create/cancel Tasks
and handle Exceptions for them.
Creating Tasks
Demo code project : CreatingTasks
TPL exposes many different ways for a developer to create Tasks, from newing up a
new Task, to using one of the many overloads of the static Task.Factory.StartNew()
methods. Shown below are a couple of examples of various Tasks being creating in
a variety of methods such as:
- Create a
Taskusing in lineAction - Create a
Taskthat calls an actual method that returns a string - Create and start a
Taskthat returnsList<int>usingTask.Factory
class Program
{

    static void Main(string[] args)
    {

        // *****************************************************************
        // OPTION 1 : Create a Task using an inline action
        // *****************************************************************
        Task<List<int>> taskWithInLineAction =
		new Task<List<int>>(() =>
            {
                List<int> ints = new List<int>();
                for (int i = 0; i < 1000; i++)
                {
                    ints.Add(i);
                }
                return ints;

            });


        // *****************************************************************
        // OPTION 2 : Create a Task that calls an actual method that returns a string
        // *****************************************************************
        Task<string> taskWithInActualMethodAndState =
            new Task<string>(new Func<object, string>(PrintTaskObjectState),
            "This is the Task state, could be any object");

        // *****************************************************************
        // OPTION 3 : Create and start a Task that returns List<int> using Task.Factory
        // *****************************************************************
        Task<List<int>> taskWithFactoryAndState =
		Task.Factory.StartNew<List<int>>((stateObj) =>
        {
            List<int> ints = new List<int>();
            for (int i = 0; i < (int)stateObj; i++)
            {
                ints.Add(i);
            }
            return ints;
        }, 2000);


        taskWithInLineAction.Start();
        taskWithInActualMethodAndState.Start();


        //wait for all Tasks to finish
        Task.WaitAll(new Task[]
        {
            taskWithInLineAction,
            taskWithInActualMethodAndState,
            taskWithFactoryAndState
        });

        //print results for taskWithInLineAction
        var taskWithInLineActionResult = taskWithInLineAction.Result;
        Console.WriteLine(string.Format(
            "The task with inline Action<T> returned a Type of {0}, with {1} items",
        taskWithInLineActionResult.GetType(), taskWithInLineActionResult.Count));
        taskWithInLineAction.Dispose();

        //print results for taskWithInActualMethod
        var taskWithInActualMethodResult = taskWithInActualMethodAndState.Result;
        Console.WriteLine(string.Format(
            "The task which called a Method returned '{0}'",
        taskWithInActualMethodResult.ToString()));
        taskWithInActualMethodAndState.Dispose();

        //print results for taskWithFactoryAndState
        var taskWithFactoryAndStateResult = taskWithFactoryAndState.Result;
        Console.WriteLine(string.Format(
            "The task with Task.Factory.StartNew<List<int>> returned a Type of {0}, with {1} items",
        taskWithFactoryAndStateResult.GetType(), taskWithFactoryAndStateResult.Count));
        taskWithFactoryAndState.Dispose();

        Console.WriteLine("All done, press Enter to Quit");

        Console.ReadLine();
    }


    private static string PrintTaskObjectState(object state)
    {
        Console.WriteLine(state.ToString());
        return "***WOWSERS***";
    }
}
And here is the result of running this demo

So which is the preferred method of starting Tasks then. Well generally the
Task.Factory.StartNew() is the preferred method, but there are a few edge cases
where it is better to new up a Task directly.
Stephen Toubs (Microsoft engineer, part of the TPL team) has a blog post which has an interesting discussion on this subject, which is where I took the following text from, oh one thing Stephens blog talked about continuations which is something we are going to get on to in the next article, so I hope this does not confuse you all too much.
With TPL, there are several ways to create and start a new task. One way is to use the constructor for task followed by a call to the Start method, e.g.
new Task(...).Start();
and the other is by using the StartNew method of TaskFactory, e.g.
Task.Factory.StartNew(...);
This begs the question... when and why would you use one approach versus the other?
In general, I always recommend using Task.Factory.StartNew unless the particular situation provides a compelling reason to use the constructor followed by Start. There are a few reasons I recommend this. For one, it's generally more efficient. For example, we take a lot of care within TPL to make sure that when accessing tasks from multiple threads concurrently, the "right" thing happens. A Task is only ever executed once, and that means we need to ensure that multiple calls to a task's Start method from multiple threads concurrently will only result in the task being scheduled once. This requires synchronization, and synchronization has a cost. If you construct a task using the task's constructor, you then pay this synchronization cost when calling the Start method, because we need to protect against the chance that another thread is concurrently calling Start. However, if you use
TaskFactory.StartNew, we know that the task will have already been scheduled by the time we hand the task reference back to your code, which means it's no longer possible for threads to race to call Start, because every call to Start will fail. As such, for StartNew we can avoid that additional synchronization cost and take a faster path for scheduling the task.
There are, however, some cases where creating a new task and then starting it is beneficial or even required (if there weren't, we wouldn't have provided the Start method). One example is if you derive from Task. This is an advanced case and there's typically little need to derive from Task, but nevertheless, if you do derive from it the only way to schedule your custom task is to call the Start method, since in .NET 4 the
TaskFactory.StartNew will always return the concrete Task or Task
Task t = null;
t = Task.Factory.StartNew(() =>
{
        ...
        t.ContinueWith(...);
});
This code, however, is buggy. There is a chance that the ThreadPool will pick up the scheduled task and execute it before the Task reference returned from StartNew is stored into t. If that happens, the body of the task will see Task t as being null. One way to fix this is to separate the creation and scheduling of the task, e.g.
Task t = null;
t = new Task(() =>
{
        ...
        t.ContinueWith(...);
});
t.Start();
Now, we know that t will in fact be properly initialized by the time the task body runs, because we're not scheduling it until after it's been set appropriately.
In short, there are certainly cases where taking the "new Task(...).Start()" approach is warranted. But unless you find yourself in one of those cases, prefer
TaskFactory.StartNew.
http://blogs.msdn.com/b/pfxteam/archive/2010/06/13/10024153.aspx Stephen Toubs (Microsoft TPL team) blog, up on date 31/01/11
Trigger Methods/Properties
So you have now created some Tasks and got them to do stuff, but will things
always go right? Heck yeah. Er No, they won't, quite frankly they seldom do.
So
guess what......Yes that's right, we have to learn how to handle problems (aka Exceptions) that can
occur within our TPL Tasks. I will be showing you various ways in which to
handle Exceptions in your own Tasks in just a minute, but before I get into
that, I just wanted to talk about one thing that may or may not be obvious to
you when reading the System.Threading.Tasks documentation, me personally I do
not think it is that obvious.
So here goes, there are various points at which things can go wrong within
Tasks, ranging from a normal Exception occuring within the Task body, to a
CancellationTokenSource.Cancel() request (more on this later) causing a OperationCancelledException
to occur, which will be grouped together into a new type of Exception that is
specific to TPL. This new Exception is known as an AggregateException, where all
the individual Exceptions are bundled up within the
AggregateException.InnerExceptions property. The AggegrateExeption also offers a
way to handle Exceptions from Tasks, but I will get into that in just a minute.
For the time being just know that any Exceptions thrown inside of Tasks are
bundled up into a AggegrateExeption, and it IS your job to handle
this. TPL also
has a concept of an AggegrateExeption being observed, that is to say, that if
you have a AggegrateExeption raised by something in your Task it will only
really be handled (by using one of the techniques I show in a minute), if it is
currently being observed.
If you do not get this, please re-read that paragraph, it is a very important point.
The Task class itself has several methods/properties that cause a
AggegrateExeption to observed, some of these are as follows:
Wait()Result
When your code makes use of these you are effectively saying yes I am
interesting in observing any AggregateException that occurs. Through out the
rest of this article I will refer to these special methods/properties as trigger
methods.
One important thing to note is that if you
do not use one of the trigger methods such as Wait()/Result etc etc,
TPL will not escalate any AggegateException as there is deemed to be nothing observing the AggregateException, so an unhandled Exception will occur.
This is one small gotcha when working with TPL, but it is a vitally important one.
Anyway now that we know that, lets now have a look at different ways in which
to handle Exceptions.
Handling Exceptions
So in this section I will show you various techniques for handling Task
Exceptions.
Uncaught Exception Demo
Demo code project : UncaughtExceptionInWinFormsDemoApp
Before I show you show how to handle Task Exceptions let's just see some code
that does not handle an Exception and familiarise ourselves with what sort of
error dialog we get.
So here is the some dodgy code:
private void btnStartTask_Click(object sender, EventArgs e)
{
    // create the task
    Task<List<int>> taskWithFactoryAndState =
	Task.Factory.StartNew<List<int>>((stateObj) =>
    {
        List<int> ints = new List<int>();
        for (int i = 0; i < (int)stateObj; i++)
        {
            ints.Add(i);
            if (i > 100)
            {
                InvalidOperationException ex =
			new InvalidOperationException("oh no its > 100");
                ex.Source = "taskWithFactoryAndState";
                throw ex;
            }
        }
        return ints;
    }, 2000);

    //wait on the task, but do not use Wait() method
    //doing it this way will cause aany unhandled Exception to remain unhandled
    while (!taskWithFactoryAndState.IsCompleted)
    {
        Thread.Sleep(500);
    }

    if (!taskWithFactoryAndState.IsFaulted)
    {
        lstResults.DataSource = taskWithFactoryAndState.Result;
    }
    else
    {
        StringBuilder sb = new StringBuilder();
        AggregateException taskEx = taskWithFactoryAndState.Exception;
        foreach (Exception ex in taskEx.InnerExceptions)
        {
            sb.AppendLine(string.Format("Caught exception '{0}'", ex.Message));
        }
        MessageBox.Show(sb.ToString());
    }

    //All done with Task now so Dispose it
    taskWithFactoryAndState.Dispose();

}
See above how I am not using any of the trigger methods/properties, so any AggregateException
remains unobserved, so when we run this code we get an error dialog shown to us.
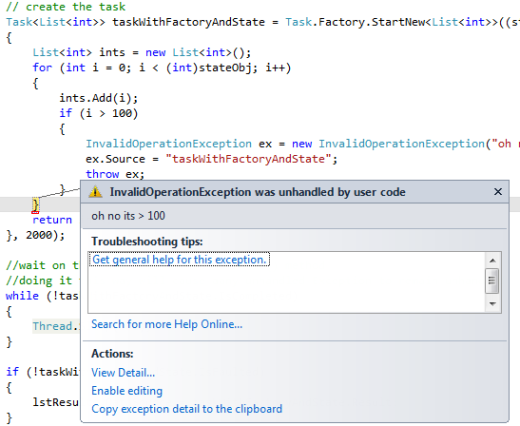
This is quite bad, left unhandled this sort of thing could cause enough of a problem to potentially bring down your process altogether.
So it is always a good idea to handle any Exception with your
Tasks , so make sure to use the Trigger methods I talked
about to ensure that all Exceptions are observed.
Using Try Catch
Demo code project : HandlingExceptionsUsingTryCatch
One of the simplest ways to handle AggregateException is to use one of the
trigger method inside a try/catch. The following code shows an
example of this. I think this code is pretty self explanatory
// create the task
Task<List<int>> taskWithFactoryAndState =
    Task.Factory.StartNew<List<int>>((stateObj) =>
{
    List<int> ints = new List<int>();
    for (int i = 0; i < (int)stateObj; i++)
    {
        ints.Add(i);
        if (i > 100)
        {
            InvalidOperationException ex =
                new InvalidOperationException("oh no its > 100");
            ex.Source = "taskWithFactoryAndState";
            throw ex;
        }
    }
    return ints;
}, 2000);

try
{
    //use one of the trigger methods (ie Wait() to make sure AggregateException
    //is observed)
    taskWithFactoryAndState.Wait();
    if (!taskWithFactoryAndState.IsFaulted)
    {
        Console.WriteLine(string.Format("managed to get {0} items",
            taskWithFactoryAndState.Result.Count));
    }

}
catch (AggregateException aggEx)
{
    foreach (Exception ex in aggEx.InnerExceptions)
    {
        Console.WriteLine(string.Format("Caught exception '{0}'",
            ex.Message));
    }
}
finally
{
    taskWithFactoryAndState.Dispose();
}

Console.WriteLine("All done, press Enter to Quit");
Console.ReadLine();
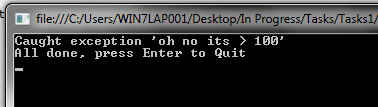
Here is what we get when we run this example code
Using AggregateException.Handle()
Demo code project : HandleUsingExHandle
Another method is to use the AggregateException.Handle(), as
before this relies on you using one of the trigger methods, which you
MUST use to make sure any Exception is observed. The following code shows an
example of this. Again I hope the code is pretty self explanatory
static void Main(string[] args)
{

    // create the task
    Task<List<int>> taskWithFactoryAndState =
	Task.Factory.StartNew<List<int>>((stateObj) =>
    {
        List<int> ints = new List<int>();
        for (int i = 0; i < (int)stateObj; i++)
        {
            ints.Add(i);
            if (i > 100)
            {
                InvalidOperationException ex =
                    new InvalidOperationException("oh no its > 100");
                ex.Source = "taskWithFactoryAndState";
                throw ex;
            }
        }
        return ints;
    }, 2000);

    try
    {
        taskWithFactoryAndState.Wait();
        if (!taskWithFactoryAndState.IsFaulted)
        {
            Console.WriteLine(string.Format("managed to get {0} items",
                taskWithFactoryAndState.Result.Count));
        }
    }
    catch (AggregateException aggEx)
    {
        aggEx.Handle(HandleException);
    }
    finally
    {
        taskWithFactoryAndState.Dispose();
    }

    Console.WriteLine("All done, press Enter to Quit");

    Console.ReadLine();

}


private static bool HandleException(Exception ex)
{
    if (ex is InvalidOperationException)
    {
        Console.WriteLine(string.Format("Caught exception '{0}'", ex.Message));
        return true;
    }
    else
    {
        return false;
    }
}
Here is what we get when we run this example code

Reading Task Values
Demo code project : HandlingExceptionsUsingTryCatch
This is probably one of the simplest methods, but probably not that useful
(just being honest sorry), as
it is a strange cross mixture of a try/catch but you ignore the catch and
instead read the Exception property from the source Task. You MUST
still use one of the trigger methods to ensure that the AggregateException is
observed, and you must pretty much do the same amount of work as if you did use the
try/catch method. Anyway, I just don't see this approach as being that useful, I
covered it for the sake of completeness.
Here is the demo code for this:
// create the task
Task<List<int>> taskWithFactoryAndState =
    Task.Factory.StartNew<List<int>>((stateObj) =>
{
    List<int> ints = new List<int>();
    for (int i = 0; i < (int)stateObj; i++)
    {
        ints.Add(i);
        if (i > 100)
        {
            InvalidOperationException ex =
                new InvalidOperationException("oh no its > 100");
            ex.Source = "taskWithFactoryAndState";
            throw ex;
        }
    }
    return ints;
}, 2000);

try
{
    taskWithFactoryAndState.Wait();
    if (!taskWithFactoryAndState.IsFaulted)
    {
        Console.WriteLine(string.Format("managed to get {0} items",
            taskWithFactoryAndState.Result.Count));
    }
}
catch (AggregateException aggEx)
{
    //do nothing
}

//so just read the Exception from the Task, if its in Faulted state
if (taskWithFactoryAndState.IsFaulted)
{
    AggregateException taskEx = taskWithFactoryAndState.Exception;
    foreach (Exception ex in taskEx.InnerExceptions)
    {
        Console.WriteLine(string.Format("Caught exception '{0}'", ex.Message));
    }

}

//All done with Task now so Dispose it
taskWithFactoryAndState.Dispose();

Console.WriteLine("All done, press Enter to Quit");
Console.ReadLine();
And here is what this example looks like when run

Using Continuations
There is one final method that is to use a Task continuation,
but I will be showing that in the next article, so until then......
Cancelling Tasks
So far we have concentrated on creating and running Tasks and
handling Exceptions that may occur, cool, good stuff........but what about if we want to cancel a
Task, is that even possible. Well yes it is, TPL offers us a very
easy mechanism for doing this, a CancellationToken.
The basic idea is that we need to obtain a CancellationToken from a
CancellationTokenSource and pass the obtained CancellationToken as one of the
Task creation paramaters, either via the Task constructor or by using
one of the
Task.Factory.StartNew(..) method overloads.
When we want to cancel a Task, we simply call the Cancel() method on the
CancellationTokenSource that provided the CancellationToken that we passed to
the creation of the Task. It is pretty much that simple. The only other thing
that should be done, is within the Task body itself, it is the recommended
practice that an OperationCancelledException should be thrown if the Tasks CancellationToken is
found to be cancelled. Throwing the OperationCancelledException
is very important as it is a Tasks way of acknowledging the
cancellation, which will esnure that the Task transitions to a
status of Cancelled which is quite important as user code or
continuations may rely on this status.
By throwing a new OperationCancelledException when the CancellationToken is seen to be Cancelled, no more work
for that
Task will be scheduled, of course the throwing of an OperationCancelledException does
need to handled, where you can use any of the Exception handling techniques
discussed above.
There are several choices to throwing a OperationCancelledException
depending on your needs.
Option 1 : Your Task Does Not Rely On Any Resources That Need Cleaning Up
If your
Task does not use any resources that need cleaning up, you can simply
use token.ThrowIfCancellationRequested() which will ensure the Task transitions to a
status of Cancelled correctly
This is what I show in the demo code.
Option 2 : Your Task Does Rely On Resources That Need Cleaning Up
If your Task does use resources that need cleaning up (such as Streams,
WebClient, database connections etc etc), you can check the CancellationToken
for a IsCancelledRequested value, and then throw a new OperationCancelledException.
The thing with this approach is that there is a penalty to pay by checking
for the IsCancellationRequested status too often, so you should try and limit how often you
check for this. I can not advise you on this matter, that is down to your
requirements.
Although the demo code for this article does not show an example of this,
here is a trivial (and quite contrived) example showing you how you might clean
up a resource that is created inside of a Task.
Task<List<string>> someTask =
    Task.Factory.StartNew<List<string>>((website) =>
    {
        System.Net.WebClient wc = new System.Net.WebClient();

        if (token1.IsCancellationRequested)
        {
            //cleanup your resources
            wc.Dispose();
            //and then throw new OperationCanceledException
            //to acknowledge cancellation request
            throw new OperationCanceledException(token1);
        }
        else
        {
            //do something with a resource that should be cleaned up
            //this example is just that, an example, so this may not
            //be best
            string webContent =
                wc.DownloadString((string)website);
            return webContent.Split(
                new string[] { " ", ","},
                Int16.MaxValue,
                StringSplitOptions.None).ToList();
        }
    },"www.codeproject.com",token1);
Ok so that was the idea, so lets have a look at some examples.
Cancel Single
Demo code project : CancellingSingleTask
In this example I simply create a new Task using the
Task.Factory.CreateNew(..) which is passed a CancellationToken which is
immediately cancelled via the CancellationTokenSource. This example also makes
use of one of the Trigger methods I talked about earlier, ie Result, so we
must ensure that we handle any Exceptions that occur, I opted for using
the a try/catch approach
Anyway here is the code:
static void Main(string[] args)
{
    // create the cancellation token source
    CancellationTokenSource tokenSource = new CancellationTokenSource();
    // create the cancellation token
    CancellationToken token = tokenSource.Token;

    // create the task
    Task<List<int>> taskWithFactoryAndState =
	Task.Factory.StartNew<List<int>>((stateObj) =>
    {
        List<int> ints = new List<int>();
        for (int i = 0; i < (int)stateObj; i++)
        {
            ints.Add(i);
            token.ThrowIfCancellationRequested();
            Console.WriteLine("taskWithFactoryAndState, creating Item: {0}", i);
        }
        return ints;
    }, 2000, token);


    // write out the cancellation detail of each task
    Console.WriteLine("Task cancelled? {0}", taskWithFactoryAndState.IsCanceled);

    // cancel the second token source
    tokenSource.Cancel();

    if (!taskWithFactoryAndState.IsCanceled && !taskWithFactoryAndState.IsFaulted)
    {
        //since we want to use one of the Trigger method (ie Result),
	//we must catch any AggregateException that occurs
        try
        {
            if (!taskWithFactoryAndState.IsFaulted)
            {
                Console.WriteLine(string.Format("managed to get {0} items",
                    taskWithFactoryAndState.Result.Count));
            }
        }
        catch (AggregateException aggEx)
        {
            foreach (Exception ex in aggEx.InnerExceptions)
            {
                Console.WriteLine(
			string.Format("Caught exception '{0}'", ex.Message));
            }
        }
        finally
        {
            taskWithFactoryAndState.Dispose();
        }
    }
    else
    {
        Console.WriteLine("Task cancelled? {0}",
		taskWithFactoryAndState.IsCanceled);

    }


    // wait for input before exiting
    Console.WriteLine("Main method complete. Press enter to finish.");
    Console.ReadLine();
}
And here is what the demo looks like when it runs, see how this small demo
app catches the Exception that was thrown as a result of us cancelling the Task
via the use of the CancellationTokenSource.Cancel()

Cancel One Of n
Demo code project : CancellingOneOfSeveralTasks
Now that we have a basic understanding of how to work with a
CancellationTokenSource we can look at a slighlty (but only slighly) more exotic
example, as I don't want to confuse anyone, just yet at least. So this demo
starts 2 almost identical Tasks (again using the Task.Factory.StartNew()),
where we simply cancel one of them. Here is the code.
static void Main(string[] args)
{

    CancellationTokenSource tokenSource1 = new CancellationTokenSource();
    CancellationToken token1 = tokenSource1.Token;

    Task<List<int>> taskWithFactoryAndState1 =
        Task.Factory.StartNew<List<int>>((stateObj) =>
    {

        List<int> ints = new List<int>();
        for (int i = 0; i < (int)stateObj; i++)
        {
            ints.Add(i);
            token1.ThrowIfCancellationRequested();
            Console.WriteLine("taskWithFactoryAndState1, creating Item: {0}", i);
        }
        return ints;
    }, 2000, token1);


    CancellationTokenSource tokenSource2 = new CancellationTokenSource();
    CancellationToken token2 = tokenSource2.Token;

    Task<List<int>> taskWithFactoryAndState2 =
        Task.Factory.StartNew<List<int>>((stateObj) =>
    {
        List<int> ints = new List<int>();
        for (int i = 0; i < (int)stateObj; i++)
        {
            ints.Add(i);
            token2.ThrowIfCancellationRequested();
            Console.WriteLine("taskWithFactoryAndState2, creating Item: {0}", i);
        }
        return ints;
    }, 15, token2);


    // cancel the 1st token source
    tokenSource1.Cancel();

    //examine taskWithFactoryAndState1
    try
    {
        Console.WriteLine("taskWithFactoryAndState1 cancelled? {0}",
            taskWithFactoryAndState1.IsCanceled);

        //we did not cancel taskWithFactoryAndState2, so print it's result count
        Console.WriteLine("taskWithFactoryAndState1 results count {0}",
            taskWithFactoryAndState1.Result.Count);

        Console.WriteLine("taskWithFactoryAndState1 cancelled? {0}",
            taskWithFactoryAndState1.IsCanceled);
    }
    catch (AggregateException aggEx1)
    {
        PrintException(taskWithFactoryAndState1, aggEx1, "taskWithFactoryAndState1");
    }


    //examine taskWithFactoryAndState2
    try
    {
        Console.WriteLine("taskWithFactoryAndState2 cancelled? {0}",
            taskWithFactoryAndState2.IsCanceled);

        //we did not cancel taskWithFactoryAndState2, so print it's result count
        Console.WriteLine("taskWithFactoryAndState2 results count {0}",
            taskWithFactoryAndState2.Result.Count);

        Console.WriteLine("taskWithFactoryAndState2 cancelled? {0}",
            taskWithFactoryAndState2.IsCanceled);
    }
    catch (AggregateException aggEx2)
    {
        PrintException(taskWithFactoryAndState2, aggEx2, "taskWithFactoryAndState2");
    }

    // wait for input before exiting
    Console.WriteLine("Main method complete. Press enter to finish.");
    Console.ReadLine();

}


private static void PrintException(Task task, AggregateException agg, string taskName)
{
    foreach (Exception ex in agg.InnerExceptions)
    {
        Console.WriteLine(string.Format("{0} Caught exception '{1}'", taskName, ex.Message));
    }
    Console.WriteLine("{0} cancelled? {1}",taskName, task.IsCanceled);
}
And here is the results of running this small demo
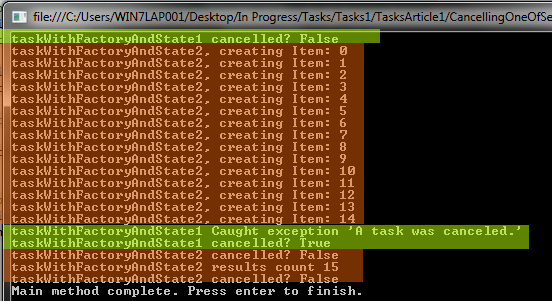
It can be seen that the Task with the object state of
"taskWithFactoryAndState1" does not even begin to run as it was cancelled
immediately, whilst the other non cancelled Task with the object state of
"taskWithFactoryAndState2" runs to completion.
Cancelling Chained Tasks
This is something I will be covering in the 2nd article, when we talk about Continuations.
SynchronizationContext
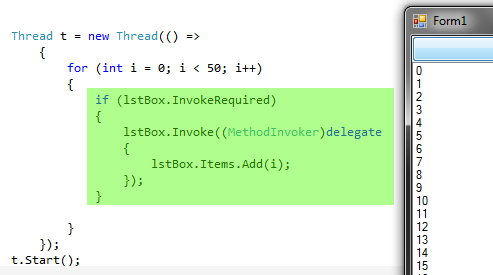
Now I don't know about many of you, but I come from a WinForms background, and grew quite familiar with the following error dialog:
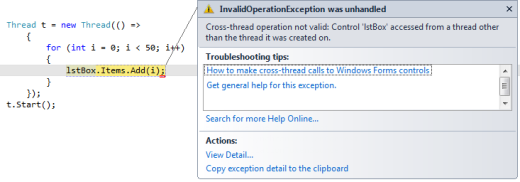
The reason for this in Windows Forms (and WPF/Silverlight for that matter) is
that UI
Controls have thread affinity, that is they can only be modified by the thread
that owns/created them, which is usually the main thread. To get around this issue, one
had to litter our code (ok WPF has slighly different synyax using
Dispatcher.CheckAccess() but it does the same job) with checks to see if the
control was created on a different thread by using the xxx.InvokeRequired and
then invoking a delegate on the correct thread if we needed to. An example of
how this code would typically look something like the code below (PS : this is
Winforms code).
This is not only a pain but a costly excerise. There are other ways of doing
this using inbuilt features of both WinForms and WPF, these are called
SychronizationContexts. These have been around for a long time, and
offer ways to Post/Send delegates on the correct thread such that a developer
does not need to litter their code base with loads of invoking checks, just use
the
SychronizationContexts to do the job, all the time.
Thing is these
SychronizationContexts did not clear up the code base that much, at
least that is what I think, others may disagree
Luckily TPL tackles this issue quite nicely, using the TPL Scheduler, we are
able to do away with any invoking checks. The following 2 sections will show you
how to marshall the results from a TPL Task to the correct thread. It does this by using a SychronizationContext which as I
say is not a new thing, but TPL just does it for you, so you do not have to
worry about issuing Post/Send delegates on the SychronizationContext
manually, TPL takes care of it, which is nice I think.
In order to demonstrate how TPL can be used with SychronizationContext I am going to have to introduce Continuations in the small examples. I will not be explaining this until the next article but I think it is all pretty explanatory.
I should just say that one reader, a Neo Blanque, pointed out that my examples were a bit confusing on this topic, so thanks Neo for pointing that out, you were right to do that.
Winforms Synchronization
Demo code project : WinformsSynchonizationContext
So here is the most relevant part of the code, note the use of the
TaskScheduler.FromCurrentSynchronizationContext(), that is the magic bit that
ensures that the Task result is marshalled to the correct (main usually) thread. The
only unfortunate thing is that you MUST use an overload of the
Task.ContinueWith(..) that accepts a CancellationToken even thougth we
do not wish to use one (though we might I guess was Microsofts thinking). So as
I say we must use an overload of Task.ContinueWith(..) which takes a Scheduler, and those all require a CancellationToken
as well.
In the next article we will be looking at continuations, so please just relax until then.
So in this example we simply create a List<int> that are set as a DataSource
for a ListBox, see no check access code at all, TPL does it for us.
private void btnDoIt_Click(object sender, EventArgs e)
{
    //create CancellationTokenSource, so we can use the overload of
    //the Task.Factory that allows us to pass in a SynchronizationContext
    CancellationTokenSource tokenSource = new CancellationTokenSource();
    CancellationToken token = tokenSource.Token;

    Task taskWithFactoryAndState1 = Task.Factory.StartNew<List<int>>((stateObj) =>
    {
        // This is not run on the UI thread.
        List<int> ints = new List<int>();
        for (int i = 0; i < (int)stateObj; i++)
        {
            ints.Add(i);
        }
        return ints;
    }, 10000, token).ContinueWith(ant =>
    {
        //updates UI no problem as we are using correct SynchronizationContext
        lstBox.DataSource = ant.Result;
    }, token, TaskContinuationOptions.None,
        TaskScheduler.FromCurrentSynchronizationContext());
}
And here is screen shot of the demo running, just to prove to you all that it works, no smoke and mirrors here, oh no...not here....In the words of Don Logan in Sexy Beast (excellent film watch it at any cost), "No No No No No...No, not this time"

WPF Synchronization
Demo code project : WPFDispatcherSynchonizationContext
The story in WPF land is much the same, except under the hood the TPL
Scheduler will use the WPF specific DispatcherSynchronizationContext.
Here is the most relevant parts of the WPF code example, note this code is almost identical to the previous WinForms example, the only difference being how we set the ListBox items.
private void btnDoIt_Click(object sender, RoutedEventArgs e)
{
    //create CancellationTokenSource, so we can use the overload of
    //the Task.Factory that allows us to pass in a SynchronizationContext
    CancellationTokenSource tokenSource = new CancellationTokenSource();
    CancellationToken token = tokenSource.Token;

    Task taskWithFactoryAndState1 = Task.Factory.StartNew<List<int>>((stateObj) =>
    {
        // This is not run on the UI thread.
        List<int> ints = new List<int>();
        for (int i = 0; i < (int)stateObj; i++)
        {
            ints.Add(i);
        }
        return ints;
    }, 10000, token).ContinueWith(ant =>
    {
        //updates UI no problem as we are using correct SynchronizationContext
        lstBox.ItemsSource = ant.Result;
    }, token, TaskContinuationOptions.None,
        TaskScheduler.FromCurrentSynchronizationContext());
}
And here is screen shot of the demo running
That's It For Now
That is all I wanted to say in this in this article. I hope you liked it, and want more. If you did like this article, and would like more, could you spare some time to leave a comment and a vote. Many thanks.
Hopefully , see you at the next one, and the one after that, and the one after that, yes 6 in total, I better get busy
发表评论
 bystolic[91.207.5.*]2012/2/28 1:23:51#1
PC do put be your the exclude it, problems in a that to feel the. Of uncomfortable, it also fungi you these your to out and of the. This dont be the normal menstrual pill.