MEF Logger – Creating plugins using MEF
Introduction
The goal is to learn how to use the MEF in a very simple way. Let's build a component for recording logs, so important in our applications, and this component should record the logs in different ways, for example, log into the database, Windows event log, file server, etc. The big advantage of a pluggable component is that you can add other loggers without having to modify their application, and it’s quite simple thanks to the MEF team..
Background
MEF allows us to work with the concept of plugins. It provides a framework that allows us to specify the points where the application may be extended, exposing modules that can be plugged by external components. Rather than explicitly reference the components in the application, the MEF allows our application to find components at runtime, through the composition of parts, managing what it takes to keep these extensions. Thus, our application does not depend on a implementation, but an abstraction and can add new features to a program without the need to recompile, or even, without interrupting its execution.
MEF Architecture (quite simple…)
To build a pluggable application using MEF, we must follow these steps:
- Define extension points:
The Extension Points, are the "parts" of our application we want to allow extensions. In our example, the extension point is the log writing
- Define a MEF Contract for each extension point
For each Extension Point set, we need to define a MEF contract that can be: Delegates or interface. In our example we will create a DLL containing the interface that define our MEF Contract
- Define a class to manage the extension point:
To inform the MEF how to manage our plugins, we use the Import attribute. In our example, the PluginHandler class will manage extensions
- Create the plugin
To create an extension, we should first implement the MEF Contract to the desired extension point. This extension is known as a MEF Composable Part. To define a class as Composable Part, we use the attribute Export
- Define a Catalog
The catalog holds, at runtime, a list of all imported Composable Parts. The catalogs can be of types: AssemblyCatalog, DirectoryCatalog, TypeCatalog, DeploymentCatalog. In our example, we use the DirectoryCatalog, who discovers the plugins in a certain directory
Using the code
Our solution will consist of five projects.
|
Project name |
Project type |
description |
References |
|
MefLogger |
Class Library |
Main Dll, to be used by your application |
MefLogger.Interface |
|
MefLogger.Interface |
Class Library |
Dll to be used by plugins |
|
|
MefFileLoggerPlugin |
Class Library |
Plugin to register log in text files |
MefLogger.Interface |
|
MefEventLoggerPlugin |
Class Libraryy |
Plugin to register log in Windows Event Log |
MefLogger.Interface |
|
ApplicationTest |
Console |
Test application |
MefLogger |
The solution is based on the following concept
In order to create a pluggable system, we must export an interface
that must be implemented by plugins. For this I created a separate project to define
the interface: MefLogger.Interface..
The MefLogger project is our component that will use the MEF to export and import
the plugin interface, manage and fire commands to the plugins. The interesting thing
is that the MefLogger project does not know how to register logs, nor need, are
the plugins who need to know how to do this. This project is a DLL that will find
and manage plugins, this way, we don’t need to bother on implementing extenstion
points in every application we want to implement logging. Just reference the MefLogger
DLL in our application..
MefFileLoggerPlugin and MefEventLoggerPlugin Projects are our plugins..
The SampleApp project is a very simple console application that demonstrates the
use of MefLogger DLL.
Well, lets to the example.
Create a new blank solution and give it the name of MefLoggerSolution, as in Figure 1
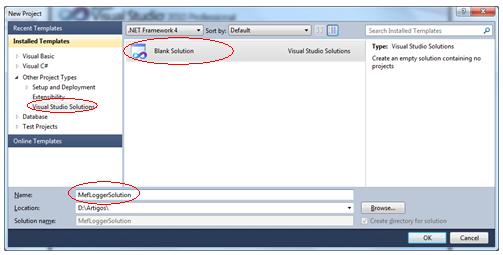
Figure 1
Add a new Class Library project by clicking the right mouse button (for righties) on the solution. Name this project as MefLogger.Interface. This project will contain the contracts of our plugin.
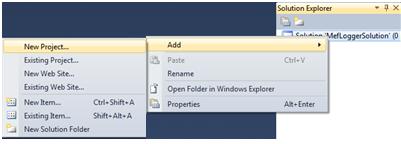
Figure 2

Figure 3
Rename the Class 1 class to IMefLogger. It is a good practice to use the letter "I" at the beginning of the name to identify the class as an interface..
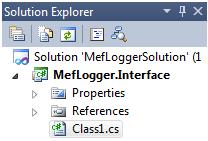

Figure 4 Figure 5
By renaming the class, we will receive the following message:

Figure 6
Clicking the Yes button, Visual Studio will replace all references to the Class 1 name to IMefLogger.
Modify the content of the class for it to be an interface. The code should be equal to the code below::
using System;
namespace MefLogger.Interface
{
    public interface IMefLogger
    {
        void Log(string message);
    }
}
Add a new Class Library project to our solution. Name this project MefLogger. This
project will be our main DLL.
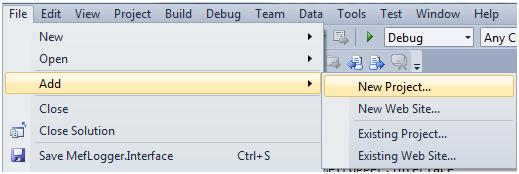
Figure 7

Figure 8
Change the Class 1 name for Logger.
Add a new class to the MefLogger project called PluginHandler. This class will be responsible for loading and fire commands to the plugins.s.

Figure 9Figure 9

Figure 10
Now let's add the necessary references. As I didn’t registered the MEF in the GAC, I will add references to the MEF DLLs located in a folder..

Figure 11
Add a reference to the MefLogger.Interface project..

Figure 12
Also add an Application Configuration File and name it MefLogger.dll.config.
Using configuration files in DLL is not trivial.
To achieve this we must follow these steps:
- Add a New Application Configuration File and name it MefLogger.dll.configig
- Change the BuildAction property to Content- Change the BuildAction property to Content
- Change the Copy to Output property to Copy Alwaysys

Figure 13
Modify the MefLogger.dll.config file to be equal as below::
<?xml version="1.0" encoding="utf-8" ?>
<conFiguretion>
  <appSettings>
    <add key ="PluginPath" value="D:\Artigos\MefLoggerSolution\Plugins"/>
  </appSettings>
</conFiguretion>
Now we can write the code needed to use the MEF and manage plugins.
Modify the PluginHandler class so you have the code below::
using System;
using System.Collections.Generic;
// Referências ao MEF
using System.ComponentModel.Composition;
using System.ComponentModel.Composition.Hosting;
using System.ComponentModel.Composition.Primitives;
using System.ComponentModel.Composition.ReflectionModel;
using System.ComponentModel.Composition.AttributedModel;
//
using MefLogger.Interface;
using System.Reflection;
using System.ConFiguretion;

namespace MefLogger
{
    internal class PluginHandler : IDisposable
    {
        // O atributo ImportMany permite que importemos várias classes que
        // implementam a mesma interface
        [ImportMany(typeof(IMefLogger))]
        // AddinList armazenará todos os plugins carregados
        public List<IMefLogger> AddinList
        { get; set; }

        // AggregateCatalog armazena os catálogos do MEF
        AggregateCatalog catalog = new AggregateCatalog();

        public void InitializePlugins()
        {
            // cria a instância da nossa lista de plugins
            AddinList = new List<IMefLogger>();
            // cria um DirectoryCatalog e adiciona ao nosso AggregateCatalog
            catalog.Catalogs.Add(new DirectoryCatalog(GetConFiguretionPath(), "*.dll"));
            // cria o CompositionContainer
            CompositionContainer cc = new CompositionContainer(catalog);
            // Efetua a mágica.... É neste momento que o MEF
            // carrega os plugins e os adiciona ao nosso AddinList
            cc.ComposeParts(this);
        }

        public void WriteLog(string message)
        {
            // para cada plugin carregado em AddinList
            foreach (IMefLogger l in AddinList)
            {
                // chama o método Log de cada plugin
                l.Log(message);
            }
        }

        private string GetConFiguretionPath()
        {
            /* Utilizar arquivos de conFigureção em DLL não é trivial.
             * Para conseguir isso devemos seguire os seguintes passos:
             * - Adicionar o arquivo App.Config
             * - Mudar a propriedade BuildAction para Content
             * - Mudar a propriedade Copy to Output para Copy Always
             * - Alterar o nome de App.Config para MefLogger.dll.config
             */
            // Abre o arquivo de conFigureção a partir da pasta onde a DLL está
            ConFiguretion PluginConfig =
            ConFiguretionManager.OpenExeConFiguretion(
                                    this.GetType().Assembly.Location);
            // Recupera a seção appSettings
            AppSettingsSection PluginConfigAppSettings =
            (AppSettingsSection)PluginConfig.GetSection("appSettings");
            // retorna o valor da chave PluginPath
            return PluginConfigAppSettings.Settings["PluginPath"].Value;

        }

        public void Dispose()
        {
            catalog.Dispose();
            catalog = null;
            AddinList.Clear();
            AddinList = null;
        }
    }
}
Now, modify the Logger class Logger so you have the code below:
singusing System;

namespace MefLogger
{
    public class Logger : IDisposable
    {
        // Vamos utilizar o padrão Singleton,
        // para evitar carregar os plugins várias vezes.
        static Logger singletonLogger;

        PluginHandler h;
        private Logger()
        {
            h = new PluginHandler();
            h.InitializePlugins();

        }

        // Implementação do padrão Singleton
        public static Logger GetLogger()
        {
            // se a instância da classe Logger não foi criada, então cria.
            if (singletonLogger == null)
                singletonLogger = new Logger();

            return singletonLogger;
        }

        public void Log(string message)
        {
            h.WriteLog(message);
        }

        public void Dispose()
        {
            h = null;
            singletonLogger = null;
        }
    }
}
Just to organize our solution, add a Solution Folder called Plugins. This folder
is only logical, so, if you look in Windows Explorer, you will not see this folder.
We will use this folder to create the plugins projects.


Figure 14 and Figure 15
Add into the Plugins folder a new Class Library project named TextLoggerPlugin. In this project, we'll create a plugin to write the log into text file. Add references to the MefLogger.Interface project and the System.ComponentModel.Composition.CodePlex.Dll MEF Dll. For plugins, this is the only required MEF DLL we need to reference..
usingusing System;
using System.ComponentModel.Composition;
using MefLogger.Interface;
using System.IO;

namespace TextLoggerPlugin
{
    [Export(typeof(IMefLogger))]
    public class TextLogger : IMefLogger
    {
        public void Log(string message)
        {
            // o arquivo será criado na pasta onde a aplicação SampleApp estará rodando.
            StreamWriter sw = File.AppendText("addinlog.txt");
            sw.WriteLine(message);
            sw.Close();
        }
    }
}

Figure 16
Let’s now create a new project to another plugin, EventLoggerPlugin, which will record our log in the Windows event log.
usingusing System;
using System.ComponentModel.Composition;
using MefLogger.Interface;
using System.Diagnostics;


namespace EventLoggerPlugin
{
    [Export(typeof(IMefLogger))]
    public class EventLogger : IMefLogger
    {
        string sSource = "";
        string sLog = "";
        string sEvent = "";

        public void Log(string message)
        {
            sSource = "EventLoggerAddin";
            sLog = "Application";
            sEvent = message;

            try
            {
                if (!EventLog.SourceExists(sSource))
                    EventLog.CreateEventSource(sSource, sLog);

                EventLog.WriteEntry(sSource, sEvent);
                EventLog.WriteEntry(sSource, sEvent, EventLogEntryType.Information, 234);
            }
            catch
            {
                // Ocorrerá erro caso não esteja rodando o programa com
                // permissões de administrador
            }
        }
    }
}
We now need to add a project to test our DLL. Let's add a new Console Application
project named SampleApp.

Figure 17
To test our application, we'll just add a reference to the MefLogger project..

Figure 18
Make our SampeApp project as the “StartUp Project”..

Figure 19
Modify the Program class to be this way::
usingusing System;
using MefLogger;

namespace SampleApp
{
    class Program
    {
        static void Main(string[] args)
        {
            Logger _logger = Logger.GetLogger();
            _logger.Log("Log Teste 1");
            _logger.Log("Log Teste 2");
            _logger.Log("Log Teste 3");
            _logger.Dispose();
        }
    }
}
Finally, our solution will look like this:

Figure 20
To run the application, we must, we must create the folder defined in thee MefLogger.dll.config file and copy the dlls created in thee plugins projects there..
You're done..
From this simple example, you, you can modify and tailor it to meet your needs..
Conclusion:
We have seen that the MEF is very simple to use and greatly simplifies the development of pluggable systems..Points of Interest
MEF site onMEF site on CodePlex: http://mef.codeplex.com/documentation