Simple Shopping Cart (Basket ) User Control using ASP.NET & JavaScript (Floating, Movable and Resizable)
You can try my live demo here.
Contents
- Introduction
- What is the Shopping Cart Software
- Why I Created this User Control
- Background
- Who Might be Interested
- Main Goals for my Basket User Control
- How to Add the User Control to Your Web Application
- Flow of Events Inside User control
- A Closer Look to the User Control Source Code
- Point to Ponder
- Points of Interest
- Finally
- References
- Revision History
Introduction
I went through many articles related to shopping cart on CodeProject and on the Internet, but I found that some of them are complex, or very basic, or have little functionality, or they are slow, or they need you to understand each and every thing to start using the code.
After I developed this user control, I feel that it could be useful to share. Because most of the developers are busy in their employment tasks, it's not always possible to know everything about a certain technology, just because there is little time. It goes a lot faster if someone creates something to make your life a little bit easier.
What is the Shopping Cart Software
Shopping cart software is software used in e-commerce to assist people in making purchases online, analogous to the American English term 'shopping cart'. In British English, it is generally known as a shopping basket, almost exclusively shortened on websites to 'basket'.
Why I Created this User Control
I searched the internet for a shopping cart user control with a specification like simple, ease of use, saving purchased items in cookies, no pages flickering, movable, floating and free. But I haven't found any solution like this, so I developed a user control to achieve these goals.
Background
To understand this article, you should have basic background about ASP.NET, C#, JavaScript, Cookies and User controls.
To run this code, you need to use (.NET Framework 3.5 and Visual Studio 2008).
Who Might be Interested
I have written this article for those who need to have a shopping basket in their web applications.
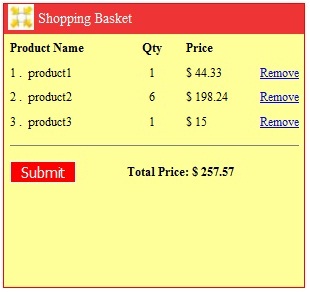
Main Goals for My Basket User Control
- Reading from cookies: So if users quit their browser without making a purchase and return later, they still find the same items in the basket so they do not have to look for these items again.
- Floating: So it will be in front of users all the time and they can know what they purchased and how much it cost.
- Movable: So the Users can move it and put it at any place in the browser.
- Resizable: So the users can show and hide the Basket.
- No page flickering: which means the possibility of working while the data is retrieved. In other words, the user control contents only will be posted back to the server when you add or remove products from the basket.
- Compatible with major browsers like Firefox, Internet Explorer and Chrome.
How to Add the User Control to Your Web Application
Using this control should be straightforward.
- Copy (User control file, JavaScript File, Images folder) to your Visual Studio 2008 project.
- Drag and drop the user control into your ASP.NET page.(I recommend to put it inside
divat the end of your page to avoid any design effect.) - Then you need only to add products through calling a JavaScript function named
addcookiefrom your web page.
The control itself will handle modifying quantities, removing products and submit the request.
The below code illustrates how you can use the control on your aspx page.
<!-- Drop the user control inside div at the end of your aspx page -->
<div>
     <uc1:basket id="Basket1"  runat="server" />
</div>

<!-- Note that when you drag and drop the user control to your web page the
 registration tag will be added automatically to the top of the page. -->
<%@ Register src="Basket.ascx" tagname="Basket" tagprefix="uc1" %>

<!-- then at any place in your aspx page you can call the JavaScript function
  to add a new product to the basket
  addcookie('ShoppingCart',product_id,'product name',price)  -->
i.e. <a id="A1" href="javascript:addCookie('ShoppingCart',5,'Iphone4',500.00)">add
Flow of Events Inside User Control
- A new product will be added from Web page (by adding this product to cookie named
ShoppingCart) (client - side).<a id="A1" href="javascript:addCookie('ShoppingCart',5,'Iphone4',500.00)">add
- The user control will read the selected products from a cookie named
ShoppingCart(server - side). - The user control will bind cookie values to data table
dt_final(server - side). - The user control will view the data table values into Repeater control
rptShoppingCart(server - side). - The total amount of purchased items will be calculated through repeater event
ItemDataBound(server - side).
A Closer Look at the User Control Source Code
-
Reading Purchased Items from Cookies
I am reading the purchased items from cookies
ShoppingCartthrough the user controlpage_loadevent.// The below code reads the purchased items from cookies // ShoppingCart and puts it in data table dt_final, then // binds it to a data repeater control rptShoppingCart protected void Page_Load(object sender, EventArgs e) { // To Make sure the cookie is not empty if (Request.Cookies["ShoppingCart"] != null) { HttpCookie oCookie = (HttpCookie)Request.Cookies["ShoppingCart"]; string sProductID = oCookie.Value.ToString(); DataTable dt_final = new DataTable(); // which means the user remove all products and he is adding a new product // in this case i need to remove the ",". // otherwise the '' will be considered as item. if (sProductID.IndexOf(",") == 0) { sProductID=sProductID.Remove ( 0, 1); } if (sProductID != "") { char[] sep = { ',' }; // split the cookie values into array string[] sArrProdID = sProductID.Split(sep); //create datatable for purchased items DataTable dt = new DataTable(); dt.Columns.Add(new DataColumn("Counter")); dt.Columns.Add(new DataColumn("ProductID")); dt.Columns.Add(new DataColumn("ProductName")); dt.Columns.Add(new DataColumn("Issue")); dt.Columns.Add(new DataColumn(("prod_price"), System.Type.GetType("System.Decimal"))); // to map the values from array of string(sArrProdID) to datatable int counter = 1; for (int i = 0; i < sArrProdID.Length - 1; i = i + 3) { DataRow dr = dt.NewRow(); dr["Counter"] = counter; dr["ProductID"] = sArrProdID[i]; dr["ProductName"] = sArrProdID[i + 1]; dr["Issue"] = 1; dr["prod_price"] = sArrProdID[i + 2]; dt.Rows.Add(dr); counter++; } //temp table to return the distinct values only DataTable dtTemp = new DataTable(); string[] col = { "ProductID", "ProductName", "prod_price" }; dtTemp = dt.DefaultView.ToTable(true, col); dt_final = dt.Clone(); //to calculate the number of issued items counter = 1; foreach (DataRow dr in dtTemp.Rows) { DataRow dr_final = dt_final.NewRow(); dr_final["ProductID"] = dr["ProductID"]; dr_final["ProductName"] = dr["ProductName"]; dr_final["Issue"] = dt.Compute("count(ProductID)", "ProductID='" + dr["ProductID"] + "'").ToString(); dr_final["Counter"] = counter; dr_final["prod_price"] = dt.Compute("sum(prod_price)", "ProductID='" + dr["ProductID"] + "'"); dt_final.Rows.Add(dr_final); counter++; } } // to bind the datatable to data repeater control rptShoppingCart rptShoppingCart.DataSource = dt_final; rptShoppingCart.DataBind(); } }
-
Calculate the Total Money Amount
To calculate the total money for purchased items, I have used the repeater event
ItemDataBound.
Each time a data record is added to the Repeater control, anItemDataBoundevent is fired. Within the event, you can access the data being bound to the row. This feature enables you to calculate the sum for purchased products.//Page level variable to save the total price when //the event rptShoppingCart_ItemDataBound has been fired. decimal decPriceSum;
//To calculate the total money for purchased items
protected void rptShoppingCart_ItemDataBound(object sender, RepeaterItemEventArgs e)
{
    // To reset the counter incase of header
    if (e.Item.ItemType == ListItemType.Header)
    {
        decPriceSum = 0;
    }

    // to add the product price to the sum variable (decPriceSum)
    else if (e.Item.ItemType == ListItemType.Item || e.Item.ItemType ==
    ListItemType.AlternatingItem)
    {
        decPriceSum +=
        (decimal)((DataRowView)e.Item.DataItem)["prod_price"];
    }
    // to view the total incase of footer
    else if (e.Item.ItemType == ListItemType.Footer)
    {
        Label lblSum = e.Item.FindControl("lblItemPrice") as Label;
        lblSum.Text = "Total Price: $ " + decPriceSum;
    }
}
-
Adding Product to the Basket
To add a product to the basket when the user presses on add link, first I call a JavaScript function
addCookie.
Then I force postback to reload the basket items by calling the JavaScript function__doPostBack.// To add a new product to the cookie function addCookie(name, value, prod_name, prod_price) { var today = new Date(); //to set the cookies expiry time var expires = expires * 1000 * 3600 * 3; //To retrieve the values of cookie named "ShoppingCart" var currentCookie = getCookie(name); if (currentCookie == null) { //it means this is the first item in the basket document.cookie = name + '=' + escape(value) + "," + escape(prod_name) + "," + escape(prod_price) + ((expires) ? ';expires=' + new Date(today.getTime() + expires).toGMTString() : ''); } else { //it means the basket already has another products document.cookie = name + '=' + currentCookie + "," + escape(value) + "," + escape(prod_name) + "," + escape(prod_price) + ((expires) ? ';expires=' + new Date(today.getTime() + expires).toGMTString() : ''); } //To maximize the basket size in case it was minimized by the user showdiv("Basket_body") //to force the post back to reload the basket items after adding product __doPostBack('Basket1_UpdatePanel1', ''); } // To retrieve the basket cookie values function getCookie(name) { var sPos = document.cookie.indexOf(name + "="); var len = sPos + name.length + 1; if ((!sPos) && (name != document.cookie.substring(0, name.length))) { return null; } if (sPos == -1) { return null; } var ePos = document.cookie.indexOf('=', len); if (ePos == -1) ePos = document.cookie.length; return unescape(document.cookie.substring(len, ePos)); }
-
Removing Product from the Basket
To remove a product from the basket when the user presses on remove link, first I call a JavaScript function
deleteCookie.
Then I force postback to reload the basket items by calling the JavaScript function__doPostBack.//To remove the product from cookies when the user press on remove link function deleteCookie(name, value,prod_name,prod_price) { //to set the cookie expiry time var expires = expires * 1000 * 3600 * 3; //In case of the removed item in the mid of the cookie if (document.cookie.indexOf("," + value + "," + prod_name + "," + prod_price) != -1) { document.cookie = document.cookie.replace("," + value + "," + prod_name + "," + prod_price, "") + ((expires) ? ';expires=' + new Date(today.getTime() + expires).toGMTString() : ''); } //In case of the removed item is the first item in cookie else if (document.cookie.indexOf(value + "," + prod_name + "," + prod_price + ",") != -1) { document.cookie = document.cookie.replace (value + "," + prod_name + "," + prod_price + "," , "") + ((expires) ? ';expires=' + new Date(today.getTime() + expires).toGMTString() : ''); } //In case of the removed item is the only item in cookie else if (document.cookie.indexOf(value + "," + prod_name + "," + prod_price ) != -1) { document.cookie = document.cookie.replace (value + "," + prod_name + "," + prod_price, "") + ((expires) ? ';expires=' + new Date(today.getTime() + expires).toGMTString() : ''); } //to force the post back to reload the basket items after removing product __doPostBack('Basket1_UpdatePanel1', ''); }
// This Javascript function will force a postback after
// removing a product to reload the basket items.
function __doPostBack(eventTarget, eventArgument) {
    if (!theForm.onsubmit || (theForm.onsubmit() != false)) {
        theForm.__EVENTTARGET.value = eventTarget;
        theForm.__EVENTARGUMENT.value = eventArgument;
        theForm.submit();
    }
}
-
Movable/Floating User Control
To make the user control movable when the user drags and drops the basket header, I added three client side events to the basket header DIV
Header_Divas below:onmousedown="begindrag(event)"when the user clicks mouse down (Start dragging)onmousemove= "mousepos(event)"when the user moves the mouse while he is clicking mouse down (Dragging)onmouseup="rel_drag(event)"when the user releases the mouse (Drop)
 <div id="Header_Div" onmousedown="begindrag(event)"
  onmouseup="rel_drag(event)" onmousemove= "mousepos(event)" style="cursor:hand;">

// Below is the JavaScript code for Div drag and drop

var drag = 0;     // a Boolean variable to determine the drag status
var xdif = 0;     // a variable to save the new X position for the basket
var ydif = 0;     // a variable to save the new Y position for the basket

function begindrag(event) {
    if (drag == 0) {
        floatingd = document.getElementById("whole_basket");

        prex = floatingd.style.left.replace(/px/, "");
        prey = floatingd.style.top.replace(/px/, "");

        drag = 1;

        xdif = Math.abs(event.clientX - prex);
        ydif = Math.abs(event.clientY - prey);
    }
}

// to move the basket during drag (mouse down and move)
function mousepos(event) {
    floatingd = document.getElementById("whole_basket");
    // to check that the mouse still down
    if (drag == 1) {
        floatingd.style.left = Math.abs(event.clientX - xdif) + "px";
        floatingd.style.top = Math.abs(event.clientY - ydif) + "px"; ;
    }
}

//when mouse up to release the basket
function rel_drag(event) {
    drag = 0;
}
// End drag and drop code
-
Resizable User Control
To make the user control resizable, I put two images (max.jpg and min.jpg) in the same place at basket header.
I toggle between them according to the user click. Once the user click minimizes, I hide the minimize image and change the basket size to minimum, then show the maximize image. And when the user clicks maximize, I hide the maximize image and change the basket size to maximum then show the minimize image.
In case of Maximize, I call the JavaScript functionshowdiv('Basket_body')and in case of Minimize, I call JavaScript functionhidediv('Basket_body').<img id="imgShow" alt="" src="Images/min.jpg" onclick="javascript:showdiv('Basket_body')" class="img_min_max" /> <img id="imgHide" alt="" src="Images/max.jpg" onclick="javascript:hidediv('Basket_body')" class="img_min_max" />

// This is the JavaScript code to make the user control resizable.
//
//to Minimize the user control
function hidediv(id) {
    document.getElementById(id).style.display = 'none';
    document.getElementById("whole_basket").style.height = '46px';
    document.getElementById("whole_basket").style.width = '130px';

    document.getElementById("imgShow").style.display = 'block';
    document.getElementById("imgHide").style.display = 'none';
}

// to maximize the user control
function showdiv(id) {
    document.getElementById(id).style.display = 'block';
    document.getElementById("whole_basket").style.height = '255px';
    document.getElementById("whole_basket").style.width = '270px';

    document.getElementById("imgShow").style.display = 'none';
    document.getElementById("imgHide").style.display = 'block';
}
// End Resizable Code
-
Embedded Style Sheet
I have used an embedded style sheet inside user control file because I tried to make it encapsulated as much as I can. From the style sheet, you can control the default position for your basket, size, color, etc.
<style type="text/css">
    #whole_basket
    {
	    left: 650px;       /* Default Left Position for the basket */
        top: 200px;             /* Default Top Position for the basket */
	    position:fixed;
	    width: 270px;
	    border-style:solid;
	    border-width:1px;
	    border-color:Red;
        overflow:auto;
        background-color: #FFFF99;
    }

    #Header_Div         /* Basket Header Div Style */
    {
        position:relative;
        height: 27px;
        vertical-align: middle;
        background-color: #EE3434;
    }

    .img_min_max            /* Minimize and Maximize image style */
    {
        left:3px;
        position:absolute;
    }

    .Basket_Header_Label    /*The style of basket Header label*/
    {
	    top:5px;
        left:30px;
        position:absolute;
        color :White;
        Font-Size:small;
    }

    #Basket_body            /* the style of basket content*/
    {
        position:relative;
        font-size: 11px;
        height: 200px;
        visibility:visible;
        background-color: #FFFF99;
    }

    .Column_header      /* Basket Column Header Product Name, Qty, Price */
    {
        color:Black;
        font-weight:bold;
    }

</style>
Point to Ponder (Why the Basket is Not Fully Client Side Script?)
I tried my best to make this user control fully client side (no post back to the server). But I failed, because as I believe it is needed to write some complex client code script. (like binding the cookie info to a table and doing the calculations).
So as a work around, I made the user control to be the only portion posted back to the server in case of adding or deleting products. And the user will not notice any flickering in the web page.
Moreover, you can consider this as business wise; because sometimes you need to post pack to the server to make sure that the products are still available.
Points of Interest
-
Basket Checked Out
Once the user finishes purchasing and presses "Submit", he will be redirected to a checked out page named submit.aspx to fill his details.
In your checked out page, you can read the purchased items in the same way as you are reading from basketpage_loadas mentioned above.protected void btnSubmit_Click(object sender, EventArgs e) { // To redirect the user once he finished shopping and press submit button Response.Redirect("submit.aspx", false); }
-
Basket in Fixed Place
Note that if you want to keep the basket in fixed place which is preferred, you have to remove only the JavaScript functions (
onmousedown="begindrag(event)"onmousemove= "mousepos(event)"onmouseup="rel_drag(event)") from the header DIVHeader_Div. -
About the Sample Application
In my sample application, I read the product info from XML file and bind it to
Gridviewcontrol to make it easy for anyone wanting to try it. But note that in real life scenario, it should be read from the database.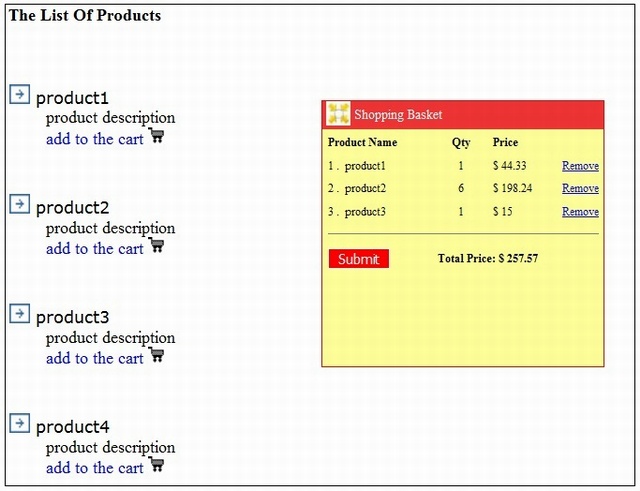
Finally
This is my first article on CodeProject. I hope it will be useful for many readers. I spent a lot of time and effort to develop this user control. Please feel free to comment or advice.
Browser Compatibility
This user control has been tested on Firefox 3.6, Internet Explorer 8 and Chrome 5.
References
Revision History
- 14 Jul 2010: Original article
- 17 Jul 2010: Formatted the article to be better and added more explanation based on readers' advice
- 21 Jul 2010: Added link to try live demo
- 30 Jul 2010: Fixed bug when the user removed all items from the basket and again added a new item
- 25 May 2011: Updated sample application and source code