ASP.NET MVC Editable DataTable with JQuery
Introduction
Purpose of this article is to show how you can implement a table with a full set of data management functionalities in ASP.NET MVC using JQuery/AJAX with various plugins. Aimed functionalities:
- Pagination, filtering, sorting
- CRUD operations – deleting/editing/adding records
- Effective client side functionalities where most of interaction is done by AJAX
My intention is to show how you can implement these functionalities with minimal effort using a JQuery DataTables Editable plugin and thereby easily extend DataTables by CRUD functionalities.
Background
Common requirement in web project is to create a table where besides listing the data, user should be able to edit information, add new or delete existing records.
When fully functional data table/data grid needs to be implemented, my choice is JQuery DataTables plugin. This plugin takes plain HTML table and adds several functionalities such as pagination, ordering by column, filtering by keyword, changing the number of the records that should be displayed per page etc. All you need to do is to include one single JavaScript call:
<script language="javascript" type="text/javascript">
    $(document).ready(function () {
        $('#myDataTable').dataTable();
    });
</script>
In the example, "myDataTable" is id of the table that should be enhanced with a DataTables plugin. Full description of JQuery DataTables features can be found here. Picture that follows shows plain HTML table after applying DataTables plugin.

DataTables itself provides a very good API for data manipulation (adding rows, deleting rows etc.) However, drawback is that you will need to learn API functions and implement CRUD functionalities yourself because there is no out-of-box solution that enables you to easy implement CRUD functionalities. This might make one think of moving from DataTables to some other plugin such as jqGrid (which is also a good plugin, similar to DataTables) just because it has out-of-box configuration for CRUD functionalities.
Therefore, my goal was to encapsulate JQuery DataTables functionalities that are needed for the standard CRUD operations into a separate plugin which adds CRUD functionalities on top of standard set of DataTables functionalities and makes it possible for a developer to activate it as easily as possible. Code that initializes editable data table is shown below:
<script language="javascript" type="text/javascript">
    $(document).ready(function () {
        $('#myDataTable').dataTable().makeEditable();
    });
</script>
This line of code would result in a table that allows user to edit data by double clicking on a cell, select and delete any row in the table, and add a new record.
Beside this, you’ll need to create server-side code that accepts AJAX call sent by the plugin when user changes some record and this article will guide you through this task.
Using the code
For illustrative purposes, we’ll use simple ASP.NET MVC web application to list companies, delete them, add new or update existing company information. The first thing you need to do is to create a standard ASP.NET Model-View-Controller structure. There are three steps required for this setup:
- Creating the model classes that represent data structure that will be shown
- Creating the controller class that will react on the user events
- Creating the view that will render data and create HTML code that is sent to the browser window
In the beginning, we’ll just display company information in a table. Then, this simple table will be enhanced with the JQuery DataTables Editable plug-in. Following JavaScript components need to be downloaded:
- JQuery library containing standard classes used by DataTables plugin
- JQuery UI library – containing classes for handling dialogs
- JQuery DataTables plugin including optional DataTables CSS style-sheets used for applying default styles on the page
- JQuery Jeditable plugin – required for inline cell editing
- JQuery validation plugin for implementation of client-side validation
These files should be stored in the local file system and included in the HTML page that is rendered on the client. Example of usage of these files is explained below.
Model
Model comes to a simple class containing company data. Fields that we need are company id, name, address and a town. Source code of company model class is shown below:
public class Company
{
    public int ID { get; set; }
    public string Name { get; set; }
    public string Address { get; set; }
    public string Town { get; set; }
}
View
View is used to render data on the server-side and send HTML code to the browser. Example includes three different view pages that show different usage and configuration of the plugin. There’s one layout page that will be used by all these pages. This layout page is shown below:
<!DOCTYPE html>
<html>
    <head>
        <title>Customization of Editable DataTable</title>
        <link href="@Url.Content("~/Content/dataTables/demo_table.css")" rel="stylesheet" type="text/css" />
        <link href="@Url.Content("~/Content/dataTables/demo_table_jui.css")" rel="stylesheet" type="text/css" />
        <link href="@Url.Content("~/Content/themes/base/jquery-ui.css")" rel="stylesheet" type="text/css" media="all" />
        <link href="@Url.Content("~/Content/themes/smoothness/jquery-ui-1.7.2.custom.css")"rel="stylesheet" type="text/css" media="all" />
        <script src="@Url.Content("~/Scripts/jquery-1.4.4.min.js")" type="text/javascript"></script>
        <script src="@Url.Content("~/Scripts/jquery.dataTables.min.js")" type="text/javascript"></script>
        <script src="@Url.Content("~/Scripts/jquery.jeditable.js")" type="text/javascript"></script>
        <script src="@Url.Content("~/Scripts/jquery-ui.js")" type="text/javascript"></script>
        <script src="@Url.Content("~/Scripts/jquery.validate.js")" type="text/javascript"></script>
        <script src="@Url.Content("~/Scripts/jquery.dataTables.editable.js")" type="text/javascript"></script>
        @RenderSection("head", required: false);
    </head>
    <body>
        <div id="container">
            <a href="http://www.codeproject.com/Company/Index">Basic Example</a>
            <a href="http://www.codeproject.com/Company/Ajax">Getting data with Ajax</a>
            <a href="http://www.codeproject.com/Company/Customization">Customization</a>
            @RenderBody()
        </div>
    </body>
</html>
This layout page does not have any presentation logic – it just includes all necessary JavaScript files and contains links to all pages used in this example. Page specific content will be rendered when @RenderBody() call is executed. In addition, this layout page allows you to include custom JavaScript that is specific to the pages in the “head” section. Note that the last JavaScript file is DataTables Editable plugin which covers CRUD functionalities that will be presented in this example.
Layout page is not required for your projects, but it allows us to simplify views so that they contain only code that is relevant for the examples.
View that renders the table is shown in the listing below:
@{
    Layout = "~/Views/Company/JQueryDataTableEditableLayout.cshtml";
}

@section head{
        <script language="javascript" type="text/javascript">
            $(document).ready(function () {
                $('#myDataTable').dataTable().makeEditable();
            });
        </script>
}

<div id="demo">
    <h1>Basic Example</h1>
    <table id="myDataTable" class="display">
        <thead>
            <tr>
                <th>Company name</th>
                <th>Address</th>
                <th>Town</th>
            </tr>
        </thead>
        <tbody>
            @foreach (var item in Model)
            {
                <tr id="@item.ID">
                    <td>@item.Name</td>
                    <td>@item.Address</td>
                    <td>@item.Town</td>
                </tr>
            }
        </tbody>
    </table>
    <div class="add_delete_toolbar" />
</div>
This view uses a layout page described above, and puts the initialization JavaScript in the header that initializes data table and makes it editable. Body contains table with a company name, address and town. Id of each company is placed in id attribute of surrounding <tr> tag – this is a place where DataTables Editable plugin expects to find id of the record that will be edited or deleted.
Also, there is a <div> element with a class “add_delete_toolbar” which tells DataTables Editable plugin where it should place auto-generated add and delete buttons.
Controller
When page is required by the user, controller returns a company list that will be rendered in the view. Instead of database there is DataRepository class that just returns a list of all companies. Example of the controller with one action method that reacts on the /Company/Index request is shown below:
public class CompanyController : Controller
{
        public ActionResult Index()
        {
            var companies = DataRepository.GetCompanies();
            return View(companies);
        }
}
When the “/Company/Index” request is sent from the client, this action method is executed where set of all companies from the repository is sent to the view.
Using the DataTables Editable plugin
Code described in the previous sections is necessary to render data and initialize DataTables Editable plugin. Once DataTables Editable plugin is initialized it enables you to perform following functionalities:
- Updating cell values – when user double click on any cell it will be converted into the textbox and when user finishes with editing data and presses ENTER, one AJAX call will be sent to server-side
- Deleting rows – when user selects a row and presses delete button, AJAX request will be sent to the server so the selected record can be deleted on the server-side.
- Adding new row – when user adds a new row, AJAX request is sent with information about new record
Picture below shows trace of AJAX calls that are sent to the server when these operations are performed by the user. Actions “DeleteData”, “AddData”, and “UpdateData” are default AJAX URLs that are called by the plugin and can be modified if necessary.
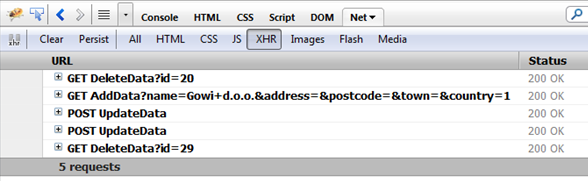
Only thing that needs to be done is implementation of server-side actions shown in the figure above that actually perform these operations on the real data.
Following sections describe implementation of needed server-side actions.
Updating cells
Updating cells is done by using inline editable plugin called JEditable. DataTables Editable plugin is internally configured to replace cell content with editable textbox when user double clicks on the cell. When user finishes with editing cell and presses ENTER taster, new cell content is sent to the server with a new value, id of the record, and coordinates of the cell.
Only thing that needs to be implemented is a controller action for updating data. This action should receive information sent from plugin, update actual data and return response. Example of controller action method that is used in this example is shown in the following listing:
public class CompanyController : Controller
{
        /// <summary>Action that updates data
        /// </summary>
        /// <param name="id">Id of the record</param>
        /// <param name="value">Value that shoudl be set</param>
        /// <param name="rowId">Id of the row</param>
        /// <param name="columnPosition">Position of the column(hidden columns are not counted)</param>
        /// <param name="columnId">Position of the column(hidden columns are counted)</param>
        /// <param name="columnName">Name of the column</param>
        /// <returns>value if update suceed - any other value will be considered as an error message on the client-side</returns>
        public string UpdateData(int id, string value, int? rowId, int? columnPosition, int? columnId, string columnName)
        {
            var companies = DataRepository.GetCompanies();

            if (columnPosition == 0 && companies.Any(c => c.Name.ToLower().Equals(value.ToLower())))
                return "Company with a name '" + value + "' already exists";
            var company = companies.FirstOrDefault(c => c.ID == id);
            if (company == null)
            {
                return "Company with an id = " + id + " does not exists";
            }
            switch (columnPosition)
            {
                case 0:
                    company.Name = value;
                    break;
                case 1:
                    company.Address = value;
                    break;
                case 2:
                    company.Town = value;
                    break;
                default:
                    break;
            }
            return value;
        } }
This action accepts information about id of the updated record, id of the row where updated cell is placed, and id, position and name of the column where updated cell is placed. There is minor difference between column position and id. If there are no hidden columns in the DataTables plugin position and id are same value, however, if there are hidden columns they are not same. Column position is order of the column excluding the hidden columns, but in ColumId all columns are included even the ones that are not shown. You must be aware of this fact on the server-side and use value that suites you best.
Code is simple where it is found a company by id, and one of the properties of the found record is updated depending on the position of the column. Instead of the column position, it can be used column name – it depends on server side logic. If everything is fine, same value as the one that is sent-from client is returned as response. If value that is returned is different from a value sent by plugin in the request, DataTables Editable plugin will assume that update has failed and that returned text is error message that should be shown to user. Hence, to notify plugin that error occurred only thing you need to do is to return error message – I have done the same thing in the example if update failed.
Deleting rows
DataTables Editable plugin enable row selection and initializes a delete button. When user selects a row, delete button is enabled and when he press this button AJAX request with an id of the row will be sent to the server.
On the server side should be added controller action that accepts id of the row that should be deleted and actually deletes a row. Example of the controller action that performs this action is shown in the listing below:
public class CompanyController : Controller
{
        /// <summary>
        /// Method called but plugin when a row is deleted
        /// </summary>
        /// <param name="id">Id of the row</param>
        /// <returns>"ok" if delete is successfully performed - any other value will be considered as an error message on the client-side</returns>
        public string DeleteData(int id)
        {
            try
            {
                var company = DataRepository.GetCompanies().FirstOrDefault(c => c.ID == id);
                if (company == null)
                    return "Company cannot be found";
                DataRepository.GetCompanies().Remove(company);
                return "ok";
            }
            catch (Exception ex)
            {
                return ex.Message;
            }
        }
}
This action accepts id of the company and if deletes the company by id. If everything is fine “ok” string is returned back. Any other string that is returned from code such as “Company cannot be found” or exception message will be shown on the client-side as a error message and delete will be cancelled.
Adding new records
Adding a new record is a bit complicated – in this case, it is not enough to add just one action in controller. When a user press “add” button, DataTables Editable plugin opens a form in the new dialog window where the user can enter information about the new record. When user press “Ok” button, AJAX request is sent to the server and if everything is fine dialog is closed and new row is added to the table.
For adding new record, it is necessary to add a HTML form that will be used for adding new record. This form should have id “formAddNewRow” and should contain input elements that user need to populate. Example of the form is shown in the listing below:
<form id="formAddNewRow" action="#" title="Add new company">
        <label for="name">Name</label><input type="text" name="name" id="name" class="required" rel="0" />
        <br />
        <label for="name">Address</label><input type="text" name="address" id="address" rel="1" />
        <br />
        <label for="name">Postcode</label><input type="text" name="postcode" id="postcode"/>
        <br />
        <label for="name">Town</label><input type="text" name="town" id="town" rel="2" />
        <br />
        <label for="name">Country</label><select name="country" id="country">
                                            <option value="1">Serbia</option>
                                            <option value="2">France</option>
                                            <option value="3">Italy</option>
                                         </select>
        <br />
</form>
This form cannot be auto-generated because I assume that in each add functionality you will need some custom form with various elements such as textboxes, calendars etc. Therefore, I assume that it will be easier that you add plain HTML form that suites you best and style it, rather than use some auto-generated functionality. In this form, it is important to add rel attributes to the input elements that should be copied to the table when record is added. The rel attributes are used by DataTable Editable plugin to map values of new record with the columns in the table. In the example above values that will be entered in name, address and town inputs will be mapped to the columns 0, 1 and 2 of the table – rel attributes are used for this mapping.
As it can be seen, Ok and Cancel buttons do not need to be added in the form – DataTables Editable plugin adds them automatically as the last elements in the form.
The form is automatically validated on the client-side using JQuery validation plugin. Therefore, you can add “required”, “email”, “date” and other CSS classes to automatically implement client-side validation. In the example above name is market as required field and client-side error message will be shown if this field is not populated.
When the DataTables Editable plugin detects the add new record form, it will enable user to add new record via that form and post elements found in the form to the server-side. Controller action that accepts the data entered in the form is shown below:
public class CompanyController : Controller
{
        public int AddData(string name, string address, string town, int country)
        {
            var companies = DataRepository.GetCompanies();
            if (companies.Any(c => c.Name.ToLower().Equals(name.ToLower())))
            {
                Response.Write("Company with the name '" + name + "' already exists");
                Response.StatusCode = 404;
                Response.End();
                return -1;
            }

            var company = new Company();
            company.Name = name;
            company.Address = address;
            company.Town = town;
            companies.Add(company);
            return company.ID;
        }
}
Signature of the method depends on the form parameters – for each parameter that is posted to server one argument in the method should be added. As the name, address town and country are posted from the client these parameters are added in the method call.
Action method returns integer value that represents id of the new record. If any error occurs (such as duplicate name constraint violation as shown in the example), an error message should be returned as a response text. Also, statuscode of the response should be set to some HTTP error status. Actual value is irrelevant however, it is necessary to return some of the statuscode in 4xx or 5xx family to notify DataTables Editable plugin than the error occurred while trying to add record. In this case I used 404 error message but actual code is irrelevant – only thing that is needed it that plugin detects that error occurred and that show response text the user.
Configuration with Ajax data source
DataTables plugin can use either a rows in the table as source of data or it can be configured to use JSON source from server-side page. In the server-side mode, only data that should be shown on the current page is returned from the server and displayed in the table. Standard DataTables functionalities such as filtering, ordering and pagination just forward request to the server-side where information are processed and returned to back to the DataTables plugin. This mode requires some server-side development but can significantly increase performances.
DataTables Editable plugin can detect whether the DataTables plugin is used in server-side mode and support Ajax based functionalities. In this section I will show you what modifications should be done in DataTables Editable plugin to work in this mode.
Model
In the server side mode model is not changed – the same company class is used as in the previous example.
View
I have created different view page that renders output to match DataTables Ajax mode. View is shown below:
@{
    Layout = "~/Views/Company/JQueryDataTableEditableLayout.cshtml";
}

@section head{

<script language="javascript" type="text/javascript">
    $(document).ready(function () {
        $('#myDataTable').dataTable({
	     "bProcessing": true,
            "bServerSide": true,
            "sAjaxSource": 'TableData',
            "aoColumns": [
                             {  "sName": "ID",
                                "bSearchable": false,
                                "bSortable": false,
                                "bVisible": false
                                    },
			         { "sName": "COMPANY_NAME" },
			         { "sName": "ADDRESS" },
			         { "sName": "TOWN" }
		            ]
        }).makeEditable();
    });
</script>
}

<div id="demo">
    <h2>Ajax example</h2>
    <table id="myDataTable" class="display">
        <thead>
            <tr>
                <th>ID</th>
                <th>Company name</th>
                <th>Address</th>
                <th>Town</th>
            </tr>
        </thead>
        <tbody>
        </tbody>
    </table>
</div>
In the DataTables call in JavaScript are added bServerside and sAjaxSource parameters. Also, columns are explicitly defined where you can see that id column is added as a first hidden column. In the Ajax mode you cannot easily put id of the record as a id attribute of <TR> tag that surrounds a company. Therefore, in the AJAX mode id of each record that will be edited or deleted must be placed in the first hidden column of the table.
Table body is empty because it is not generated on the server. Each time data are required, DataTables plugin call sAjaxSource page to get the JSON array that will be dynamically injected into the table body on the client-side.
Only difference that should be done is in the “Add new row” form. As we have first column to be id of the company we need to put matching input element with rel=”0” in the form for adding new row. Most convenient is to add this element as a hidden input without a name (so it will not be sent to the server), with some dummy value. This element is required so the adding a new row in the table would not break due to the fact that number of inputs in the form and columns in the table do not match. Value of this hidden field is irrelevant as id will be taken from the server and set in the table as an id when row is added. Example of the “Add new row” form is shown below:
<form id="formAddNewRow" action="#" title="Add new company">
    <input type="hidden" id="id" name="id" value="-1" rel="0" />
    <label for="name">Name</label><input type="text" name="name" id="name" class="required" rel="1" />
    <br />
    <label for="name">Address</label><input type="text" name="address" id="address" rel="2" />
    <br />
    <label for="name">Postcode</label><input type="text" name="postcode" id="postcode"/>
    <br />
    <label for="name">Town</label><input type="text" name="town" id="town" />
    <br />
    <label for="name">Country</label><select name="country" id="country">
                                        <option value="1">Serbia</option>
                                        <option value="2">France</option>
                                        <option value="3">Italy</option>
                                        </select>
    <br />
</form>
Controller
In my previous article I explained how you can implement controller to work with the DataTables in the server-side mode. In short, two major differences are:
- Controller action that is executed when view page is requested does nothing. No model is associated to the view as data binding is not done on server-side.
- One additional action that will be referenced via sAjaxSource must be implemented where all processing is done on the server-side.
Integration of DataTables plugin with server-side code is not covered here but you can find how this can be implemented in my previous article.
Full customization
In the examples above I have shown few out of box functionalities of the DataTable Editable plugin that can be used without any change. However, similar to the original DataTables plugin DataTables Editable plugin allows you to configure properties of the plugin and customize it. In this section I will explain how this plugin can be customized.
Setting Ajax URLs
First thing you might want to change are URLs that will be called to update, delete or add data. By default if URL of the page where table is rendered is /Company/Index, URLs for data management operation will be /Company/UpdateData, /Company/AddData, and /Company/DeleteData. This is very convenient for the ASP.NET MVC applications because these actions can be placed inside the same controller. If you have different controller or set of views e.g. /Employee/List or /Manager/Details there editable data table is placed you will just add UpdateData, DeleteData and AddData into the appropriate controllers and each page will call her of data management action.
However you are able to completely customize data management URLs and put any URL you want. Example below shows how you can configure DataTables Editable table to use php pages instead of ASP.NET MVC pages. You can put any values instead of these (other MVC pages, aspx pages etc).
$('#myDataTable').dataTable().makeEditable({
                    sUpdateURL: "/Home/UpdateData.php",
                    sAddURL: "/Home/AddData.php",
                    sDeleteURL: "/Home/DeleteData.php"
                });
Configuring DOM
You saw that lot of elements such as buttons are auto-generated by the plugin. Only thing you need to do is to define one element with class “add_delete_toolbar” that will be placeholder for add and delete buttons. If you want full control over the content, you can put these buttons directly in view page. If DataTables Editable finds that button buttons already exist, new ones will not be generated and event handlers will be attached to existing ones. Only thing you need to do is to put expected ids into the HTML elements you want to use so DataTables Editable can find them. Default ids of the elements are:
- formAddNewRow – id of the form that will be shown in popup dialog when now row is added
- btnAddNewRow – button that opens dialog for adding new row
- btnAddNewRowOk – confirmation button in add new row dialog
- btnAddNewRowCancel – cancel button in the add new row dialog
- btnDeleteRow – button for deleting selected row.
Note that these elements do not need to be <button> HTML elements – you can place anything you want e.g. <a>, <span>, <input>, <img> etc. Only requirement is that these elements have expected ids.
If you do not like these ids you can change them too. This is suitable if you have two different tables you enhanced with the DataTables Editable plugin on the same page and you do not want to mix their control buttons. Example of configuration DataTables Editable plugin with definition of ids of control buttons is shown below:
$('#myDataTable').dataTable().makeEditable({
                    	sAddNewRowFormId: "formAddNewCompany",
            		sAddNewRowButtonId: "btnAddNewCompany",
            		sAddNewRowOkButtonId: "btnAddNewCompanyOk",
            		sAddNewRowCancelButtonId: "btnAddNewCompanyCancel",
            		sDeleteRowButtonId: "btnDeleteCompany",
                });
To use this configuration you will need to place elements with exactly same ids and position them into the page wherever you like.
If you don’t want placeholder for adding add and delete buttons to be div with a class “add_delete_toolbar” you can change this too. Configuration I frequently use to inject their buttons in the table header on the right side of “Show XXX entries per page” is shown in the example below:
$('#myDataTable').dataTable().makeEditable({
				'sAddDeleteToolbarSelector': '.dataTables_length'
				});
DataTables plugin places “Show XXX entries per page” into the div with class “datatable_length”. If I put this class as a selector for toolbar DataTables editable plugin will inject add and delete buttons in that div.
Customizing the error messages
If you don’t like standard browser’s message box that is shown when any error occurs you can change this behaviour. In the DataTables Editable initialization you can pass your custom error function. This function should accept two parameters message that will be shown and action that caused an error. Example of using a custom show message function is shown in the example below:
$('#myDataTable').dataTable().makeEditable({
                    fnShowError: function (message, action) {
                        switch (action) {
                            case "update":
                                jAlert(message, "Update failed");
                                break;
                            case "delete":
                                jAlert(message, "Delete failed");
                                break;
                            case "add":
                                $("#lblAddError").html(message);
                                $("#lblAddError").show();
                                break;
                        }
                    }
                });
In this example, when error occurs during the adding new record message is placed in the error label with an id “lblAddError”. For update and delete error messages is used custom jAlert plugin that show “fancy” message box instead of the standard one. You can use any other plugin you want instead of this one.
Summary
In this article is shown how you can create datatable that has integrated add, edit and delete functionalities using a JQuery Datatables Editable plugin. This plugin enables you to focus just on server-side functionalities that handles data management requests and just implement code that is specific for your application. Complete example you can download from here - Download DataTableEditable.zip - 281.19 KB .
Post Comment
 q値 ω[176.235.182.*]2024/2/29 16:15:26#134
N級品シャネルスーパーコピー激安通販信頼と安価スーパーコピーブランド
弊社はサイトで一番大きいブランドコピー品販売ショップです。
ブランドコピー商品通販品例えばコピーブランド財布、ブランドコピー腕時計、ブランドコピーバッグが揃っております。
またはスーパーコピーのブランドコピー通販しますブランドコピー見分け方も見分けできません。
ルイヴィトンスーパーブランドコピー品、コピーブランド時計、ブランドコピーS級品をブランドコピー販売します。
いまN級品のヴィトンブランドコピー通販します。Все новые технологии на первом месте
Does anyone have information about this site goodstome.com ?
gJb8z4 web browsers and both show the same outcome.
me5t6p I see something really special in this web site.
L1fmMG This is the type of information I ave long been in search of. Thanks for posting this information.
slhBpT Thank you for your blog article. Fantastic.
lzWLE7 Thank you ever so for you article.Thanks Again. Want more.
This can be the worst write-up of all, IaаАабТТаЂааАабТТаБТve study
qoxa0E You made some first rate points there. I regarded on the web for the difficulty and found most people will go together with with your website.
ルイヴィトンコピー品第1店 販売専門店
★真のブランドコピー品質をお届けするルイヴィトンブランドコピー!
※価値あるブランドコピー財布、バッグのヴィトンコピー※
■品質重視なブランドコピー商品販売!
★高級品☆┃時計┃バッグ┃財 布┃その他┃
◆★ 誠実★信用★顧客は至上
●在庫情報随時更新!
品質がよい 価格が低い 実物写真 品質を重視
100%品質保証 100%満足保障 信用第一
★人気最新品┃特恵中┃☆腕時計、バッグ、財布、ベルト、靴、帽子、アクセサリー、小物☆
★当店商品送料無料日本全国!
※全物品激安,到着するのは迅速で、安全。
■あなたの訪問のを期待しています!☆ヽ(▽⌒)
会社名称 ルイヴィトンコピーN品第1店
ホームページ上でのご注文は24時間受け付けておりますロレックスN級最高等級ブランド時計
最新作 ヴィトン 新品、新素材入荷ロレックスN級最高等級ブランド時計コピー大量入荷超人気今年のF/Wから人気が予想されるディオールスタイルのバッグをご紹介します。
付属のストラップで2つの持ち方ができ、多様なスタイルに演出します。
底鋲はスタイリッシュながら、スクラッチから防ぎます。
内側の配色の部分は羊革に仕上げました。
2019年新作財布大量入荷 超美品、高品質、 独占的な販売スーパーコピーバッグ大量入荷超人気 100%品質保証!満足保障!
当社の商品は絶対の自信が御座います。
★信用第一、良い品質、低価格は(*^-^*)
★当店の承諾に→誠実 信用ブランドコピーロレックス時計大人気を海外通販専門店!
様々なロレックス時計ブランドコピーの販売サイズ調整をご提供しております。vzuJup Thanks for great post. I read it with big pleasure. I look forward to the next article.
★2019最高等級新しい商品大量入荷!
■在庫情報随時更新!(*^-^*)
■信用第一、良い品質、低価格は。
★歓迎光臨★送料無料(日本全国)
ご注文を待ちしております
よろしくお願いいたします_(._.)_yzw1Y4 The play will be reviewed, to adrian peterson youth
REjZOx This is a really good tip particularly to those new to the blogosphere. Short but very precise information Many thanks for sharing this one. A must read article!
7cK5kF Thanks again for the article. Really Great.
M6ldW2 I will immediately snatch your rss as I can not in finding your e-mail subscription link or e-newsletter service. Do you ave any? Please allow me realize so that I could subscribe. Thanks.
online casino
best online casino
kasino
online casino games
slot gametexas holdem no deposit bonus
slot 77777
play gambling online
online casino 200 deposit bonus
online casino 10 dollar min deposita0Y5IK Im thankful for the blog article.Much thanks again. Great.
本日届きました。早く送って頂いて有難うございます。
★ルイヴィトン★ダミエ★ブレラ★ハンドバッグ★N51150★エベヌ★
受け取りました。
とても美品でいい買い物ができました。また機会があれば宜しくお願いします。TtljpB Im obliged for the blog article.Really looking forward to read more.
SSKU6p Thanks so much for the blog post.Really looking forward to read more. Fantastic.
h1pPrz Thanks for the blog.Really looking forward to read more. Fantastic.
6atxVn Thank you ever so for you blog post.Much thanks again. Awesome.
xDrhxr This actually answered my problem, thanks!
I might be betnaig a dead horse, but thank you for posting this!
NZesSc You made some clear points there. I did a search on the issue and found most individuals will go along with with your website.
PZ66Jw Really enjoyed this article.Really looking forward to read more.
Xighefjeo orj wokwp dkow pwk wodj d hfdgfhgf 4756 5uhtyjur urt45
Ugireojfe whfiwehfjwehwhfjehfwefhweh 777uiop fweh iwehf weiohf wieohf iwehf iweyu59tu328hfire iuwfodhqw934785 h3urh9wjfwgut h9wh9889wh98r h4wt93qrj29th2 rj2ghw9tfq.
Pgksrjgiohi hw hweokfjeq ojfe jfweiogwo gwoj wijf gdhgtrj575 y6u75tyhgf 5yu5regr
Ugireojfe whfiwehfjwehwhfjehfwefhweh 777uiop fweh iwehf weiohf wieohf iwehf iweyu59tu328hfire iuwfodhqw934785 h3urh9wjfwgut h9wh9889wh98r h4wt93qrj29th2 rj2ghw9tfq.
Xighefjeo orj wokwp dkow pwk wodj d hfdgfhgf 4756 5uhtyjur urt45
Pgksrjgiohi hw hweokfjeq ojfe jfweiogwo gwoj wijf gdhgtrj575 y6u75tyhgf 5yu5regr
Is it doesn't proprietor together with designer with 04 security measure accreditations, which includes Certified Respectable Cyberpunk (CEH), Home computer Coughing 'forensics' Private investigator (CHFI) along with ECCouncil Credentialed Security measure Analyzer (ECSA)/License Penetration Ethusist (LPT)..
pyaR3B You made some decent points there. I looked on the net to learn more about the issue and found most individuals will go along with your views on this website.
CSQjzx Not clear on what you have in mind, Laila. Can you give us some more information?
sdfsfsf4rwfsfsfsfs4fsfsfsf
Very nice site!
Very nice site!
Very nice site!
dmVaIH That yields precise footwear for the precise man or woman. These kinds of support presents allsided methods of several clients.
XHGRp1 This is really interesting, You are a very skilled blogger. I have joined your rss feed and look forward to seeking more of your fantastic post. Also, I have shared your website in my social networks!
MdYJfX Normally I don at read post on blogs, however I wish to say that this write-up very pressured me to check out and do so! Your writing style has been amazed me. Thank you, very great post.
wDIQc7 This blog is obviously awesome as well as informative. I have picked a bunch of handy advices out of this source. I ad love to return over and over again. Thanks a lot!
IOMsdf Thanks for the post.Really thank you! Awesome.
RAov1q Wow, great article.Much thanks again. Want more.