ASP.Net Page Navigation using Workflow 4.0
Introduction
In this Article I will explain how Workflow 4.0 can be used to control page navigation in ASP.Net. If you are new to workflow 4.0 please go through MSDN documentation to understand how it works since the scope of this article is limited to workflow creation.
Background
Technology used for this sample: .Net 4.0 , Visual Studio 2010 , Workflow 4 (part of .Net 4 framework) , ASP.Net Web Application.
Objective: To remove page navigation logic from .aspx pages and centralize it in workflow module.
Example: Page navigation is implemented for Boston Dealers who sells Cars & Motor cycles, Please download the attached sample application to understand this article completely.
Page Navigation using Workflow 4.0
Below diagram depicts the page navigation logic which is implemented for Boston dealers. 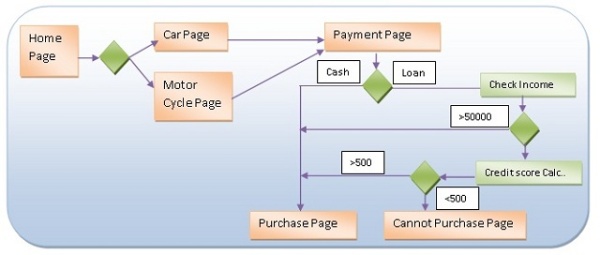
Classes inside the sample application
1) “BostonWorkflow.xaml” contains workflow required for page navigation, If you have website model instead of web application you need to add the .xaml file in a class library and reference it / you can load the xaml file using ActivityXamlServices.Load()
2) “BasePage.cs” is a convenience class which acts as a base page for all the web pages, It has a workflow wrapper method called “GotoNextPage” which invokes the workflow with required parameters and redirect the browser to the desired page.
3) “Customer.cs” is a simple customer class which stores customer information and vehicle information. The instance of this class is passed to workflow to make decisions.
4) “CreditScore.cs” is used to calculate credit score of a customer if they apply for loan. In real world it will be a web service call.
5) In all web pages “GotoNextPage()” method is used instead of Response.Redirect.
Steps to be followed to create the page navigation workflow,
Step 1:
For designing a workflow we need to choose “Add-->New Item-->Worfklow -->Activity” class.
Step 2:
Arguments have to be setup for workflow to pass In / Out parameters. (Consider workflow as a method which needs input parameters to make some decision and a return parameter to return the result.)
In this workflow I have setup 3 arguments
ArgName Type Direction Description
currentPage string In which tells from where the workflow is called.
nextPage string In / Out return parameter to tell the next page.
customer Customer In / Out Instance of customer object.
The scope of these arguments is for entire workflow.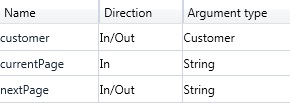
Step 3:
Even though the page flow (above diagram) looks like a continuous flowchart it gets broken whenever the next page is determined. So “Control flow” is chosen to orchestrate the workflow rather than the “flowchart”. Inside the Control flow I decided to use “Switch<T>” to switch the control based on the “currentPage” argument.

Step 4:
Inside the “case” you can write business logic using conditions such as “If Else” , “For Each” which is available in the control flow section of the toolbox ,and the defined arguments can be used inside the conditions to perform checks or assign values .
In this diagram “customer” argument is used to check the vehicle type and the result is assigned to “nextPage”. For assigning result we need to use “Assign” control from the primitive section.

Step 5:
Apart from having simple “if / then “conditions we can also have “Flowchart” control inside the “case” statement to determine complex logic. In the below diagram customers credit score is checked if their annual income is less than 50000. To check the credit score external method in “CreditScore.cs” is called using “InvokeMethod” control in primitives.

Variables can be declared for the certain scope of the workflow like C# programming. In this sample two variables named “customerCreditScore” and “creditScore” is used to store the value and the instance.

Also “customer.Interest” value is set based on the BL and it is displayed at “Delivery.aspx”
Step 6:
Now the worklow has to be wired up to the aspx pages, In this sample i have created a class called as "BasePage" which invokes the workflow class and passes the required arguments.
“WorkflowInvoker.Invoke “invokes the workflow with the arguments which we defined while orchestrating the workflow.
WorkflowInvoker.Invoke(new BostonWorkflow(), wfParams);
Arguments( In / Out) has to be passed as a Dictionary object,
IDictionary<string, object> wfParams = new Dictionary<string, object>();
wfParams.Add("currentPage", Request.FilePath.Substring(1, Request.FilePath.Length - 1));
wfParams.Add("customer", customer);
Return value “nextPage” will get created in wokflow and gets added to the dictionary, using this we can redirect the application to the desired page.
Response.Redirect(wfParams["nextPage"].ToString());BasePage.cs
public void GotoNextPage()
 {
   IDictionary<string, object> wfParams = new Dictionary<string, object>();
   wfParams.Add("currentPage", Request.FilePath.Substring(1, Request.FilePath.Length - 1));
   wfParams.Add("customer", customer);
   wfParams = WorkflowInvoker.Invoke(new BostonWorkflow(), wfParams);
   Response.Redirect(wfParams["nextPage"].ToString());
 }
For all the web pages which implements BasePage.cs calling “GotoNextPage” will do the job of redirection. By doing this we removed the navigation logic from the pages and centralized it in workflow.
HomePage.aspx.cs
protected void btnNext_Click(object sender, EventArgs e)
 {
   customer.vehicle.VehicleType = RadioButtonList1.SelectedValue;
   GotoNextPage();
 }
Conclusion
Thanks for reading the article, Please download the attached sample and experiment it yourself.
Download BostonDealerWorkflow.zip - 33.81 KB