Google Chrome Extension - CodeProject Reputation Watcher
- Extension installation link - Installation served from author's website (packaged extension)
- Download source code V1.6 - 184.28 KB (unpackaged extension)

Introduction
This article was written as a result of me wanting to try some new topics. In order to try these new topics, it would be better to try and develop a functioning component rather than just play about with code syntax.
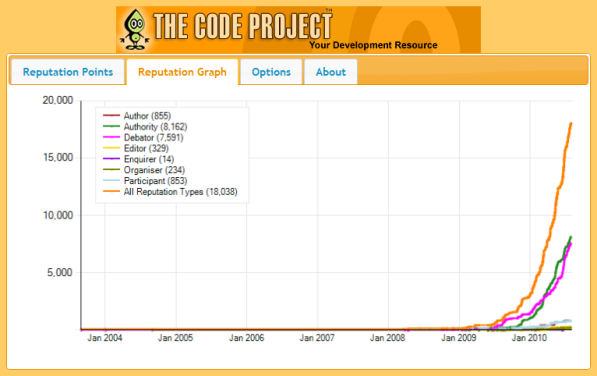
This article will explore how to put together a Google Chrome Extension, and also how I utilised jQuery and jQuery UI in building the extension. So what will this extension do? This extension can recover the source of a user's CodeProject profile page and scrape out their reputation points. The extension stores these points locally, and compares the changes between polls to The Code Project, and then presents this information in a nice little table. The extension can also recover the member's reputation graph and display this in the extension.
Background
The information required in building this extension can be found on Google Chrome Extension pages. For information relating to jQuery and jQuery UI, see here and here.
The Chrome Extension
Chrome Extensions are effectively a collection of HTML files with fully embedded JavaScript and CSS, or can link out to other JavaScript, CSS, and image files. In order for Chrome to know what to do with all these files and how to present it to the user, a manifest file in the root of the project defines the various elements. The manifest file must be named 'manifest.json'.
Let's take a look now at the manifest file crafted for this extension:
{
  "name": "CodeProject Reputation Watcher",
  "version": "1.6",
  "description": "Extension to retrieve a CodeProject accounts reputation points.",
  "icons":{"48":"images/bob48.png",
  "128":"images/bob128.png"},
  //Define any icon sizes and the files that you want to use with them. 48/128 etc.

  "browser_action": {
    "default_icon": "images/bob.png",
    // What icon do you want to display on the chrome toolbar
    "default_popup": "cprepwatch.html"
    // The page to popup when button clicked.
  },
  "options_page": "options.html",
  // Page to handle the options for the extension
  "permissions": [
    "http://*.codeproject.com/"
    // Cross Site Access Requests
  ],
  "update_url": "http://www.dave-auld.net/ChromeExtensions/CPRepWatcher/updates.xml"
  // Auto Update location
}
There are some basic attributes like 'name', 'version', and 'description', which are self-explanatory. The 'icons' element defines which images are available for use by the extension; these appear in the Chrome Extensions page when it is installed.
The 'browser_action' element tells Chrome which icon to show in the toolbar and which HTML file is the main popup when the extension icon is clicked.
The 'options_page' element tells Chrome which HTML page will be displayed to allow the user to set any options/user settings used by the extension. This page is accessed from the Options menu displayed when the toolbar button is right-clicked, or from the Options link on the Chrome Extensions page accessed from the Tools menu of Chrome.
The 'permissions' element defines which site the extension wants to access, and is used by the cross site security model.
The 'update_url' element defines the XML file used by the Auto Update tool to check for newer revisions of the extension. As this is being hosted privately, it points to the distribution server and not any of Google's servers.
There are several other elements that can be added to the manifest file depending on your requirements; there are details of these on the Chrome Extensions developers page.
Adding jQuery and jQuery UI
To make use of these JavaScript libraries, you need to download them first from the developers site, here, and here. On the jQuery UI site, there are also a number of predefined themes that can be used with the UI elements, and you can also create your own using the website's theme generator. After you have downloaded the zip files with the libraries and themes, unpack these and add them to your project folder. Every page that wants to make use of these libraries must have them linked in the HTML. This is easily achieved using standard markup.
<link type="text/css"
      href="css/custom-theme/jquery-ui-1.8.2.custom.css" rel="Stylesheet" />
<script type="text/javascript" src="jquery/jquery-1.4.2.min.js"></script>
<script type="text/javascript" src="jquery/jquery-ui-1.8.2.custom.min.js"></script>
<script type="text/javascript" src="js/cpjshelper.js"></script>
You will also notice that there is a reference to a 'js/cpjshelper.js' JavaScript file. As the extension was developed, common shared helper functions were moved out to this file, to maximise code re-use and keep the HTML files neater.
Why Use jQuery?
jQuery provides an excellent method for manipulating and traversing the DOM. It certainly made things very easy once I had got my head round the syntax, which doesn't take too long. Here are some basic examples of what it can do:
//Insert some HTML into a Div element named 'holdingdata'
$("#holdingdata").html("the html markup would go here");
$("#anElement").hide();        //Hide an element
$("#anElement").show();        //Show an element
$("p").each(function(){ $(this).hide();});
//Find all 'p' tags and hide them
The jQuery command below executes a function when the browser document has loaded. The function sets up a timer which calls another function after a period of time. .get() performs an AJAX query using HTTP GET and then passes the returned data onto another function for processing. The AJAX calls can be made synchronous or asynchronous depending on your requirements. The two helper functions are JavaScript functions written to deal with the CodeProject addresses and data.
$(document).ready(function () {
    setTimeout(function () {
        //Start loading the data from Codeproject profile
        $.get(getCPMemberProfile(), function (data) {
            setCPProfileData(data);
        });
    }, 1000);
});
This is just a fraction of the full capabilities of jQuery, and if you pop over to the developer site and explore the documentation, you will soon see what I mean.
Why Use jQuery UI?
jQuery UI provides a comprehensive set of interface widgets that can be plugged into your HTML, and then using the CSS markups, provides a set of rich interface components. In this extension, the components that have been used are the Tabs panel and a basic button.
The Tabs panel was easily created as shown below:
<script type="text/javascript">
                       $(function() {
                           $("#tabs").tabs();
                       });
</script>
<div id="tabs" style="height: 400px;">
    <!-- Tab Pages -->
    <ul>
        <li><a href="#tabs-1">Reputation Points</a></li>
        <li><a href="repgraph.html">Reputation Graph</a></li>
        <li><a href="#tabs-3">Options</a></li>
        <li><a href="about.html">About</a></li>
    </ul>
    <!-- Tab 1 Rep Points -->
    <div id="tabs-1" style="padding-left: 5px">
        <!-- Main Rep Page content -->
    </div>
    <!-- Tab 2 Rep Graph ; Note: This does not require a section
           as it is a link URL in tab definition above. -->
    <!-- Tab 3 Options -->
    <div id="tabs-3" style="padding-left: 5px">
        <!-- Options Tab Content goes Here -->
    </div>
    <!-- Tab 4 About ; Note: This does not require a section
            as it is a link URL in tab definition above. -->
</div>
You will also notice that Tab 2 (Rep Graph) and Tab 4 (About) are references to an external document within the extension files. This content is loaded via AJAX, and then injected into the current page's DOM at the relevant tab location.
Scraping the CodeProject Content
In order to retrieve the CodeProject content, a JavaScript function first loads the member profile page by using an AJAX call. The returned content is then placed in a hidden Div block on the page, which can then be accessed, traversed, and parsed using jQuery. There were three main Elements on the CodeProject content which were used to identify the areas to be scraped. These were 'ctl00_MC_Prof_TotalRepBox' for the overall member level, 'ctl00_MC_Prof_TotalRep' for the total reputation points, and 'ctl00_MC_Prof_Status' for all the individual category points.
//The Total Reputation Member Level is Found in
if ($("#ctl00_MC_Prof_TotalRepBox").hasClass("nostatus")) { $("#repStatus0").html(" "); };
if ($("#ctl00_MC_Prof_TotalRepBox").hasClass("bronze")) { $("#repStatus0").html("Bronze"); };
if ($("#ctl00_MC_Prof_TotalRepBox").hasClass("silver")) { $("#repStatus0").html("Silver"); };
if ($("#ctl00_MC_Prof_TotalRepBox").hasClass("gold")) { $("#repStatus0").html("Gold"); };
if ($("#ctl00_MC_Prof_TotalRepBox").hasClass("platinum"))
              { $("#repStatus0").html("Platinum"); };

//The Total Reputation is found in this node
var thestring = $("#ctl00_MC_Prof_TotalRep");
if (thestring) { newRep[0] = thestring.text(); } else { newRep[0] = "0"; }
$("#loadRepTotal").html(newRep[0]);

//Reputation Points table
holdingdata.innerHTML = $('table.member-rep-list').html();
Once the content had been located and copied into the holding Div, jQuery was then used to extract the text from the inner element. Below is the code that is used to locate each TableRow, and then within each one, find each TableData and locate the Points, Category, and Status level, and then inject them into the DOM for presenting to the user.
$("#holdingdata").find("tr").each(function (iTR) {
    $(this).find("td").each(function (iTD) {
        var MemberLevel = "";
        if ($(this).hasClass("nostatus")) { MemberLevel = "" };
        if ($(this).hasClass("bronze")) { MemberLevel = "Bronze" };
        if ($(this).hasClass("silver")) { MemberLevel = "Silver" };
        if ($(this).hasClass("gold")) { MemberLevel = "Gold" };
        if ($(this).hasClass("platinum")) { MemberLevel = "Platinum" };


         //Version 1.6 21st March 2011, Additional second link in each category
         //iterate all the links determining a Category/Value pair
         var thevalue = $(this).find("div.medium-text").text();
         if (!thevalue) { thevalue = "";
         $(this).find("a").each( function (iA) {
            var category = $(this).text();
            var category = $(this).find("a").text();

            if (!category) { category = "No Data"; };
            category = category.toUpperCase(category);
            switch (category) {
                case ("AUTHOR"):
                    newRep[1] = thevalue;
                    $("#loadRepAuthor").html(newRep[1]);
                    $("#repStatus1").html(MemberLevel);
                    break;
                case ("AUTHORITY"):
                    newRep[2] = thevalue;
                    $("#loadRepAuthority").html(newRep[2]);
                    $("#repStatus2").html(MemberLevel);
                    break;
                // Other case statements
                    for the other categories continue...........
            }
        });
    });
});
Testing Code
In order to test the code, first load the unpackaged extension into Chrome. To do this, you select 'Tools', then the 'Extensions' menu, expand the developer panel, and then select 'Load unpacked extension...', and navigate to the folder which contains all the files used in the extension. The extension will be loaded, shown as unpacked, and the icons, etc., specified in the manifest should appear in the toolbar and also to the left of the extension.

To see what is going on under the hood, you can right click the toolbar and select 'Inspect Pop-up' and look for errors, see what is being stored in the local storage, etc. As you revise the codebase/HTML files, simply click 'Reload' in extensions to update it.
To aid testing, you can place some JavaScript code in your extension to output to the Chrome debugger; this is as simple as:
//Output the contents of a variable to the debugger
console.log(variablename);
//Output a string to the debugger
console.log("Some text.");
Local Storage of Data/Settings
Objects can be stored locally, and in this extension, the CodeProject member ID as well as the reputation points for the last data poll are stored. Persisting the data is easy, and as you can see below, it is also easy to recall the data when required.
// Put data in the local store
var sometext = "Hello";
localStorage["AnyKeyName"] = sometext;

// Get data from the local store
var sometext;
sometext = localStorage["AnyKeyName"];

// Test the data does exist and was read
if (!sometext)
{
    // The data is not present in the local store
}
Packaging and Deployment/Hosting
There are three methods of distribution of the extension:
- Unpackaged method, which although works, is really suited to testing and development scenarios
- Google hosting, which makes the extension via the Google Extensions gallery
- Private hosting, the extension is served by a privately hosted web server
The unpackaged extension is available to download from this article, and the extension has also been packaged and deployed to the author's web server.
To package the extension for distribution, you first load the unpackaged extension into Chrome, and then select Package Extension from the extensions page. You can see the button on the screenshot under the Testing Code section above. When you select it, Chrome will ask you to browse to the folder that contains the elements of the extension, and also for a key file. The first time you package the extension, you will not have a key file, so Chrome will create one for you. You then use this key file for future revisions to the packaged extension. Chrome will create a file with a CRX extension, which is the package used for distribution.
To privately host the file, you must locate the CRX file on the web server in a suitable location. I also had to add a MIME type (application/x-chrome-extension) to the IIS configuration, to allow the Chrome browser to recognise and install the extension.
It is then necessary to create an update XML file, which details the extension ID, version number, and source path, which can then be modified for future revisions. The update XML file is shown below:
<gupdate xmlns='http://www.google.com/update2/response' protocol='2.0'>
  <app appid='aahcadlihomcibehjklhigoccjodcekj'>
    <updatecheck codebase='http://www.dave-auld.net/ChromeExtensions/
                       CPRepWatcher/cprepwatcher_v1_6.crx' version='1.6' />
  </app>
</gupdate>
When you first install the packaged extension, you can access the AppID from the Chrome Extensions view, and copy this across to the updates file.
For more information on Packing, Deployment, and Google Hosting, see Extension Packaging.
How Can I Use This Extension?
You can either download and install the unpackaged extension, or click the link above to install the packaged version. Using the packaged version will mean any future updates will be automatically captured when Chrome performs its update checks every few hours. If you select the unpackaged method, install the extension as per the instruction under the Testing section above.
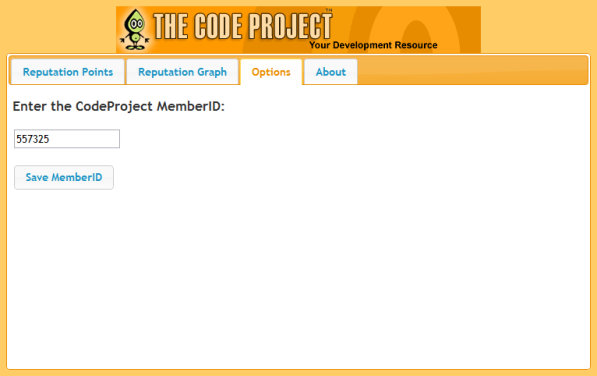
Once you have installed either the packaged or unpackaged extension, then all you need to do is from the Options menu item, Extensions Options link, or from the Options tab on the actual extension, set this to your CodeProject member ID. Your member ID can be found on your profile page for your account.
Every time you click the Extensions Toolbar button, it will display the page shown at the top of the article and update the table with your latest points.
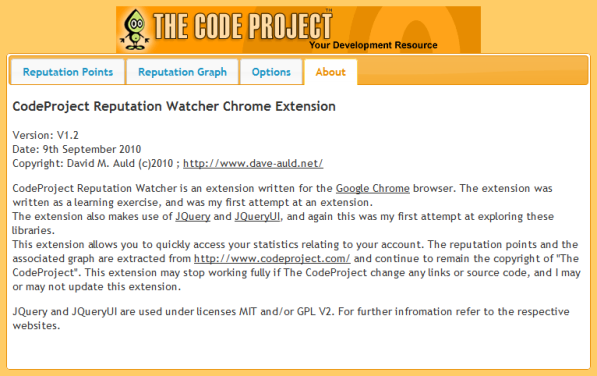
The other tabs on the extension can be seen below: Rep Graph, Options, and About.
Extension Removal
After you install an extension, it's just a case of hitting the uninstall link and deleting the source folder where you unzipped the unpackaged extension.
What Next
The codebase isn't probably the most optimised, so could do with a tidy up, but as usual, once it is working, I was reluctant to change anything. If I get time, I might look into this and possibly add some other features, like auto refresh.
Tracking Usage and User Interaction
It is possible to track usage of the extension by adding Google Analytics code to the files. From this, you can track which pages are being viewed, which buttons get clicked etc. More information on Analytics integration can be found here.
Points of Interest
As this was my first adventure in Chrome Extensions, jQuery, and jQuery UI, it was certainly a challenge, which has proved very rewarding.
Known Issues
There appears to be a weird cache related problem in Chrome, which is only an issue if you enter an invalid CodeProject member ID: e.g., navigate to your member profile, then navigate to an invalid profile, navigate to someone else's profile, navigate to the same invalid profile, and you will see your member profile entered at the start appears... I can't explain this, and for normal use of the extension, it doesn't matter anyway. As long as you use a valid member ID: things will be fine.
History
(Version numbers relate to code changes, not article revisions.)
- V1.6, 21 March 2011 - Updated for CodeProject DOM/Member Profile changes
- V1.5, 13 December 2010 - Updated for CodeProject DOM changes
- V1.4, 20 October 2010 - Added Overall Member Level
- V1.3, 10 September 2010 - Resolved some Google Analytics issues
- V1.2, 9 September 2010 - Fixed some JS errors, moved the About content to a standalone file and called via AJAX, added Google Analytics tracking. Also introduced Package & Deployment to private web server details to the article
- V1.1, 4 August 2010 - Fixed to handle new CSS class IDs for member status; removed redundant CSS theme from zip file
- V1.0, 1 August 2010 - First version of article