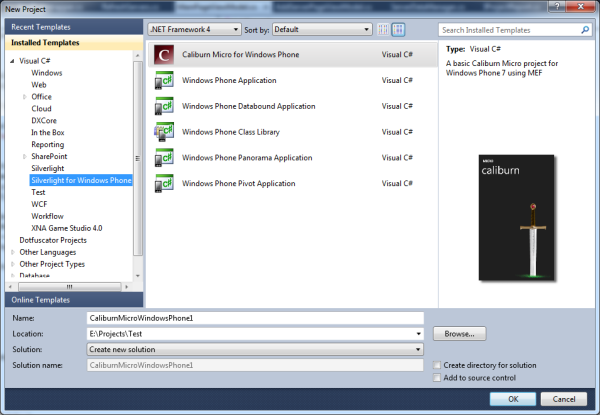
Caliburn Micro for Windows Phone 7
Introduction
Caliburn Micro framework is one of the first MVVM frameworks to become available for Widows Phone 7 (WP7) and it stands out as very productive thanks to extensive use of “convention over configuration”.
Background
When creating Silverlight applications for Windows Phone 7 you are offered basic MVVM implementations, but most will find these inadequate for any non-trivial application. I do recommend that people learning WP7 Silverlight programming do not use a framework, as this will expose them more to the platform, and make them appreciate more the frameworks they are using.
About Caliburn Framework
Original Caliburn was created as open source (MIT License) MVVM Framework for WPF and later adopted for Silverlight. At the time of writing of this article project has reached version 2.0. And right on the project page you’ll find following message:
“STOP! If you are new here, we recommend a simpler framework with 90% of the features and power! Check out Caliburn.Micro”
Also, name “Caliburn” is one of the different spelling/names of “Excalibur”
Enter Windows Phone 7
Now if you are developing for Silverlight and WP7 it is natural fit to choose lighter framework, and if you are starting development why no choose simpler one as well?
http://caliburnmicro.codeplex.com/
Here’s some extra information about history and creation of this framework: link.
Alternative WP7 MVVM Frameworks
There are few other popular MVVM frameworks out there:
Problem we’re solving
I’ll demonstrate benefits of using Caliburn Micro framework by writing a WP7 client monitoring statuses of Cruise Control.Net.
If you are familiar with what Cruise Control.Net (CC) does, I recommend following the link above, but elevator pitch would be “It is Automated Continuous Integration server, monitoring your source control, running builds, tests and code analysis, helping maintain your product in state of successful build and correct function” –it’s free, open source and written in .net.
Using Caliburn Micro for Windows Phone 7
Download page
of Caliburn Micro project contains single package that you have to download and install that will install binaries, samples and Visual Studio templates you’ll need.
At the time of writing of this article, this project was not in NuGet, but I’m guessing you’ll soon be able to get it that way, too.
Update (April 20th 2011): Now there is Caliburn Micro NuGet package (and here's article about adding NuGet support fo Caliburn Micro).
If you have NuGet 1.2 or later installed, from the Package Manager Console, just
type:
Install-Package Caliburn.Micro
Empty Project
As part of the Visual Studio Templates installed, you’ll find this project template:
After project creation, readme.txt file will be opened pointing you to Caliburn Micro project page, which is currently best place to look for documentation.
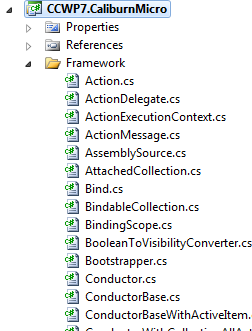
Project tree that will look something like this:

Notice a new folder “Framework”, new class “AppBootstrapper”, and Main Page with no code-behind.
“Framework” folder contains entire Caliburn Micro source code below it (and there are no extra assembly references):
App and App Bootstrapper
App.xaml has been left almost entirely empty – there’s only AppBootstrapper reference in resources and this is because all logic from this class has been redirected to AppBoostrapper, which will do few extra things for us.
IoC/Dependency Injection
As part of new project you’ll also get basic Inversion of Control container, but you can replace that container with any other for WP7. To setup the container, AppBootstrapper contains basic code in overridden Configure method:
protected override void Configure()
{
    container = new PhoneContainer(this);

    container.RegisterPerRequest(typeof(MainPageViewModel), "MainPageViewModel", typeof(MainPageViewModel));

    container.RegisterInstance(typeof(INavigationService), null, new FrameAdapter(RootFrame));
    container.RegisterInstance(typeof(IPhoneService), null, new PhoneApplicationServiceAdapter(PhoneService));

    //container.Activator.InstallChooser<phonenumberchoosertask,>();
    //container.Activator.InstallLauncher<emailcomposetask>();

    AddCustomConventions();
}
Convention over Configuration
Now, about that AddCustomConventions method: modern development tends to be a very repetitive and verbose process that we have learned to put up with mostly due to vastly improved IDEs. XAML platforms (WPF, WF, Silverlight, WP7) are no exceptions. You’ll often find yourself repeating common patterns – like this one:
    <Button x:Name="Insert"
        Content="insert"
        IsEnabled="{Binding CanInsert}"
        Click="Insert_OnClick"/>
And this is just a tip of the iceberg. All of this is due to the fact that you can set all of these properties and bindings in variety of ways and due to increased flexibility we have increased complexity. To deal with complexity developers tend to use patterns to simplify their mental maps of project (like in the case above – notice that there’s “Insert” text in every line). Why just not go step further and say – we’ll use these conventions by default and maybe
all we need is:
    <Button x:Name="Insert"
        Content="insert"/>
Caliburn Micro gives you this goodness, thanks to usage of those conventions and much more:
In the sample above we had to have a method in code-behind of the page that would have had to then find ViewModel and invoke extra “Insert” method. With CM you’ll get all of that for free:
- By having public Insert method in your View Model CM will make sure that click from Button “Insert” is passed to ViewModel’s Insert method
- If you have a public method returning bool or property of type bool with name “CanInsert” CM will bind this to IsEnabled property of the button
And this is just the start…
Yes, but!
But what if you don’t like conventions that have been setup for you, or you need
to override them in some cases?
- Every binding and value that is set before Caliburn Micro attaches to a View
Model will not be changed. This allows to you to override convention bindings.
- There is an API to change conventions, and you can check out article about it
here:link.
Pairing Views and View Models
Since in WP7 you are navigating between pages they (as views) will be the one the one that will need to somehow find and initialize appropriate View Models.
Again, you are most likely to have “AddServerPage.xaml” and "AddServerPageViewModel.cs” as pair so let’s allow Caliburn Micro to pair these up for us:
container.RegisterPerRequest(typeof(AddServerPageViewModel), "AddServerPageViewModel", typeof(AddServerPageViewModel));
By just doing this you will, whenever you navigate to your AddServerPage, have your ageView model ready and waiting in the page’s DataContext.
Base Classes for View Models
It’s possible to use just plain-old-CLR-objects (POCO) for your View Models. In most cases you will want to implement INotifyPropertyChanged interface. Caliburn Micro has quite a few base classes for View Models to choose from:
- PropertyChangedBase – is a basic implementation of INotifyPropertyChanged with a
few extras - Screen – which offers a lot of events that you can hook-up to, like OnActivate,
and the option to reach-out to attached views - Conductor – and especially Conductor
.Collection.OneActive are pre-assembled
View Model kits for when you are working with collections
Using ProperyChangedBase
Let’s dig in into AddServerPageViewModel and have it derive from this base
class:
    public class AddServerPageViewModel : Framework.PropertyChangedBase
    {
        public AddServerPageViewModel()
        {
            _fullAddress = new Uri("http://ccnet.wheelmud.net/XmlServerReport.aspx");
        }

        Uri _fullAddress;

        public string ServerName
        {
            get { return _fullAddress.Host; }
            set
            {
                if (string.IsNullOrEmpty(value))
                    throw new ArgumentNullException();

                var ub = new UriBuilder(_fullAddress)
                {
                    Host = value,
                };

                SetFullAddress(ub.Uri);
            }
        }

        public int PortNumber
        {
            get { return _fullAddress.Port; }
            set
            {
                var ub = new UriBuilder(_fullAddress)
                {
                    Port = value,
                };

                SetFullAddress(ub.Uri);
            }
        }

        public string FullAddress
        {
            get { return _fullAddress.ToString(); }
            set
            {
                if (string.IsNullOrEmpty(value))
                    throw new ArgumentNullException();

                SetFullAddress(new Uri(value));
            }
        }

        void SetFullAddress(Uri uri)
        {
            _fullAddress = uri;

            CanAddServer = _fullAddress.IsAbsoluteUri;

            Refresh();
        }
    }
We have three properties that are all tied together and help with editing of
the server URL.
Since all three are likely to change together I am just calling the Refresh
method from PropertyChangedBase, which will notify the View that all of these
properties have changed. Handy.
For View all we need to add to ContentPanel is:
<StackPanel>
    <TextBlock><Run Text="Server DNS:"/></TextBlock>
    <TextBox x:Name="ServerName" InputScope="Url" />
    <TextBlock><Run Text="Server Port:"/></TextBlock>
    <TextBox x:Name="PortNumber" InputScope="Number"/>
    <TextBlock><Run Text="Full Uri:"/></TextBlock>
    <TextBox x:Name="FullAddress" InputScope="Url"/>
</StackPanel>
Tip: When testing this page in the emulator, instead of typing with mouse on on-screen keyboard you can press Page Up on computer’s keyboard to simulate phone’s hardware keyboard.
Using Conductor.Collection.OneActive
Inheriting your View Model from this base class allows for simple creation of View Models for collections and in this variation it allows and maintains only one active child.
This base class has Items property which is matched in View with List Box or other Items Control-derived class with x:Name=”Items”. Active Item is also bound to SelectedItem.
Problem of Navigation
You might have noticed that pages and behaviours (if using Blend) have the power
to navigate to other pages, but this is not really desirable, as we want View Models to be in control of navigation.
After navigating to page, it can access passed arguments by parsing query string parameters, but again – this is what we want View Model to do.
Caliburn Micro solves these two problems by exposing a rich INavigationService interface and making it easily available to your View Models thanks to beauty of dependency injection. All you need to get this service in your View Model is to have a constructor that will take this interface as a parameter:
public AddServerPageViewModel(INavigationService navigationService) {/*…*/}
The second part of the problem (parsing arguments passed) is handled automatically thanks to Convention over Configuration. If you are navigating to Uri: “/ProjectPage.xaml?projectId=17” and you have a ProjectId property on View Model for that page, Caliburn will auto-magically populate the ProjectId property with the specified parameter value.
If you need more control over the lifetime of View in your View Model, just inherit from Screen base class or one of the more specialized sub-classes.
WP7’s Un-Bind-able Application Bar
Part of WP7 UI is Application Bar, which in this first version is not bind-able. As a matter of fact, you’ll have to use indexes to manipulate buttons, usually directly from your View.
Caliburn Micro for WP7 provides significant improvements in this area – allowing you to bind App Bar to your View Model.
What you’ll need to do is just use CM’s AppBarButton and AppBarMenuItem inside standard App Bar and then identify what it needs to bind to by specifying “Message” property.
I like to do this from inside of Blend and thankfully you can do that, too. Open your project in Blend (you can right-click on project in Visual Studio to do this), then open the page you want to add an App Bar to and select the page in objects list:

Then in properties, section “Common Properties”:
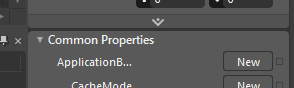
Press “New” button to create application bar:

Notice the “Buttons (Collection)” and press the “…” button to edit a collection of buttons that will be in this application bar:
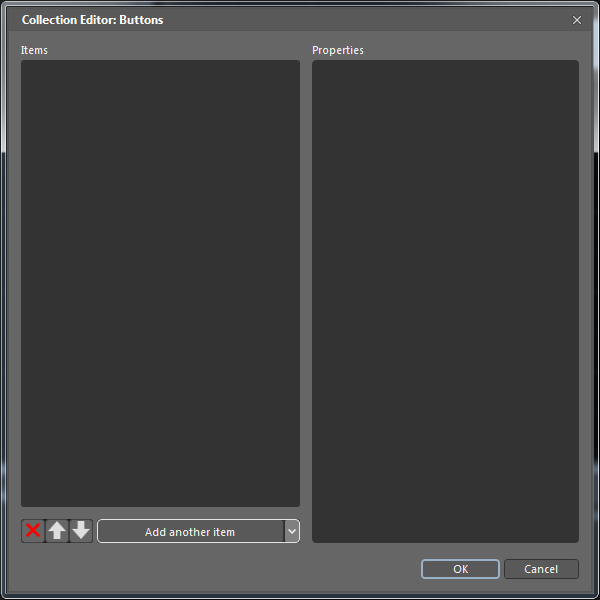
Now “Add another item” has is a drop-down button and if you want WP7 framework’s button, you can use this drop-down, but to use Caliburn Micro’s improved version of this button just press the “Add another item” button. Select Object dialog will pop-up:
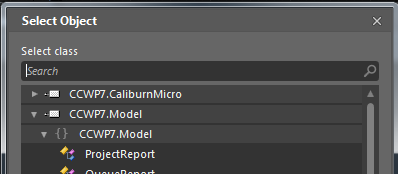
I often find that just typing “AppBar” will quickly filter out unwanted types:
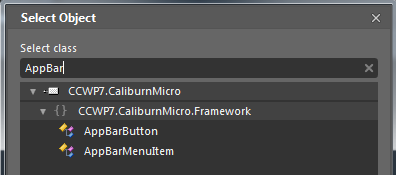
Select AppBarButton from that list and press Ok button.
The added items will look a lot like standard button:
- IconUri drop down allows for quick selection of images, including stock ones,
which will also be added to the project, if needed - Text to be displayed below the button
One extra, Message field is Caliburn Micro’s field that is mapping to Command in View Model.
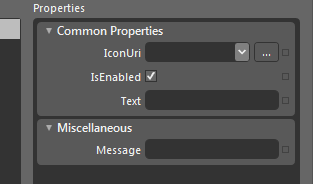
Not only does this auto-map to “Message” Command (method), but also to “CanMessage” (method of property) that will control enabling or disabling of the button.
C# 5 is Long Way Away
Ever since Silverlight 2 the only way to make web service calls was asynchronously. Because we have multi-threading environment and that Microsoft is preventing us from shooting ourselves in the foot by forcing us to do all UI activities on UI thread doing network calls in WP7 is slightly painful. C# 5 is going to introduce “async” keyword which is going to make this much easier, but right now we have to program without it.
This introduces few big questions:
- How can we leave as much as possible inside MVVM and keep it as clean
- How to offload all possible processing on non-UI threads to keep app performing
- How to present user with good loading/processing feedback and possibly option to cancel it
One of the trickiest questions for me was:
- How to control animations to indicate busy status from View Model
And then I found this blog post:link.
Caliburn Micro has this great feature that methods which are called to invoke commands could also return IEnumerable<IResult>. Caliburn will go over the returned results, executing them one by one until they are all completed, one cancels or throws/returns an error.
This by itself is great but there’s more! IResult interface looks like this:
public interface IResult
{
    void Execute(ActionExecutionContext context);
    event EventHandler<resultcompletioneventargs> Completed;
}

public class ActionExecutionContext
{
    public ActionMessage Message;
    public FrameworkElement Source;
    public object EventArgs;
    public object Target;
    public DependencyObject View;
    public MethodInfo Method;
    public Func<bool> CanExecute;
    public object this[string key];
}
Thanks to Source property in ActionExecutionContext we have access to objects on the actual page. This is good unless you abuse it – so try to keep it simple and no tight coupling. My choice is to use Visual State Manager to change state of the page:
    public IEnumerable<iresult> AddServer()
    {
        CanAddServer = false;
        Refresh();

        yield return new SetVisualState("Adding");

        var readServer = _readServerFactory();
        readServer.Server.Name = ServerName;
        readServer.Server.Uri = FullAddress;

        yield return readServer;

        _serverDataManager.AddServer(readServer.Server);

        yield return new SetVisualState("Default");

        CanAddServer = true;
        _navigationService.GoBack();
    }
This sample is form AddServerPageViewModel and it will execute these operations asynchronously but for me best part is the fact that I can easily and cleanly manipulate Visual State:
    public class SetVisualState : IResult
    {
        readonly string _state;
        public SetVisualState(string state)
        {
            _state = state;
        }

        public void Execute(ActionExecutionContext context)
        {
            VisualStateManager.GoToState((Control)context.View, _state, true);

            Completed(this, new ResultCompletionEventArgs());
        }

        public event EventHandler<resultcompletioneventargs> Completed = delegate { };
    }
Conclusion
Caliburn Micro is fantastic framework for WP7 and it holds promise of great productivity boost, but still it has some issues that will turn away lot of people:
- It will probably restructure your code differently than what you’ve might be used to
- Sometimes you’ll waste time trying to figure out how to perform action which looks to you pretty straightforward
- Working with design-time data and Caliburn Micro is possible, but those pages will have to use standard XAML bindings
Notes
- I’m always setting Input Scope on Text Boxes and if Visual Studio does not give
you intelli-sense, Blend will - Your app should start fast. Don’t use splash screen unless you are certain that you need it.
- You can find some great articles that serve as Caliburn Micro documentation here: (http://caliburnmicro.codeplex.com/documentation)
- This project will continue on:
http://ccnetwp7.codeplex.com/ to add features like: - Ability to monitor and control builds from your phone
- Live Tile + Server Notifications
History
- May 31st 2011 - Initial Version
- April 4th 2011 - Minor clean-ups
发表评论
 cbd washington dc[89.28.10.*]2020/9/29 5:37:20#1
93lxoY Now I am ready to do my breakfast, once having my breakfast coming yet again to read other news. Look at my blog post; billigste ipad