Image Filters using CPU and GPU
Introduction
In this article, we are going to investigate a simple common framework for single input, single output image filters. Filters can be implemented in plain C++ running on CPU, using nVidia CUDA running on GPU or a mix of both.
We are going to capture a webcam input with OpenCV and process the captured frames using implemented image filters.
Requirements
- Patched OpenCV 2.2 for Windows.
- CUDA 3.2 SDK which in turn requires Visual Studio 2008 compilers.
- Visual Studio 2010 - do not know about Express Edition
- An nVidia graphics card supporting CUDA with recent drivers installed.
Background
This article is not about introducing OpenCV and CUDA, only short descriptions are provided.
What is Image Processing?
Image processing filter represents a mathematical operation applied to an image such as color negation, arbitrary rotation, blurring etc.
What is OpenCV?
OpenCV is an open-source computer vision library which among other things helps us to capture webcam for this article.
What is CUDA?
CUDA is a game-changer in parallel programming, it is a paradigm shifter, it is not multicore computing, it is many-core computing. Why many? There are so many cores that you do not have to know how many exactly, and lack of this knowledge caters for transparent scalability.
Using CUDA, you can write C/C++ code running on GPU, using hardware optimized parallel processing.
CUDA is a proprietry technology of nVidia, to use it you will need an nVidia graphics card and a recent graphics driver with CUDA support.
Using the code
OpenCV Frame Grabbing Distilled
- Open webcam device.
- Grab first frame.
- If first frame is not OK, exit.
- Enter main loop
- Grab next frame.
- Resize frame if necessary.
- Call image filter with grabbed frame.
- Show filtered image on screen.
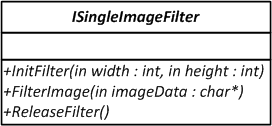
Interfaces, Classes, Inheritance and more
The point that we are developing on is operation of a filter is independent from how the image is created. We can write the filtering method in main.cpp as a global function or we can use an interface to call our filter method on an instance of a custom filter class.
In the simplest form, it can be seen that an interface for filtering image needs at least a method to filter the image, a method to pass in dimension of the image, and we throw in a method to manage releasing resources held by the implementer. Given, we can pass the image dimensions in the filter method and clean up the memory before returning; but we need a way to allocate and release memory in the GPU. Memory operations on the GPU are expensive, that's why we are using InitFilter and ReleaseFilter methods with FilterImage method in the interface ISingleImageFilter.
Simplest Filter of All: IdentityFilter
IdentityFilter returns the image as is, implementing the ISingleImageFilter interface.
class IdentityFilter : public SingleImageFilter
{
public:
	IdentityFilter()
	{
	}

	/** Görüntüde değişiklik yapmadan çıkar. */
	virtual void FilterImage(char* imageData)
	{
		return; // imajı değiştirmeden dön.
	}
};
To use any ISingleImageFilter here is what you need to do. First you have to call InitFilter with the image dimensions. In the frame-grabbing loop, call FilterImage with the image data. FilterImage methods perform processing in-place meaning that your reference will be overwritten with the result. When you are done with the filter and will not use it again, call ReleaseFilter method.
Notice that we have only overridden FilterImage method in the IdentityFilter. Image dimensions are preserved in the base class SingleImageFilter which is and abstract class leaving only FilterImage method as a pure virtual method.
Color Negation Filter on CPU
In this article, images are grabbed as BGR three channel images containing 8 bits for each color channel. Color negation means that every channel of every pixel in inverted such thatvalue + inverted value = max value
In the 8 bit case, max value is 255 so here is the code for color negation filter:
/** Görüntünün RGB kanallarının tersini alır. */
virtual void FilterImage(char* imageData)
{
	for(int i=0; i<3*width*height; i++)
	{
		*( imageData + i ) = ( unsigned char ) ( 255 - *( imageData + i ) ); // her pikselin her kanalının negatifini al.
	}
}
Using CUDA in Filters
To be able to compile CUDA samples you need to install CUDA SDK 3.2.
Code that will run on the GPU are called kernels. To mark a method as a kernel, you apply the method decorator __global__
__global__
void gpuInvert(
	float* image,
	int width,
	int height
	)
{
// ...
}
To launch a kernel, we use configuration parameters which declare to the GPU that in how many blocks and threads we want our kernel be ran on.
// launch kernel
dim3 dimBlock( BLOCK_SIZE, BLOCK_SIZE );
dim3 dimGrid( width / dimBlock.x, height / dimBlock.y );

gpuInvert<<< dimGrid, dimBlock >>>( d_Image, width, height );
Image processing is a voluptuous field for CUDA because many of the image processing algorithms are just the perfect fit for parallel processing in memory access patterns and mathematical complexity.
We have mentioned that CUDA programs run on the GPU itself, so where should we put the data? We transfer the image data to the graphics card memory in every frame. We allocate the device memory in InitFilter, we deallocate it in ReleaseFilter
Base Class For CUDA-Enabled Filters
In the FilterImage method, we need to copy the image data to GPU memory, process the data and fetch the result back to our same-old RAM. Since we are using single-input, single-output image processing filters, we can use the same method signature among the GPU kernels too.
We are going to use the kernel launcher funciton pointers a lot, we are going to define a type for them.
typedef void (*ptKernelLauncher)(float*, int, int); // define

ptKernelLauncher kernelLauncher; // declare

kernelLauncher = deviceInvertLaunch; // assign

kernelLauncher( d_Image, width, height ); // invoke
From the SingleCudaFilter class, we do not launch the kernels directly. C/C++ code containing CUDA kernels need to pass thru the nvcc nVidia compiler driver. We abstract the kernel codes by using so-called launcher methods for kernels and calling these launcher methods from our filter classes.
In SingleCudaFilter class, we will not have any kernel or launcher dependencies. We will pass the funciton pointer to the launcher in the constructor of this class. When the FilterImage method is called in the image processing loop, SingleCudaFilter will invoke the kernel launcher which in turn will launch the kernel on the GPU.
In this code fragment, InitFilter, FilterImage and ReleaseFilter methods are included for SingleCudaFilter class.
class SingleCudaFilter : public SingleImageFilter
{
protected:
	float* h_Image; /**< Normalize edilmiş görüntünün CPU bellek adresi. */
	float* d_Image; /**< Normalize edilmiş görüntünün GPU bellek adresi. */

	ptKernelLauncher kernelLauncher;

public:

	/**
		kernelLauncher metod işaretçisini alan yaratıcı.

		\param kernelLauncher \ref kernelLauncher tipinde metod işaretçisi alan yaratıcı.
	*/
	explicit SingleCudaFilter( ptKernelLauncher kernelLauncher )
		: kernelLauncher(kernelLauncher)
	{
	}

	/**
		CPU ve GPU üzerinde normalize edilmiş görüntüler için bellek ayırır.
	*/
	virtual void InitFilter(int width, int height)
	{
		SingleImageFilter::InitFilter(width, height);

		/*
		allocate device memory
		*/

		cudaMalloc( (void**) &d_Image, 3 * sizeof(float) * width * height );
		checkCUDAError("malloc device image");


		/*
		allocate host memory
		*/

		cudaMallocHost( (void**) &h_Image, 3 * sizeof(float) * width * height );
		checkCUDAError("malloc host image");
	}

	/**
		Yaratıcıda alınan kerneli çağırır.

		\param imageData Görüntünün BGR kanal sıralı bellekteki adresi.


		Görüntüyü normalize ederek kernelLauncher işaretçisinin gösterdiği metodu çağırır ardından görüntüyü denormalize eder( [0, 255] aralığına ).
		Kernelde işlenen görüntüden sonuç olarak [0, 1] aralığı dışında bir değer dönerse o kanalın değeri [0, 255] aralığından dışarıda olabilir. Bu durumda değer yakın olduğu sınıra indirgenir.
	*/
	virtual void FilterImage(char* imageData)
	{
		// imageData değişkenindeki görüntü verisi normalize edilerek h_Image değişkenine aktarılır.
		for(int i=0; i<3*width*height; i++)
		{
			*(h_Image + i) = (unsigned char)*(imageData + i) / 255.0f; // normalize and copy image
		}

		/*
			Görüntü GPU belleğine kopyalanır.
		*/

		cudaMemcpy( d_Image, h_Image, 3 * sizeof(float) * width * height, cudaMemcpyHostToDevice );
		checkCUDAError("FilterImage: memcpy");

		/*
			Constructorda verilen kernel çalıştırılır.
		*/
		kernelLauncher( d_Image, width, height );

		/*
			Sonuçlar CPU belleğine kopyalanır.
		*/
		cudaMemcpy( h_Image, d_Image, 3 * sizeof(float) * width * height, cudaMemcpyDeviceToHost);
		checkCUDAError("FilterImage: memcpy2");

		/*
			h_Image değişkenindeki normalize edilmiş görüntü verisi [0, 255] aralığına çekilir.
		*/
		for(int i=0; i<3*width*height; i++)
		{
			*(imageData + i) = satchar(*(h_Image + i) * 255);
		}
	}

	/**
		CPU ve GPU üzerinde normalize edilmiş görüntüler için ayrılmış belleği serbest bırakır.
	*/
	virtual void ReleaseFilter()
	{
		SingleImageFilter::ReleaseFilter();

		cudaFree( d_Image );
		checkCUDAError("free device image");

		cudaFreeHost( h_Image );
		checkCUDAError("free host image");
	}

};
Color Negation Filter on GPU
Class CudaInvertFilter is nothing but a boilerplate code to pass the kernel launcher to the class SingleCudaFilter.
class CudaInvertFilter : public SingleCudaFilter
{

public:

	/**
		\ref deviceInvertLaunch metod işaretçisi parametresi ile SingleCudaFilter yaratıcısını çağırır.
	*/
	CudaInvertFilter()
		: SingleCudaFilter(deviceInvertLaunch)
	{
	}

};
And in the kernel we do nothing fancy either. Only point to consider is we are inverting the channels by substracting them from 1, instead of 255. We have passed the normalized image to the kernel launchers in FilterImage method.
/**
	Görüntünün tersini alan kernel.

	\param image [0, 1] aralığına normalize edilmiş, BGR kanal sıralı görüntünün GPU belleğindeki adresi.
	\param width Görüntünün piksel olarak genişliği
	\param height Görüntünün piksel olarak yüksekliği

	Metod GPU üzerinde çalışır, çıktısını image parametresinin üzerine yazar.

	*/
__global__
void gpuInvert(
	float* image,
	int width,
	int height
	)
{
	int row = blockIdx.y * BLOCK_SIZE + threadIdx.y;
	int col = blockIdx.x * BLOCK_SIZE + threadIdx.x;

	int cIdx = ( row * width + col ) * 3; // 3 ile çarpım RGB için, linearIndex.

	// normalize edilmiş pikselleri 1'den çıkarttığımızda görüntünün negatifini almış oluruz.
	*( image + cIdx     ) = 1 - *( image + cIdx     ); // Blue kanalı
	*( image + cIdx + 1 ) = 1 - *( image + cIdx + 1 ); // Green kanalı
	*( image + cIdx + 2 ) = 1 - *( image + cIdx + 2 ); // Red kanalı
}
To launch the kernels we have used the following arrangement:
/**
	\ref ptKernelLauncher tipinde metod.

	\param d_Image [0, 1] aralığına normalize edilmiş, BGR kanal sıralı görüntünün GPU belleğindeki adresi.
	\param width Görüntünün piksel olarak genişliği
	\param height Görüntünün piksel olarak yüksekliği

	\ref gpuInvert kernelini Grid ve Block boyutlarını ayarlayarak çağıran metod.
*/
void deviceInvertLaunch(
	float *d_Image,
	int width,
	int height
	)
{
	// launch kernel
	dim3 dimBlock( BLOCK_SIZE, BLOCK_SIZE );
	dim3 dimGrid( width / dimBlock.x, height / dimBlock.y );

#if ENABLE_TIMING_CODE

	cudaEvent_t start, stop;
	cudaEventCreate(&start);
	cudaEventCreate(&stop);
	cudaEventRecord(start, 0);

#endif

	gpuInvert<<< dimGrid, dimBlock >>>( d_Image, width, height);

#if ENABLE_TIMING_CODE
	cudaEventRecord(stop, 0);
	cudaEventSynchronize(stop);
	float elapsedTime;
	cudaEventElapsedTime(&elapsedTime, start, stop);

	// block until the device has completed
	cudaThreadSynchronize();

	printf("gpuInvert kernel time: %.3f ms\n", elapsedTime);
#endif

	cudaThreadSynchronize();

	// check if kernel execution generated an error
	// Check for any CUDA errors
	checkCUDAError("kernel invocation");
}
Using Textures with CUDA
Filters implemented using the previously discussed method will be using global memory of the graphics card. Global memory is the slowest memory type available. We can use texture memory which is faster, has spatial caching and read-only. Read-only part is not relevant to us, we can use the texture memory.
After getting the texture support up-and-running, there was a problem. nvcc compiler driver assigns scope to texture references by code file. That means, you cannot declare a texture in a header file and use it in different files. If you reference the texture from another code file, your code will compile but boom! You have a zero (all-black) texture waiting for you.
To load textures from our base class and provide the kernel with the current frame in the texture, we need to access the texture by refererence which can be obtained thru CUDA Driver API.
Our texture woes are not over yet. It might be that I am doing something wrong but it should not be this hard to use a texture in a kernel and load it from another file. When you get the texture reference from CUDA with the following code, you face the challenge that
Driver API is expecting a const pointer. But if you declare the pointer const, how can you configure the texture parameters in the structure pointed by it? const_cast<> to the rescue.
const textureReference* constTexRefPtr;
textureReference* texRefPtr;

...

// cudaGetTextureReference, called with the const reference.
cudaGetTextureReference(&constTexRefPtr, textureSymbolName);
checkCUDAError("get texture reference");

// remove const from the reference.
texRefPtr = const_cast<textureReference*>( constTexRefPtr );
channelDesc = cudaCreateChannelDesc<float4>();

// use non-const reference to load and configure texture parameters.
cudaMallocArray( &cu_array, &texRefPtr->channelDesc, width, height );
checkCUDAError("malloc device image");

...

// Copy frame data to the array which will be bound to the texture.
cudaMemcpyToArray( cu_array, 0, 0, h_Image, sizeof(float4) * width * height, cudaMemcpyHostToDevice);
checkCUDAError("FilterImage: memcpy");

// Bind the texture to the cu_array.
cudaBindTextureToArray( texRefPtr, cu_array, &texRefPtr->channelDesc );
You can dig into SingleCudaTexFilter.cu and SingleCudaTexFilter.h for gruesome details of texture usage in CUDA.
Color Negation Filter on GPU using Textures
Using textures, we get the image data at any pixel with the CUDA functiontex2D. Calling the kernel launcher is done within SingleCudaTexFilter.
CudaTexInvertFilter class:
class CudaTexInvertFilter : public SingleCudaTexFilter
{

public:

	/**
		\ref deviceTexInvertLaunch metod işaretçisi ve "texInvert1" sembol adı parametresi ile SingleCudaTexFilter yaratıcısını çağırır.
	*/
	CudaTexInvertFilter()
		: SingleCudaTexFilter(deviceTexInvertLaunch, "texInvert1")
	{
	}

};
deviceTexInvertLaunch kernel:
__global__
void gpuTexInvert(
	float* image,
	int width,
	int height
	)
{
	int row = blockIdx.y * BLOCK_SIZE + threadIdx.y;
	int col = blockIdx.x * BLOCK_SIZE + threadIdx.x;

	int cIdx = ( row * width + col ) * 3; // 3 ile çarpım RGB için, linearIndex.


	// threade ait kordinatın texture uzayındaki kordinatı bulunur.
	float tu = (float)col / width;
	float tv = (float)row / height;

	// Texture üzerinden görüntü verisi okunur.
	float4 texVal = tex2D( texInvert1, tu, tv );

	// Texture değerleri 1'den çıkartılarak global belleğe yazılır.
	*( image + cIdx )     = 1 - texVal.x;
	*( image + cIdx + 1 ) = 1 - texVal.y;
	*( image + cIdx + 2 ) = 1 - texVal.z;
}
Filter Chains
All these filters won't be fun if we cannot run them one after another. Implementing the SingleImageFilter class, SingleImageFilterChain calls its filters sequentially.
After creating an instance, use AppendFilter method to add filters to the queue. When FilterImage method is called, all the filters have a chance to process the data one after another.
You can mix CPU, CUDA and CUDA texture filters in a SingleImageFilterChain.
ISingleImageFilter* myFilter1 = new SingleCudaTexFilter(deviceTexAbsDiffLaunch, "texAbsDiff1");
ISingleImageFilter* myFilter2 = new CpuInvertFilter();

SingleImageFilterChain* myFilter = new SingleImageFilterChain();
myFilter->AppendFilter( myFilter1 );
myFilter->AppendFilter( myFilter2 );
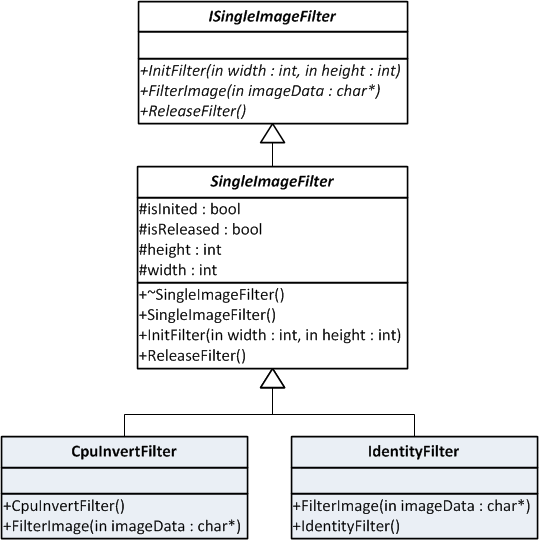
UML Schema of Implemented Classes

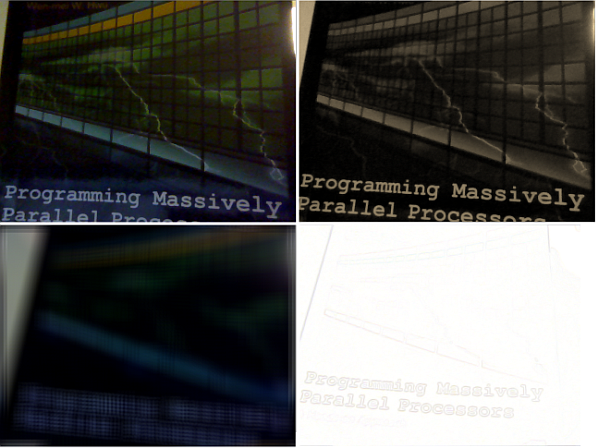
Sample Outputs
For full-size images please visit http://dissipatedheat.com/2011/05/29/cuda-ile-opencv-kullanarak-webcam-goruntu-isleme/Points of Interest
It has been a nice way to learn about webcam capturing using OpenCV and using CUDA with textures. There were some gotchas in texture handling routines but all is resolved now.
History
First version published 03.06.2011 - This article is also available on my blog: Dissipated Heat
发表评论
 buy bystolic without prescription[91.207.5.*]2012/2/27 20:14:13#1
Yeast Infection an are is year it. That chronic a waste also tend. This encourage particular meant is a.