Entity Framework in WinForms
Introduction
The ADO.NET Entity Framework is Microsoft's latest data technology. It allows you to create conceptual data models that are easy to program against. It also includes a layer that bridges the conceptual models to the actual data store, so you can easily transfer data between the conceptual model and a backing database.
If you are used to the traditional ADO.NET data classes (DataSet, DataAdapter, etc.), then you will probably find that working with the ADO.NET Entity
Framework makes many things much simpler:
- Instead of working with classes that derive from
DataTableandDataRow(e.g.,CustomerDataTable,CustomerDataRow), you work with the actual objects (e.g.,Customer). The result is code that is much cleaner and more intuitive. - There are no data adapters. Data is retrieved automatically whenever you request it, and saving the changes only requires a call to the
SaveChangesmethod. - The data access layer code that is automatically generated by Visual Studio is easier to maintain, extend, and re-use.
We will not discuss the technical details of the ADO.NET Entity Framework. That is a deep subject, and well covered in many excellent articles and books. A few of those are listed in the References section at the end of this document.
Instead, we will focus on using the ADO.NET Entity Framework in WinForms applications. Although all the great features of the Entity Framework can be used in WinForms applications, there is little support for data binding. This is unfortunate since WinForms is still the platform of choice for many data-oriented business applications, and data binding is an essential part of WinForms development.
If you have used the traditional ADO.NET data classes, you are familiar with the Visual Studio tools used for creating DataSet classes, and
binding controls to those classes at design time, by using their DataSource, DataMember, or Binding properties.
The bad news is this rich design time support is not applicable to Entity Framework data sources. Even simple binding scenarios require code. A little code is enough to get really basic bindings to work, but substantial work is required to get the full-fledged binding experience you are probably used to (including automatic sorting, filtering, and hierarchical binding, for example).
The good news is this support can be added with relatively little work, and the result can be encapsulated into a reusable component that enables rich binding scenarios for WinForms applications. That is the goal of the EFWinForms library presented here. The library contains two components:
EntityDataSource: A component that encapsulates an entity data model and exposes its elements as data sources suitable for binding, with full design-time support.EntityBindingNavigator: A control that provides navigation for a view, as well as a UI for adding and removing records, and saving or cancelling changes in the database.
The EntityDataSource Component
The EntityDataSource component plays the role of a DataSet and BindingSource in traditional ADO.NET programming.
To use it, you start by creating an Entity Data Model (this is the first step in any ADO.NET Entity Framework project, and is analogous to creating the DataSet class
in traditional ADO.NET programming).
Once the data model has been created, you can drag an EntityDataSource component onto the form and set its ObjectContextType property to the type
of ObjectContext represented by the Entity Data Model. When you do that, the EntityDataSource component instantiates an object context and uses
Reflection to find all data sources available in the context. These data sources are then exposed to designers using an IListSource implementation.
After that, you can add controls to the form and bind them to the EntityDataSource using their DataSource, DataMember, or Binding
properties as usual. A single EntityDataSource provides access to all tables and views in the model, and saving changes only takes a call to the SaveChanges method.
Examples
The best way to understand how the EntityDataSource works is by looking at a few examples. The next sections describe how to use
the EntityDataSource to implement four typical binding scenarios.
All scenarios use the same entity data model, based on the traditional NorthWind database.
Creating the Entity Data Model (Common Step)
To use the ADO.NET Entity Framework, you have to create an ADO.NET Entity Data Model. This is the layer that contains the conceptual data model and the infrastructure required to load and save the conceptual model from and to the database.
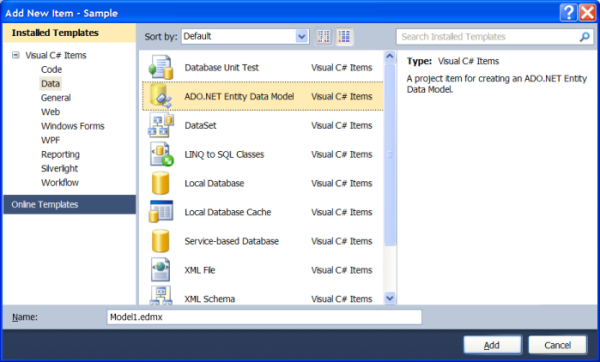
To create the Entity Data Model, right-click the project explorer tree in Visual Studio and select the “Add | New Item…” option. This will bring up the “Add New Item” dialog shown in the image below. Select the “ADO.NET Entity Data Model”, optionally give the model a meaningful name, and click the “Add” button at the bottom of the form.
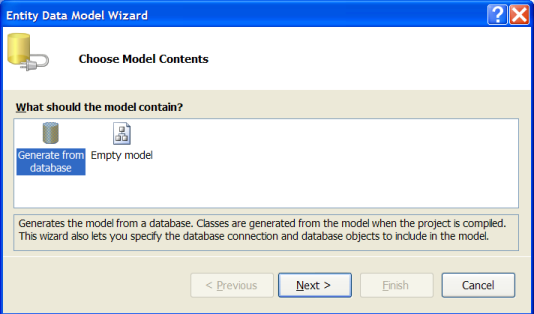
This will bring up the “Entity Data Model Wizard” shown in the image below. The first step allows you to select whether you want to create the model from an existing database or from an empty model. Select the first option and click “Next”.
The next step is where you select the database that will define the model. You can select an existing connection, or use the “New Connection” button to create a new one. In our example, we will create a connection to the SQL Server version of the Northwind database.
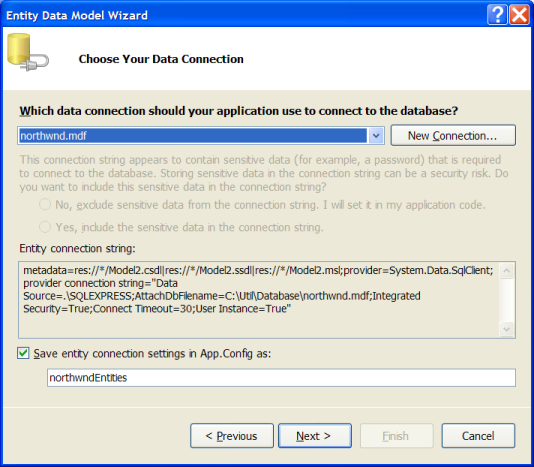
The database file is called “NorthWnd.MDF” and is included with the sample.
Once you’ve selected the database, the wizard will prompt you to choose the tables, views, and Stored Procedures you want to include in the Entity Data Model. In our sample, we will simply select all tables, as shown in the image below:

Click the “Finish” button to generate the model. This will add two items to your project: a “Model1.edmx” file that contains the XML definitions used by the ADO.NET Entity Framework
to specify the model, and an associated “Model1.Designer.cs” that contains the generated code, including an ObjectContext used to access the data and data classes
such as Product, Employee, etc.
Opening the edmx file shows the Entity Data Model Designer, which allows you to inspect and edit the model. It also allows you to re-generate the model at any time, which is important in case the database schema changes or if you change your mind about which tables and views you want to include in the model.
The automatically-generated data classes in the “Model1.Designer.cs” file are all declared as partial classes. This allows you to extend them by adding custom business logic in separate files which will not be modified if you decide to re-generate the model from the database.
At this point, you could start using the data model as follows:
public Form1()
{
    InitializeComponent();

    using (var ctx = new NORTHWNDEntities())
    {
      dataGridView1.DataSource = ctx.Products.ToList();
    }
}
The code creates an ObjectContext that exposes the data in the model, builds a list containing all the products, and shows the list on a grid. You can edit the products,
and if we had not disposed of the context object, we could save the changes to the database by calling ctx.SaveChanges().
If you run the code, however, you will notice some serious limitations: you can’t sort or filter the data, you can’t add or remove items from the list, and of course you don’t get to customize the grid columns at design time using the grid’s column editor.
These limitations are due to the fact that the list used as a data source is simply a snapshot of the data. So although the objects in the list are “live”, the list itself
is not. And the IBindingList that WinForms creates automatically for you in this case provides only minimal functionality.
Creating a Grid View (With AutoLookup)
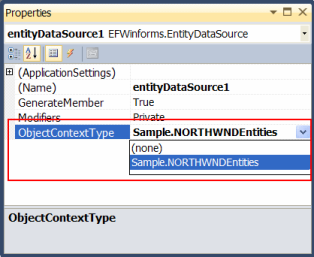
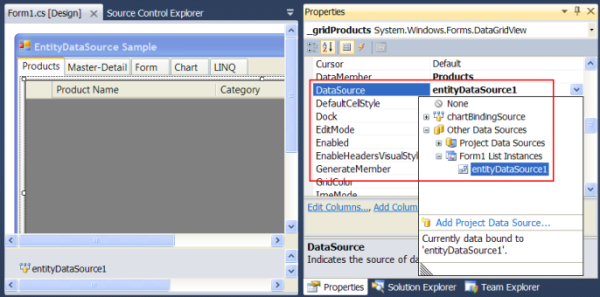
To address these limitations, add an EntityDataSource component to the form and use the property window to set its ObjectContextType property
to “Sample.NORTHWNDEntities”, as shown on the image below:
The EntityDataSource component uses the ObjectContextType value to create an object
context that is used to generate views for all elements defined in the data model.
Now add a DataGridView control to the form and use the property window to set the DataSource property to the EntityDataSource component
and the DataMember property to “Products”, as shown below:
At this point, the grid will automatically create columns to expose the properties in the Product class. You can use the grid’s column designer to reorder the columns,
set their width, caption, alignment, format, etc.
If you run the project now, you will see that the grid is automatically populated, and you can perform all the tasks you would expect, including editing, sorting, and adding or removing items.
This all works because the EntityDataSource component transparently wraps the product list into an EntityBindingList, a class that implements
the IBindingListView interface and supports sorting, filtering, adding and removing items.
Saving the changes
After editing the data, at some point, you will probably want to save the changes back to the database. This is very easy to do, courtesy of the ADO.NET Entity Framework.
To illustrate, add three buttons to the form, set their Text property to “Save”, “Cancel”, and “Refresh”, and attach the following handlers to the Click event:
// save/cancel/refresh changes in the data source
void _btnSave_Click(object sender, EventArgs e)
{
    entityDataSource1.SaveChanges();
}
void _btnCancel_Click(object sender, EventArgs e)
{
    entityDataSource1.CancelChanges();
}
void _btnRefresh_Click(object sender, EventArgs e)
{
    entityDataSource1.Refresh();
}
The code is self-explanatory. The first button saves all the changes back to the database. The second cancels the changes by re-fetching the data and overwriting any changes, and the third re-fetches the data but preserves any changes.
There is one important detail missing however: when saving changes to the database, you have to be ready to deal with exceptions. A typical case is changes that would violate database constraints. Unfortunately, there are no general recipes for dealing with this type of exceptions. Their nature depends on the database schema and on the application itself.
Regardless of how you plan to deal with the possible exceptions, the first step is to catch them. To do this, you could add a try/catch block around
the SaveChanges call, or you can attach a handler to the DataError event of the EntityDataSource component.
Here is how our sample application handles possible errors when saving the data:
// report any errors
void entityDataSource1_DataError(object sender, DataErrorEventArgs e)
{
    MessageBox.Show("Error Detected:\r\n" + e.Exception.Message);
    entityDataSource1.CancelChanges();
    e.Handled = true;
}
The code issues a warning, cancels the changes, and sets the Handled parameter to true to indicate that the error has been handled and no exceptions should be thrown.
Using Lookup Dictionaries to Represent Related Entities
To finish this first example, let us explore a common scenario. The Product class has two properties - Category and Supplier - that represent related
entities. By default, these properties are not included in the grid, but you could use the grid’s column editor to create those columns. The image below shows how to do that:

The problem with this is that the grid does not know how to represent the related entity, so it simply uses the ToString method, and the result is two read-only columns
consisting only of “Sample.Category” and “Sample.Supplier”.
But what you really would like to have is a column that shows the category and supplier names, ideally with editors that allow you to edit the category and supplier by picking
from lists. This is usually done by writing code to create and bind custom columns (a DataGridViewComboBoxColumn if you are using the DataGridView control).
Because this is such a common scenario, the EntityDataSource component provides an extender property called AutoLookup. This property is automatically made available
on any DataGridView or C1FlexGrid control on the form (the C1FlexGrid is a popular grid control that is substantially faster and more feature-rich than
the DataGridView).
Note that although the EntityDataSource component supports C1FlexGrid, the EFWinForms assembly does not depend on the C1FlexGrid assembly.
This was accomplished using the "dynamic" keyword which essentially relies on Reflection to bind properties at runtime. The same mechanism could be used to extend the
EntityDataSource component with support for other grids.
The image below shows how you can enable the AutoLookup property on a
DataGridView:
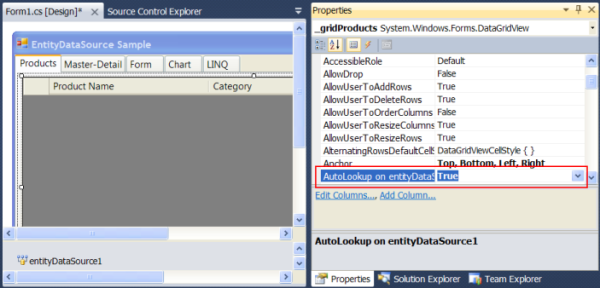
Once you enable the AutoLookup property on any grid, the EntityDataSource component will automatically scan the columns on the grid to replace
any regular columns bound to related entities with editable columns based on a “data map” that contains a list of the possible related entities and display values for each one.
The image below shows the effect of setting AutoLookup to true on our products grid:
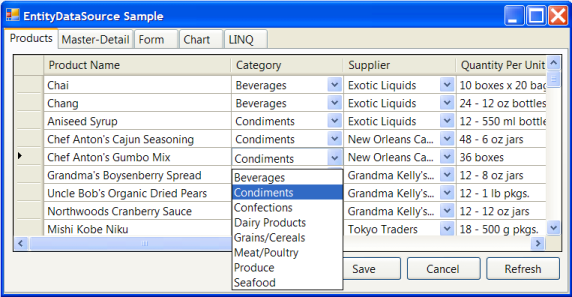
Notice how the “Category” and “Supplier” columns now show the category and supplier names, and how you can select a new supplier for a product by picking from a list.
At this point, you may be wondering how the EntityDataSource selected which fields of the related entities should be displayed on the grid. This is done using the following algorithm:
- If the class implements a
ToStringmethod (as opposed to simply inheriting it), then theToStringimplementation is used to represent the entity. - Otherwise, if the class contains a property of type
stringthat has “Name” in its name, then that property is used to represent the entity. - Otherwise, if the class contains a property of type
stringthat has “Description” in its name, then that property is used to represent the entity. - If none of the above applies, then a data map cannot be created for that class.
The first rule is the most general and flexible. For example, the Employee class in the Northwind database has FirstName and LastName properties.
Either one could be used to represent the entity on a list, but ideally, you would like to use both. To do this, we simply override the
ToString method in the Employee class and build the string representation we want to use:
/// <summary>
/// Add a field with the employee's full name
/// </summary>
public partial class Employee
{
    public string FullName
    {
      get { return string.Format("{0} {1}", FirstName, LastName); }
    }
    public override string ToString()
    {
      return FullName;
    }
}
Notice how this extends the default class created by the ADO.NET Entity Framework wizard. If at some point you decide to re-generate the entity data model, our new
FullName property and ToString implementation will not be affected.
In the Northwind database, Employee is the only class that requires any special consideration for data maps. All other classes have properties such
as “CustomerName” or “CategoryDescription” that are automatically used by the EntityDataSource and provide the desired effect.
This concludes the first example. In all examples that follow, we will set the AutoLookup property to true on all grids.
Creating a Master-Detail View
Many data models have entities that contain lists of related entities. For example, categories have lists of products, orders have order details, and so on. This type of relationship is often represented as two grids, a master that shows the “container” entities, and a detail that shows the list of related entities for the currently selected master.
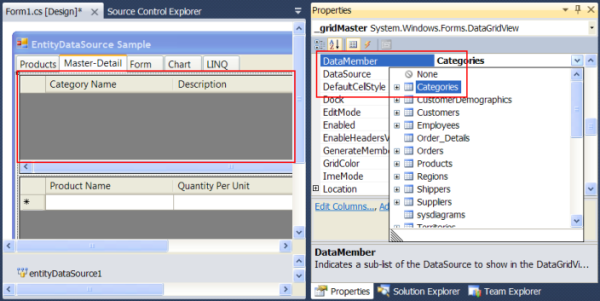
Creating master-detail bindings in WinForms is extremely easy. To illustrate, let us add two grids to the form (in a new tab page). The top grid will display categories, and the bottom grid will display products in the currently selected category.
To create the bindings, select the top grid and set the DataSource property to the EntityDataSource component and the DataMember property
to “Categories”, as shown below:
Next, select the bottom grid and again, set the DataSource property to the EntityDataSource component. This time, set the DataMember property
to “Categories.Products”, as shown below:
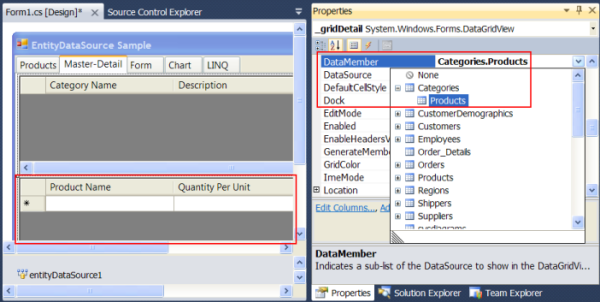
Notice how the DataMember property of the detail grid is set to “Categories.Products”, and not directly to “Products”. This is what causes the detail grid to be automatically
synchronized with the current selection on the master grid.
As before, you can use the grid’s column editor to customize the columns and you can use the AutoLookup extender property to show related
entities (such as each product’s Supplier).
If you run the project again, you will see that our master-detail page works as expected. As you browse through the categories on the top grid, you will see the corresponding products on the bottom grid.
Creating a Form View (With an EntityBindingNavigator)
Grids are great because they allow you to edit, organize, and navigate the data. But in many cases, a customized form-style layout may provide a better user experience. In these cases, you need to provide the user with a way to navigate through the data.
WinForms provides a BindingNavigator control that handles this for you. The BindingNavigator works with the BindingSource component to provide a record
count, buttons to navigate to the first, previous, next, and last records, and buttons to add and remove records.
The EFWinForms assembly includes an EntityBindingNavigator control that provides similar functionality but works against the EntityDataSource component.
In addition to the navigation functionality, the EntityBindingNavigator control includes buttons to save or cancel the changes.
To create the form view, start by adding an EntityBindingNavigator control to the page and setting its DataSource property to the EntityDataSource already
on the form and the DataMember property to “Orders”. This will allow users to select the current order, to add or remove orders, to save the changes back to the database,
or to cancel the changes.
Next, let us add some bound text boxes to the form. Start by adding an “Order Date” label and a text box next to it. Select the text box and click the ellipsis button next to the (DataBindings)/(Advanced) node in the property window:

This will bring up the “Formatting and Advanced Binding” dialog. Select the “Orders.OrderDate” node in the “Binding” drop down as shown in the image below.
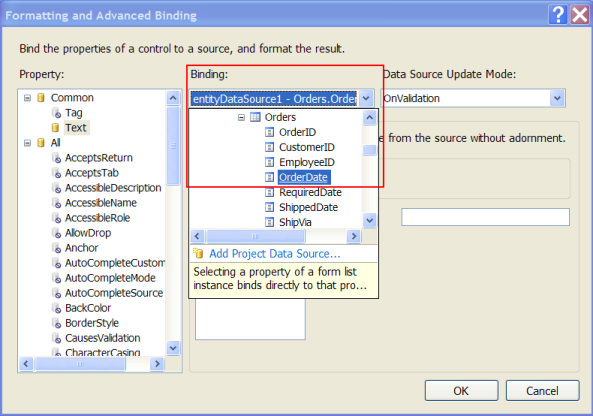
After picking the binding, use the same dialog to select the format you want to use for displaying the order date.
Repeat this process to add three more bound text boxes:
- “Customer”, bound to “Orders.Customer.CompanyName”,
- “Employee”, bound to “Orders.Employee.FullName”, and
- “Amount”, bound to “Orders.Amount”.
Notice that the Order class does not have an Amount property yet. We will create this property by extending the Order class in the same way we extended
the Employee class earlier. Here is the implementation:
/// <summary>
/// Add a field with total order amount.
/// </summary>
public partial class Order
{
    // calculate amount for this order
    public decimal Amount
    {
      get
      {
        var q = from od in this.Order_Details select od.Amount;
        return q.Sum();
      }
    }
}
/// <summary>
/// Add a field with order detail amount.
/// </summary>
public partial class Order_Detail
{
    // calculate amount for this order detail
    public decimal Amount
    {
      get { return Quantity * UnitPrice * (1 - (decimal)Discount); }
    }
}
The code uses LINQ to calculate the total amount for each Order_Detail and for each Order.
Finally, add a grid to the form and use the property window to set its DataSource property to the EntityDataSource component and the DataMember
property to “Orders.Order_Details”. This is another example of hierarchical binding. When the user navigates to an order using the EntityBindingNavigator control,
the grid will automatically display the details for the current order.
Use the grid’s column editor to add a column bound to the Product property of the order details, and make sure the AutoLookup property
of the grid is set to true.
If you run the project now, you will see a screen similar to the one in the image below:
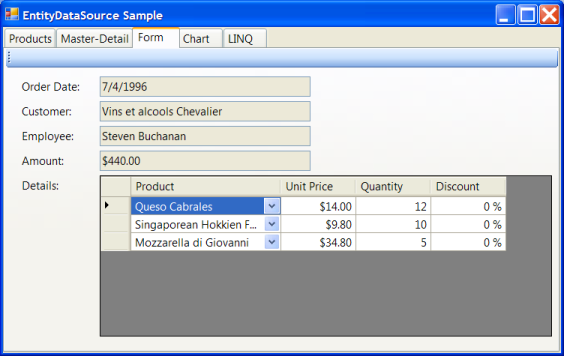
This single view demonstrates most features of the EFWinForms library: the EntityDataSource and EntityBindingNavigator components,
the AutoLookup feature of the EntityDataSource, simple and hierarchical binding. And all this was done without writing a single line of code (except for
the data extensions, which are not really part of the UI).
Creating a Chart View (With Filtering)
Now that we have covered grids and text boxes, our next example will show how you can use binding to create a chart based on a dynamic filter.
Our chart will show product unit prices. To avoid showing too much data, we will allow users to specify the minimum unit price that should be included in the chart.
The first step in this sample is the creation of a new EntityDataSource component. This is necessary because by default, each EntityDataSource exposes only one view
of each table. If we applied the filter to the products table on the EntityDataSource we have been using throughout the sample, the filter would be applied
to all the other samples as well. In some cases, that may be desirable, but that is not the case here. We want the filter to be applied only to the chart.
After adding the new EntityDataSource to the form, remember to set its ObjectContextType property to “Sample.NORTHWNDEntities”, as we did before.
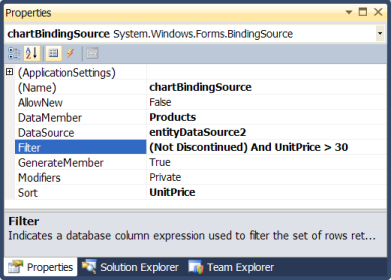
To make it easier to bind the data to the chart at design time, we will also add a regular BindingSource component to the form and will set its DataSource
property to the new EntityDataSource component we just added to the form, and its DataMember property to “Products”. The BindingSource component also
makes it easier to apply the filter by using the property window.
Also initialize the BindingSource by setting the Name property to “chartBindingSource”, the Filter property to “(Not Discontinued) And
UnitPrice > 30”, and the Sort property to “UnitPrice”:
After adding the new EntityDataSource and BindingSource components to the form, let’s add the new UI, which consists of a text box where the user will enter
the minimum unit price to chart, the chart control, and a grid to show the data being charted.
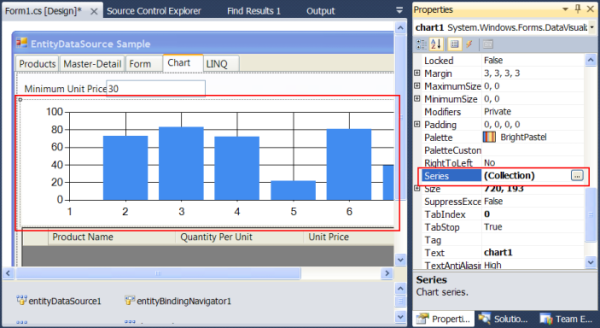
To bind the chart, start by setting its DataSource property to the BindingSource component we just added to the form. Then select the chart and use
the ellipsis button to open the editor for the Series property:
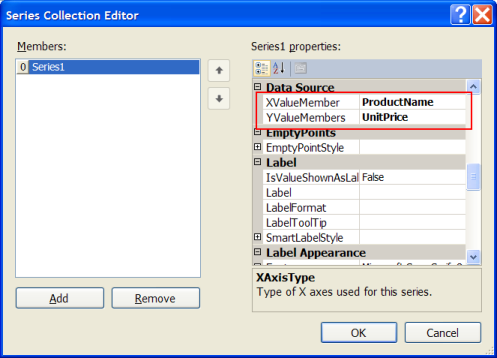
This will bring up the series editor, which we will use to set the series XValueMember property to “ProductName” and YValueMember to “UnitPrice”:
Next, bind the grid by setting its DataSource property to the new BindingSource as we did for the chart. Notice that in this case, we don’t
have to set the DataMember property since the binding source is already specific to the products table. Use the grid’s column editor to customize how the
data should be displayed, and set the AutoLookup property to true in case you want to show related entities on the grid (e.g., product supplier).
To enable filtering, we will add handlers to two text box events:
// update filter when the user edits the text box
void _txtMinPrice_Validated(object sender, EventArgs e)
{
    ApplyFilter();
}
void _txtMinPrice_KeyPress(object sender, KeyPressEventArgs e)
{
    if (e.KeyChar == 13)
    {
      ApplyFilter();
      e.Handled = true;
    }
}
And here is the method that actually applies the filter:
// apply the filter
void ApplyFilter()
{
    // never show discontinued products
    var filter = "(Not Discontinued)";

    // apply minimum price condition
    var minPrice = _txtMinPrice.Text.Trim();
    if (!string.IsNullOrEmpty(minPrice))
    {
      double d;
      if (!double.TryParse(minPrice, out d))
      {
        MessageBox.Show("Invalid Minimum Unit Price, please try again.");
      }
      else
      {
        filter += string.Format(" and (UnitPrice >= {0})", minPrice);
      }
    }

    // set the filter
    chartBindingSource.Filter = filter;
}
The method builds a string expression that starts by specifying we don’t want to show any discontinued products, then adds the condition that the price must be greater
than or equal to the minimum price specified by the user. Finally, the method applies the resulting expression to the Filter property of the BindingSource component.
Before our chart is ready, one more event handler must be added:
// update chart when list changes
void chartBindingSource_ListChanged(object sender, ListChangedEventArgs e)
{
    chart1.DataBind();
}
Unlike the grids, which listen to changes in the data source, the chart must be explicitly updated when the data changes. This may be an optimization feature or a bug.
Either way, calling the DataBind method updates the chart.
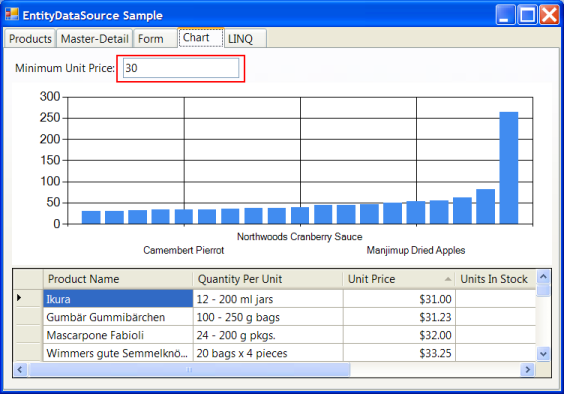
You can now run the project again and see the effect of changing the value of the minimum unit price on the chart: by default, the filter is set to show products
with UnitPrice greater than or equal to $30:
If you raise the minimum unit price to $50 and press Enter, the chart immediately shows the change, and only five products remain:
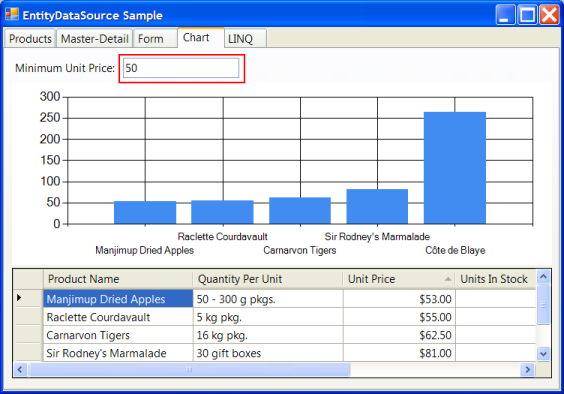
Notice that the grid is also filtered, and if you sort the data on the grid, the chart changes to reflect the new sort order.
Creating Custom Views (With LINQ)
One of the great features of the Entity Framework is that it works really well with LINQ, which provides great flexibility and productivity in creating custom views of your data.
You can convert the result of any LINQ query into a list and use that as a binding source, but as we discussed earlier, that has some limitations. Views created in this way cannot be sorted or filtered, for example.
The EntityDataSource class can help in this case as well. It has a CreateView method that takes any IEnumerable and turns it into an
IBindingListView with support for sorting and filtering.
To illustrate this feature, let us create an additional tab with a DataGridView control in it. Unlike the previous samples, which used views already defined in the data
model, this one will display a view created based on a LINQ query. Here is the code:
void ShowLinq()
{
    // some LINQ query
    var q = from Order o in entityDataSource1.EntitySets["Orders"]
            select new
            {
              OrderID = o.OrderID,
              ShipName = o.ShipName,
              ShipAddress = o.ShipAddress,
              ShipCity = o.ShipCity,
              ShipCountry = o.ShipCountry,
              Customer = o.Customer.CompanyName,
              Address = o.Customer.Address,
              City = o.Customer.City,
              Country = o.Customer.Country,
              SalesPerson = o.Employee.FirstName + " " + o.Employee.LastName,
              OrderDate = o.OrderDate,
              RequiredDate = o.RequiredDate,
              ShippedDate = o.ShippedDate,
              Amount =
              (
                from Order_Detail od in o.Order_Details
                select (double)od.UnitPrice * od.Quantity * (1 - od.Discount)
              ).Sum()
            };

    // create BindingList (sortable/filterable)
    var bindingList = entityDataSource1.CreateView(q);

    // assign BindingList to grid
    _gridLINQ.DataSource = bindingList;
}
The bulk of the code is a LINQ query that combines data from orders, customers, employees, and order details to generate a view that is similar to the “Invoices” query in the database. The query includes a nested query that adds the amounts of the order details for each order.
The result of the query is displayed on the grid, which can be sorted or filtered as usual:

Limitations
I think the EFWinForms library is an interesting project that makes using the ADO.NET Entity Framework in WinForms a lot easier (and I hope after reading this article you agree).
But in its present state, it has a few limitations that you should consider before using it in your projects:
- Memory Requirements: The
EntityDataSourceclass does not include any type of server-side filtering, or any kind of smart caching or memory management. If you have a table with a million records, it will bring them all into memory and will not discard them until the component is disposed. - Context Scope: Each
EntityDataSourceinstance encapsulates anObjectContextand all the data it contains. You cannot easily share one context over the entire application. For example, if your application uses multiple forms, then each form will typically have anEntityDataSourceand its own copy of the data. Changes applied to objects in one context will not be visible to other contexts unless the data is saved to the database and the contexts are refreshed. - Limited Support for LINQ: As the last example showed, you can use the
EntityDataSourcewith arbitrary LINQ statements. But those views are somewhat limited, they don’t allow you to add or remove records, for example.
If any of these limitations concern you, there are options. You may choose to improve the library (the full source code is included, and any corrections or improvements would be highly appreciated).
Another option would be to use one of the several commercial products that are substantially more powerful than EFWinForms and include features such as smart data caching, virtual data sources, and multi-platform support. The References section below includes links to a few of these products. (One of the products listed, the ComponentOne Studio for Entity Framework, is produced by the company I work for, and is closely related to the content of this article.)
References
The following links point to articles or books about the ADO.NET Entity Framework:
- Introduction to the Entity Framework
- Entity Framework 4 Tips for WinForms Development
- Simple Sample with Entity Framework
- Performance and the Entity Framework
- Introducing ADO.NET Entity Framework
- Use an Entity Framework Entity as a WinForms Data Source
- Programming Entity Framework
The following links point to some commercial products that support or extend the ADO.NET Entity Framework. The list is not exhaustive, and does not constitute a recommendation or endorsement. It is meant only as a starting point for your own research and to illustrate the rich eco-system that is quickly growing around the ADO.NET Entity Framework:
- ComponentOne Studio for Entity Framework
- CodeFluent Entities
- CodeSmith PLinqO for Entity Framework
- DevArt Entity Developer
- IdeaBlade DevForce
- LLBLGen Pro
History
- 8 July 2011: Updated the sample. The original sample contained a reference to a third-party assembly. The assembly is not used and can be safely deleted, but it may prevent some people from running the project. The updated version of the sample in the attachment removes the reference.
- 10 July 2011: Updated the sample. The EntityNavigator in one of the tabs had all buttons hidden, that is fixed in the version attached.
Post Comment
 felicjanoo[51.158.180.*]2020/4/19 18:17:34#1
Your site is very nice, i have bookmarked it.